

Learn how to use the right DPI for Printing or On-Screen Graphics
By Dan Richard
One of the most common questions I get when working with folks just starting up their hobby or career in digital graphic arts surrounds the confusion of DPI. What DPI should I use? Does it have to be different when I print? What's the difference between DPI and PPI? The questions go on and on, and being confused about DPI is completely normal even though most don't want to admit it.
So, what exactly IS DPI?
DPI is an abbreviation meaning Dots Per Inch, and it's used as a form of resolution measurement for printers, scanners, digital cameras and displays. The greater the native DPI number, the higher the resolution and detail of the image is.
PPI is a similar term that stands for Pixels Per Inch, which in essence means the same thing as DPI, however tends to apply to images intended for on-screen use only and not for physical printing.
For the sake of simplicity, it's all the same thing.
Measuring DPI with a Ruler
One of the most confusing aspects of DPI is figuring out how big something is based on it's resolution when it comes time to printing. The rule of thumb here is that 1 inch = 72 DPI. Well, sort of, depending on who you ask and if they accept the 72 DPI myth turned standard. More on this to come...
Let's take a camera for example. My Nikon D70s tech specs state that the largest photo resolution supported is 3,008 x 2,000 pixels. So if I want to print that image at it's native size, I'd up printing a huge 41.7" x 27.8" poster!
Here's the math:
Width: 3008 / 72 = 41.7
Height: 2000 / 72 = 27.8
That's how you convert DPI resolution to inches.
Here's the complete conversion chart:
1 Centimeter = 28 Pixels
1 Inch = 72 Pixels
1 Millimeter = 3 Pixels
At this point, you may be asking "Why 72 Pixels?".
Well, you may have heard that monitors display a resolution of 72 or 96 DPI, or something similar, but that's completely bogus and is nothing more than a myth that's been repeated over and over until it became fact. The DPI level of an image is irrelevant when it comes to a video monitor because everything is measured in pixel sizes. Think I'm crazy? Try this little test: Open up Photopaint or some other graphics program and create a 1" document in 72 DPI. Next, take out a ruler, hold it to your monitor and you'll see that it's not exactly 1" wide or high, and depending on your resolution, it's probably not even close.
So again, why 72 pixels? It actually has to do with text fonts, which are measured in points. A point is defined as 1/72 of an inch, so a 12 point font size is 12/72 of an inch in height when printed.
So in essence, the 72 pixel concept is really just a fake number that has become an industry standard unit of measurement. You can read about this concept in great detail at www.scantips.com. We'll go over the true measurement of DPI vs Ruler Measurements in a bit.
At first, this is probably just adding to your confusion, but I can assure you that it will all become quite clear by the time you're done reading this tutorial.
Before you can figure out what kind of DPI you should be using, you first have to consider what the graphic is for. Is this for printing, or is this for on-screen video display? Answering this question is really the first thing you should be asking yourself, because you're in for a real nightmare if you design in the wrong DPI and only find out halfway through the project.
Let's start with the easiest answer: "I am designing a graphic for on-screen display."
Great, well in that case the DPI you choose doesn't matter in the slightest because video screens like the monitor you are using right now uses pixel sizes and couldn't care a less about the DPI level of your image. See for yourself:
The following image is 450 x 317 Pixels at 72 DPI and measures 6.25" x 4.4"

Here's the same image at 450 x 317 Pixels at 150 DPI and measures 3" x 2.1"

And finally, here's the image at 450 x 317 Pixels at 600 DPI and measures 0.75" x 0.53"

Do you see a difference? You won't because your monitor doesn't care what the DPI level is, it only cares about pixel measurements. If you have a windows wallpaper at 1024 x 768 pixels, it can be 6 or 6000 DPI and it'll still look exactly the same. Does the DPI affect anything in the 3 examples above? Of course! Try printing out the 3 samples in their stated resolutions and watch happens.
The fact that people all work in 72 or 96 DPI for on-screen graphics is a myth that became a standard, and as you can see, it's a bogus number and clearly doesn't make a difference whatsoever. You work in whatever DPI level you need to achieve the pixel sizes you require. Want more proof? Open up a 3D graphics program like Swift 3D and in your render or sizing settings do you see somewhere to set the DPI? You won't because the program uses screen resolution sizes, not DPI levels. If you want to render something for printing, you simply need to make some easy calculations to get the final pixel resolution size required.
Let's pretend that you are creating a 3D scene in 3D Studio Max and you need to figure out how big your final render has to be for various uses. Here's some possible scenarios:
A) I want to create a Windows wallpaper for a 1024 x 768 background:
Set your render size to 1024 x 768 and run the render... end of story.
 I want to create a render than can be printed on a 40" x 30" poster in 150 DPI:
Open your calculator and simply multiply the dimensions in inches by the DPI level you want. So, for a this poster size, you would calculate 40 x 150 and then 30 x 150 to arrive at the final required resultion of 6000 x 4500 pixels. Set your render size to 6000 x 4500 and export away!
C) I want to print this render out on some 8" x 10" glossy photopaper at 300 DPI:
By using the same calculation as in scenario B, your render should be processed at 2400 x 3000 pixels.
We'll get into how to determine what DPI you need to use for printing certain formats and sizes later in the tutorial.
Now for the harder part: "I am designing a graphic for printing."
If you are going to be producing images for a printed hard copy, you need to determine the desired DPI resolution, which is normally dictated by the printer itself. The higher the allowable native DPI, the more detail the print will have. In other words, a 6 x 4 photo printed in 72 DPI won't be nearly as crisp and detailed as the same photo printed in 300 DPI.
Before we move on, the native DPI is what you have to go by, and this means that DPI of the raw image before editing. The original (or native) resolution of the image will determine how much I can dial up the DPI level without my image getting too small. What you don't want to run into is having a small image with a low DPI and require printing it in a higher DPI or size because it won't turn out very nice.
To help you understand this a bit better, let's go back to our Nikon D70S photo example. We know that the largest available image resolution on this camera is 3008 x 2000 pixels. If we printed that image at 72 DPI, we would end up with a poster sized print of 41.7" x 27.8". We obviously don't want to print a photo quite this huge, so we'll want to fix this image up so that it both looks great on paper AND fits our desired size.
The first part of this re-size job is the overall print size of this photo. Let's pretend our photo album holds 6" x 4" prints, so that means we'll need to reduce the size of our 41.7" x 27.8" poster to 14% of it's original size. If we don't change the DPI level of the document, that will end up giving us an image that went from 3008 x 2000 pixels to 432 x 288 pixels. Unfortunately you've only re-sized the image but didn't take into consideration the DPI output, so when you print this image as is, the photo will come out blocky with very poor details. What happened? You didn't take advantage of the higher DPI level your printer is capable of, so your image details were completely lost.
Let's go back to our original 3008 x 2000 pixel photo, and this time we'll assume our printer is capable of a 300 DPI print. When you re-size the image in our graphics program this time, we'll change the photo's size to 6" x 4", but we'll also change the DPI level to 300DPI instead of the default 72. This will end up giving us an image of 1800 x 1200 pixels and is 60% of the original size, rather than a mere 14% when using 72 DPI. Print that and compare it with the other photo and you'll notice that while the prints are the exact same size when measured with a ruler, the 300 DPI one is crisp and clear and the 72 DPI print is already falling into the trash can.
"So, just how large can I print this photo?"
This all depends on the level of detail you want to sacrifice and the purpose of the image once it's printed out. Let's have a look at our native 3008 x 2000 pixel photo and see what sizes we can print at without actually enlarging the original photo:
72 DPI: 41.7" x 27.8"
120 DPI: 25.1" x 16.7"
200 DPI: 15" x 10"
300 DPI: 10" x 6.7"
600 DPI: 5" x 3.3"
So as you can see, the higher the DPI level I use without changing the size of the image, the smaller the image will be when I print it out because I'm forcing more dots or pixels per inch.
The DPI level you choose depends on the application, but here's a general guideline:
Large posters: 120 DPI
Basic business documents: 200 DPI
Documents with photos or decent photo prints: 300DPI
High resolution prints: 600 DPI+
The higher the number you can work with, the better, but it's important to know what you're printing on or you could be wasting your time. The average large plotter ink jets used to print a low number of posters for example often don't print in a DPI level higher than 150, so breaking your head with a HUGE 300 DPI poster could end up being a waste of time.
"Does the DPI I choose affect what I see when working on screen?"
One of the main reasons of knowing the resolution you need and not going overboard is that the larger the document's size and DPI level is, the bigger the file gets and the slower your system will get when working on it in a graphics program.
Let's pretend you have been hired to design a poster for a local dance club in town, and the desired dimensions are 35" high and 25" wide. Lets have a look at how big this document will be when you're working on it on your computer:
35" x 25" at 72 DPI = 1800 x 2520 pixels - At this resolution, you shouldn't have too much trouble working on it.
35" x 25" at 150 DPI = 3750 x 5250 pixels - As you can see, our on-screen resolution just took a huge jump and the computer is working hard when applying filters and things are starting to slow down.
35" x 25" at 300 DPI = 7500 x 10500 pixels - At this point, my slightly older PC is in real pain and is practically unusable.
Now, imagine I go and design this poster in 300 DPI knowing that higher DPI is better. After hours of waiting around for filters to apply and countless reboots, I finally get the document done. I get the image to the printer only to find out that the prints will be done in 120 DPI, at which point I'd probably pound my head into the nearest wall a few times.
Is there a big difference between printing in high DPI vs low DPI?
One of the worse mistakes you can do when it comes to designing print media is to use a DPI level that is lower than the optimal printing level allowed to you. As a general rule, anything that you intend to print that is relatively small such as a magazine, postcard, calendar, photo etc. should be no less than 300 DPI. More often than not, the required DPI will be even higher than that, but always check with your printer to find out what you should be using. Anything in a large size format like posters are typically 120 - 150 DPI because it's extremely difficult to get source images in a 300+ DPI range with that kind of size. Even when shooting your own stock photos, you would need to spend a fortune on a very high end camera for that level of native resolution.
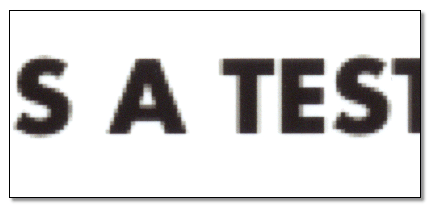
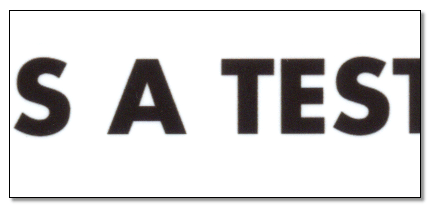
We've seen how DPI means absolutely nothing when viewing an image on screen, so now let's have a look at how printing is affected. The following images were taken from a single sheet of glossy brochure paper, which I fed into a Canon i470D printer multiple times for each print out. I then took the sheet of paper and scanned it with an HP ScanJet 5300C so you could see the difference in detail between text and photos at 72 DPI versus 300 DPI. The following images were taken straight from the scanner and were not touched up in any way.
Our first example is a sample line of text that was printed in 72 DPI. At first glance, the text doesn't look too bad, but if you look closely, the text is badly pixelated and the edges of the fonts or not crisp at all.
Our next sample is the same text printed at 300 DPI. Note the pixelated look is gone and the edges are crisp and clear.
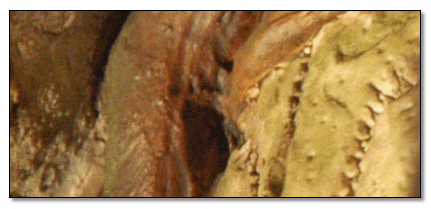
Next we look at some sample photo printouts. This is a closeup of some wood and rocks I have on a diorama in my office that I photographed with my Nikon D70s. I down-sampled the photo to a 6" x 4" print at 72 DPI, and here's a closeup of one section of the photograph once printed.
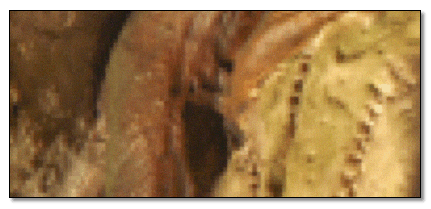
Here is the same area of the photo printed as a 6" x 4", but this time at 300 DPI. Once again, the poor detail and chunky pixels are gone and the photo is crisp.
What if my native DPI is lower than what I need?
Unfortunately, you can only work with your native resolution and go down from there. You can enlarge images slightly without too much loss in detail, but if you have a photo that is 6" x 4" at 72 DPI, there's no way to enlarge it to get a 300 DPI level print. You can print it at that resolution, but the end result will be a photo that looks the same as if you had printed it at 72 DPI in the first place. Bottom line here is to keep your raw photos and images, and if you do shoot stock yourself, capture the photos in the highest resolutions available on your camera because you never know how big you'll need to go.
Any final thoughts?
Just remember, when it comes to creating and working on images and graphics for on-screen use, DPI is meaningless because you work in resolution sizes. Just remember that most graphic programs for 2D raster use the 72 DPI base rule simply because it's a myth that turned into an industry standard. At first people try to argue this, but think about it. When you are creating a beautiful new abstract wallpaper for your windows background, do you worry about DPI, or do you simply know it needs to be 1024x768? But when it comes time to printing, the rules change and DPI is suddenly vital and can make or break your final product.
Remember to always check with the print technician at your intended printer company for the DPI requirements, or if you plan to print at home, check your manual to ensure you're using the best DPI you can possibly use.
I hope this tutorial has helped clear up the DPI mystery and that you comfortably know the difference between what's needed for posting a picture on a website versus printing it on photo paper for your album.
Please be sure to post any comments or questions you may have, and we'll see you next post!
Dan
About the Author:
Dan Richard is the owner of the popular tutorial search engine portal at www.pixel2life.com and runs a personal blog with articles and tutorials based on his personal web and art experiences at www.danrichard.com.