Tut
Alright, this time you are learning to make a sig like this:

The first thing to do is make a new document with the size 400 x 125px.. Fill it with black..
Now get your render for the sig.. I used this:
Click
Paste your render onto your sig and press Cntrl + T to make it fit you sig..
Click Layer> Matting> Defringe and set it to 1px..

Duplicate [Cntrl + J] the layer 4 times, set the top layer's blending mode to Overlay and go back to the bottom layer of the render..

Now go to Filter> Blur> Motion Blur and use these settings..
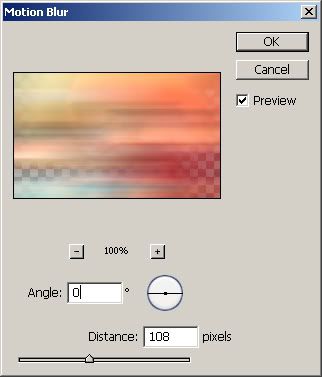
Duplicate the layer twice and move one layer to the left and one layer to the right.. Merge [Cntrl + E] these 3 layers together..

Next, go to the second render layer from the bottom and go to Filter> Blur> Motion Blur again.. but this time use these settings..
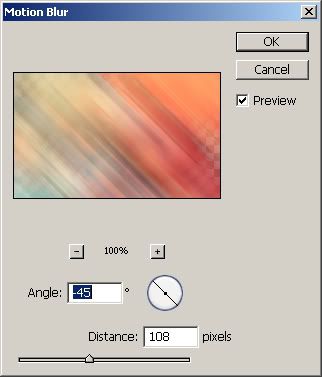
Duplicate the layer 3 times and then Merge them back to the same layer again..

On the next render layer up, grab your smudge tool and use these settings..
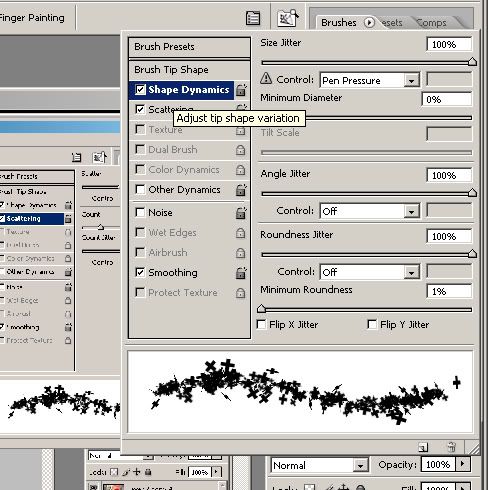
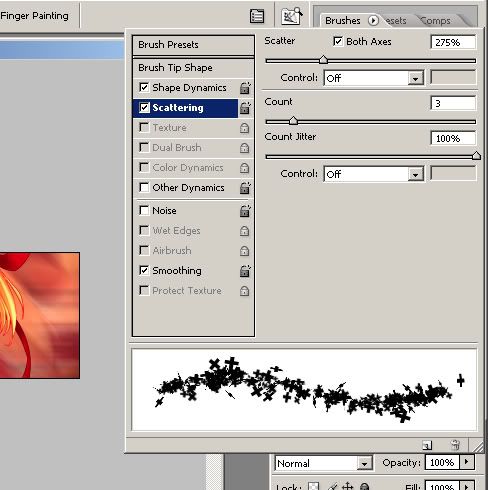
Smudge around the egdes of your render..

Ok we're going to move on from smudging the render around now.. Make a new layer above all the renders..
Open a C4d render.. I used this one..
Click
Paste it onto your sig and use the transform tool to make it fit somewhere.. Set this layer's blending mode to overlay.. Erase any parts that don't look good..

Make another new layer and use some brushing to add to he style of your sig.. I used this brushset.. Use some in black and some in white.. Set the Blending Mode to Overlay..

Create a new layer above this and add a border.. The way I did it was by pressing Cntrl + A to select the whole image and then went to Edit> Stroke and set it to Inside at 1px.. Then press "M" to get the Rectangular Marquee Tool and make a rectangle on the top of the sig and fill it with your border colour.. Move the Selection to the bottom of the sig by dragging inside the dotted lines and do the same..

It may look finished but we have some touch-ups to do before we add our text.. Create a new layer and go to Image> Apply Image.. Then go to Filter> Sharpen> Sharpen..

Duplicate the layer and then press Cntrl + B to bring up the Colour Balance Settings.. In the three text boxes, use these settings..
Colour Levels: -16 0 +17
Now on the same layer, go to Image> Adjustments> Brightness/Contrast..
Brightness: -5
Contrast: +7

Duplicate the layer and go to Filter> Blur> Gaussian Blur.. Set it to 4.0px.. Now set the layer to Overlay.. Erase parts towards the middle of the render but leave some of this effect on the outside edges of the render..

Now make a new layer, set to Overlay and fill it with a colour that suits the sig.. This may take a while to find the colour.. Set the opacity of this layer to 35%..

All that is left is to add a focal point and it's done! Make your last new layer and get your gradient tool.. Select a radial gradient with the colours as white to trasnparent and drag from where it looks like the light source of your render comes from to halfway down the sig.. then zoom in and use the rectangular marquee tool to delete it off the border..

Add text and you are finished!! Hope you have learn and benefited from this tutorial.. Here is the outcome once more:
Here is the .PSD file for you to look at and learn from.. PSD