


Before you get started, you need these things:
Media Coder (Free Program) FLV Player (Also a Free Program) Along with those two programs, you need paitience for this big tutorial. This can take a very long amount of time to get right (Step Seven for example), especially if your a newbie at designing and/or don't know your way around. It can be very tricky, but if you just follow everything this tutorial says, you should be fine. And the end result makes it worth it. You also need a really good system cause if your computer is just a slow piece of crap, it just will not work. ***For this tutorial, I use YouTube cause for me it's the easiest to work with, but there are a few video hosting sites that can go okay with this as well. You'll see the list of sites within the first step.*** Step One
Pick a video on YouTube and copy the URL. I chose one called song called "Please Don't Cry" by Toby Love. Go to KeepVid.com. Enter the URL in text box provided, choose YouTube from the Any Site list, and click Download. When the Download Link comes up, right click on it and choose Save Link As (in IE, it's Save Target As). VERY IMPORTANT: You can name it what you want, just make sure you end it with ".flv"... (I'm naming mine PlzDntCry.flv)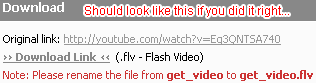 Step Two
Open up MediaCoder. (The first time you do, your browser will have to pop up to start it up.) Go to File>Add File and open up the video.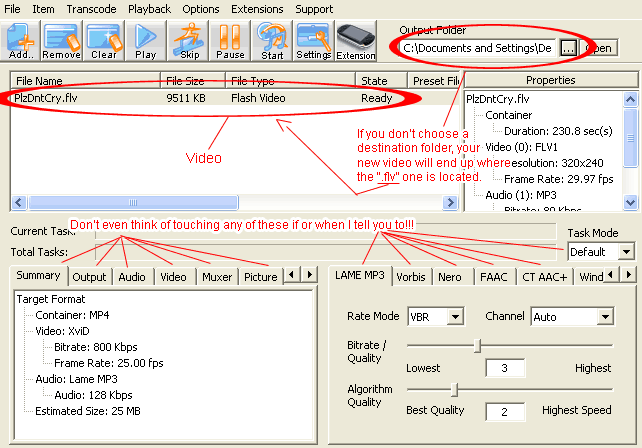 Go to Transcode>Clipping and Effects. A window will pop up and start to play the video. Watch the video once and watch out for the few seconds (no more than like 5) that you want to cut out. Watch it again and as soon as very second that it begins, click Mark In. Right when it ends, click Mark Out. Click Ok  Step Three
This step is only for the people who have a watermark or black bars at the bottom and top of their videos. You can skip this if you have none of these. Go to Transcode>Cropping Option>Manual Cropping. This will play the clip you just cut over and over. (I you got the wrong piece of video, go to Item>Remove All Items, and repeat Step Two.) Drag the middle of the video to the corner of the box and close it in by dragging the border around the video. Do this just so any bars or logos can't be seen anymore. Don't worry about making it "even". Click Done. Step Four
Go to the Audio menu and un-check Enable Audio. In the Video menu, change the Format and Container to MPEG1. In the Picture menu, change Resize to Original. (DO NOT touch what's in Crop!)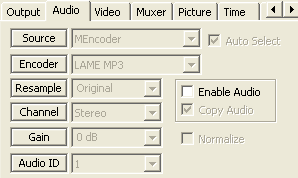 Step Five
Open up PhotoShop. Go to File>Import>Video Frames to Layers. Find the clip you just made and Open it up. (Should be in the folder you had the original .flv video in.) Press play and it should be the section that you wanted but without sound. If everything is okay with the clip, it's okay to close MediaCoder now. Under Range to Import, select From Beginning To End. Make sure there's a check in the Make Frame Animation box. Step Six
Making sure all the frames are seleted in the animation window, click on the black arrow under a frame and choose No Delay.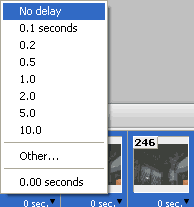 Step Seven
Carefully compare each frame one by one. If it seems that two frames look exactly the same, delete one of them. Do this for all the frames.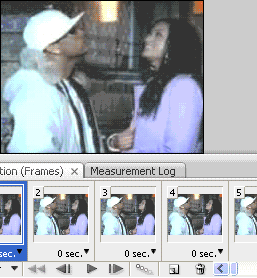 Step Eight
Press the Convert to Timeline button. If you look at the layers, you'll notice that the visibility on some of the layers are turned off (the little eye is not showing). Click on on those layers and delete them. Only delete the ones that aren't visible, or else the animation will be messed up!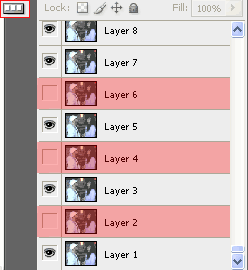 Step Nine
(I decided that I wanted to make the picture a little bit smaller so I went to Image>Image Size and reduced Width and Height by 80%.) Go to File>New and make a 200 by 200 pixel box with a transparent back ground. Make a text layer (the big T). I chose a font called Rage Italic size 30. I double-click on the text layer and put these settings: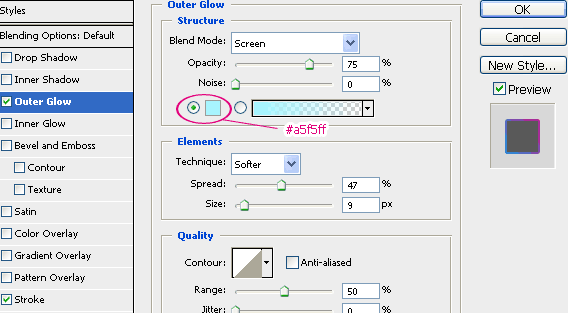 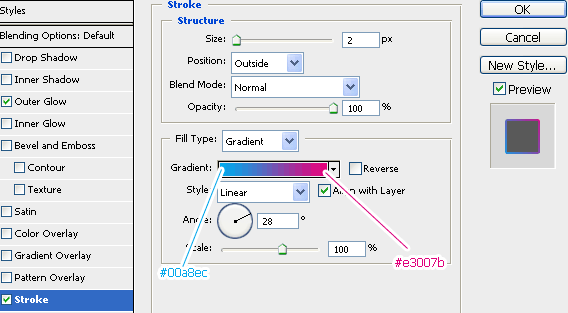  Step Ten Go to File>Save for Web & Devices. Make sure the Looping Options is set to Forever. Set the colors to the lowest number you can get it to before it loses alot of quality. (Usually between 150 to 230.) Click play for a preview and if you like what you see, click Save and save as a .gif. YOU'RE DONE!  If this version seems too complicated, try the new version I put on my site... http://artisamor.com/ 
Dig this tutorial?
Thank the author by sending him a few P2L credits!


|


