UITableView is an inseparable part of every iOS development project. Ever since the introduction of iOS, UITableView has been the key component of the visual design process. With UITableView development practices being the key to mastering the cell reuse; it is quite crucial for an iOS app developer to acquaint himself with all the proven techniques of developing the UITableView.
If creating beautiful table views is on your mind then a detailed knowledge about UITableView development is a must for you. Although Apple has been introducing something or the other with each of its operating system versions, the iOS8 is being equipped with a brand new feature for the UITableView called Self Sizing Cells.
Today, through this blog, I'll be throwing some light on this exciting feature available with the all-new iOS 8 SDK (Software Development Kit).
What's exactly the self-sizing cells feature?
Well, the self-sizing cells are an important addition to the new iOS8 SDK (Software Development Kit). If you're facing issues in displaying dynamic content in table views, then self-sizing cells feature can serve as a great sigh of relief.
Working with dynamically sized table cells has become quite convenient and hassle-free with the inception of iOS8's self-sizing cells feature. This has proved beneficial in case of iOS development projects which include the use of Auto layout.
Activities you need to perform while using self sizing cells
Here's a list of activities that must be performed by the iOS developer:
- Defining the auto layout constraints for the respective prototype cell
- Specifying the estimatedRowHeight of the table view
- Setting the rowHeight of the table view to UITableViewAutomaticDimension
Here are the two lines of code that instruct the table view to calculate the table cell's size that matches the content and renders the same dynamically:
1. tableView.estimatedRowHeight = 44.0
2. tableView.rowHeight = UITableViewAutomaticDimension
iOS8 - New in/out concept that has added flexibility to dynamic sizing of the UITableView cells/rows

There's a great news for the iOS developers. Now, you no longer need to devote your valuable time on writing lengthy class methods or calling auto layout for dynamic sizing of the UITableView rows. The all-new in/out concept has eliminated all issues revolving the sizing of table views in iOS8. Here is a list of key pointers that describe this new in/out concept:
Here, each cell that's being created/dequeued is sent a resolved width using any one of the following methods:
1. systemLayoutSizeFittingSize(targetSize: CGSize) -> CGSize when using Auto Layout
2. sizeThatFits(size: CGSize) -> CGSize without Auto Layout
Here, the cell returns a resolved height. The Auto layout will be returning the resolved height.
And now, let me explain an example that showcases the use of self-sizing cells in iOS8
In my example, I'll be developing a simple demo app for demonstrating the use of self sizing cells. Here's the link for project download:
Download Project Files (.zip)
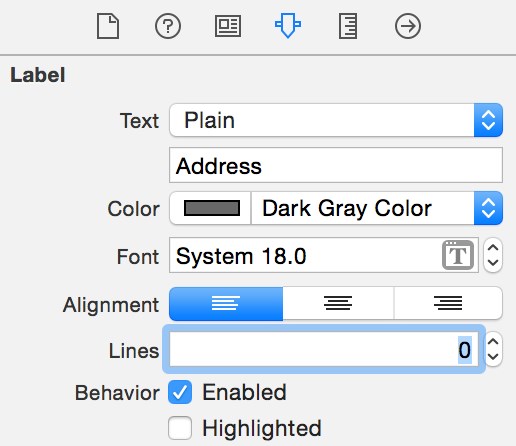
Once you're done with downloading the project, you'll see an app on your screen. Within this app, you'll see some of the fields being truncated due to a fixed row height. Unlike the conventional method of fixing this issue by reducing the font size or increasing the number of lines; the all new iOS8 just expects you to use the Self Sizing Cells so as to enable the display the cell content in a proper way, irrespective of the total length of content.
And now, its time for you to add auto layout constraints to your table cells. It is mandatory to add auto layout because without that the self sizing cells won't work flawlessly. As the basic process, the table view calls systemLayoutSizeFittingSize on the device and returns the size of the cell on the basis of the auto layout constraints.
Here are the steps that you need to follow for adding the auto layout constraints:
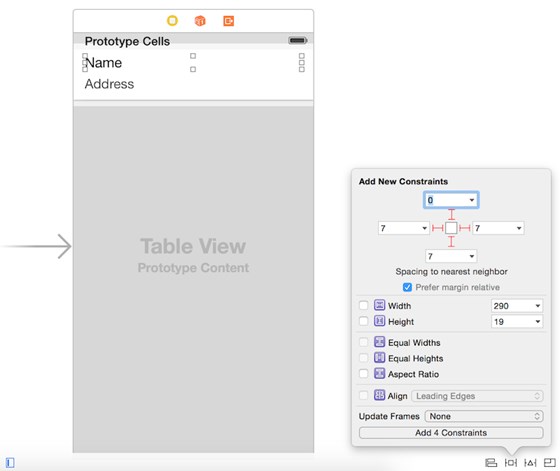
- For the name label, simply click the Pin button of the auto layout menu and add four appropriate spacing constraints.
- For the address label, simply add three spacing constraints for left/right/bottom sides.
Next, its time for setting the estimated row height
Now that you've configured the auto layout, the next step is to add the following code snippet into the viewDidLoad method of the ViewController as shown below:
1. tableView.estimatedRowHeight = 68.0
2. tableView.rowHeight = UITableViewAutomaticDimension
While the first line of code will set the estimated row height of the cell, the second one will change the rowHeight property to UITableViewAutomaticDimension, i.e. the default row height in iOS8. In this way, you'll allow the table view to determine the cell size on the basis of available information.
Download Project Files (.zip)
Wrapping Up
In this blog, I walked you through the basics of Self sizing cells. Hope the details covered here would have encouraged you to use the features as an attempt to update your iOS app with out-of-the-box assets. With just a few simple lines of code, you'll be able to size the table cells during iOS8 development ventures.