


Welcome to one off several tutorials in which i will be explaining one the new features in Dreamweaver 8. To start with i will be showing you how to use the CSS Panel (seen below). Depending on which mode you selected when you first got DW it could be in one off two places, for coders like me its in the top left hand corner below the File menu however for designers its on the opposite side of the screen. If you have trouble locating it you can click the
 in the properties panel which is located at the bottom. in the properties panel which is located at the bottom.  To begin with we need to have a style sheet so we can use the panel, you create one by right clicking on the panel and then pressing new.  You could press "Attach Style Sheet..." and add a style sheet, but for this tutorial i am creating a new style sheet.  its now asking us which selector type which want, as you can see we have 3 choices. Class, Tag and Advanced some off you may be familiar with XHTML however for you that don't XHTML uses the id attribute to control CSS styles instead off the class like in normal HTML. Select Class and then type in .arutha1 for the name of your new class. Then Click OK and save the style sheet. From here we have 3 method's off editing the Class.   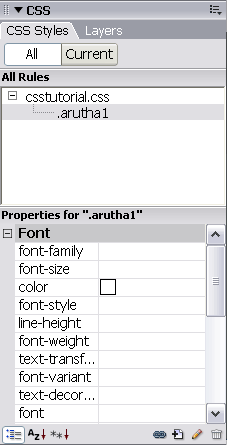 Three seperate modes for editing css. I would say that the left panel is for the most familiar with css commands and the right is for most inexperienced. As you can see on the left we have the add property button which allows us to see the specific properties that are on the object. The one in the middle is the list off all the css commands in alphabetical order and the final one is them in there groups. I would have to say that the last one is the best for when you are first designing the style and the the one furthest to the left is best for editing. For those that notice the small things you may have noticed how we switch between these modes. The bottom bar with all the symbols ( [image=473 ) from left to right off these i shall explain what each button does.
Its similar to the Design menu in Dreamweaver MX. 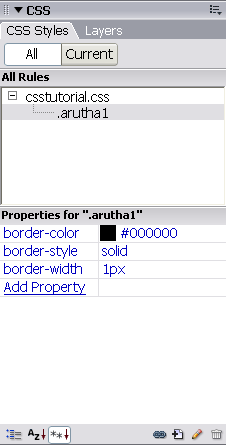 I've added a border to this style using the "Show only set properties" and got the code: 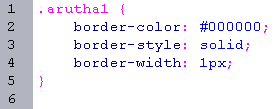 Thats about it for creating CSS Styles. Im now going to switch to the current menu so that i can show how you can quickly edit CSS styles by clicking on them in the design view. When in the design menu, if you click on an image or highlight something you get this properties panel come up and it will have this menu:  and the CSS menu will look like: 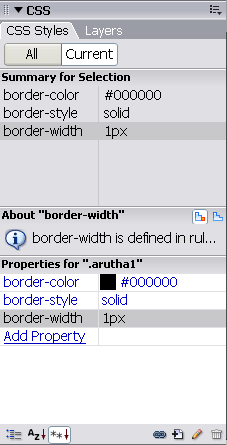 Notice that its on the current menu because i have selected something on the design menu, this allows you to edit in thee same 3 ways as before and watch as things change in the design menu. This allows users to create CSS layouts with greater ease. Arutha 
Dig this tutorial?
Thank the author by sending him a few P2L credits!

Arutha
As much as i love the default message i want to just say hello and to tell you to visit my blog :) 


|


