A Quick and Easy Watercolor with Photoshop’s Art History Brush

Today I’m going to show you a fast, easy way to create a very convincing watercolor image from a photograph, using Photoshop. (And we’re going to do it without using the Watercolor filter, or any filters, for that matter.) After all, why should Corel Painter users have all the fun, right? Instead of using Painter’s cloning brushes, we’ll use Photoshop’s Art History brush. If you haven’t used the Art History brush before, you’re in for a surprise!
To follow along, you can download the photo from Stock Exchange here. This is a free stock photo. Please read the instructions regarding usage restrictions.
Setup for Painting with the Art History Brush
Open your image in Photoshop. Since Photoshop does not have Painter’s tracing paper option, we’ll add a layer, fill it with white, and turn the opacity down just a tad. Result: instant tracing paper! Here’s how:

Steps: Go Layer > New Layer (or click on the new layer button). With the new layer selected, make the foreground color white, choose the paint bucket, and click on the image to fill with white. Name this new layer “Tracing Paper”. Lower opacity of this layer to 85% or so.
Next, add a new, empty layer. This will be your “canvas.” You could paint on the tracing paper layer, but by creating a layer just for painting, it’s easy to erase mistakes, or start over by deleting the layer. Now that you’ve got your “paper” prepared, it’s time to get out the brushes.
Painting with the Art History Brush

The Art History Brush (AHB) is grouped with the regular History brush. The AHB will use any brush you have selected in Photoshop. So, you could select the Wet Media brushes, pick a brush, and start painting. But I want to point out the brush presets. There’s one in particular that comes with Photoshop, and it’s called (surprise!) Art History. To load it, go to the option bar way in the upper left corner, and click on the down-pointing triangle next to the AHB icon (it may be a different icon, if you don’t have the AHB selected). Your list of current presets appears. Now, click on the right-pointing triangle in the upper right of this pop-up window. You’ll see a list of presets, as shown. Choose Art History. If you don’t see Art History there, choose “Load Tool Presets…”, and browse to the Presets > Tools directory, and select Art History.tpl. Now you have your Art History presets loaded. Click on the down-triangle once more (in the upper left) and choose “Oil Sketch”.

At this point, you have the Oil Sketch brush selected, though Photoshop does not tell you that clearly, as Painter does. It just shows a little icon with some dots and the number 50, which tells you very little, other than the brush size (50 pixels). But take my word for it, you have the Oil Sketch brush selected. Let’s take a look at the AHB settings in the option bar:

You’ve seen Mode and Opacity before, but a new option here is Style, which right now is set to “Dab.” Click on the style drop-down to see the other options. This is what determines how the brush behaves, and it allows Photoshop to act quite a bit like Painter. The brush is going to pull in pixels from the original image, and vary the output based on the setting here, very much the way the brushes in Painter work when cloning from one image to another. Try the various options and see how they behave. The Area setting determines the range of pixels affected. Tolerance determines whether the same area will be painted over or not.
Painting a Watercolor: the Method
After all that, what you need to know to paint is pretty simple — and fast! This painting took me all of ten minutes to do. Here are the steps:
Paint the background.
Make sure the top, blank layer is selected. Select the Art History Brush, as explained above. Now, change the settings as shown:

Use a quick, sweeping stroke, and cover the background without being very careful. Don’t worry if you overlap the flowers a bit. We’ll fix that in the next step. I chose to use a vignetted approach, rather than paint to the edges. This shows off the brushwork. It really does resemble the dispersal and spreading characteristic of real watercolor. Here’s what the background looks like at this point:

Paint the flowers
To paint the flowers, we’ll change the setting as follows:
![]()
Scrub up and down along the flowers, but don’t stay too long in one area. The longer you stay, the more detail is brought back. Define edges, but leave lots of areas undefined, to add to the loose look. The flowers should take just a minute or two. It’s a very fast process. Now select the “tracing paper” layer, and turn the opacity up to 100%. Here’s what it looks like so far:
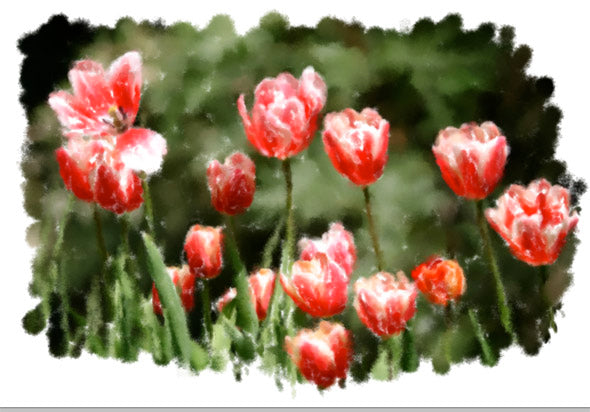
Finishing Touches
Open the list of brush presets again (click on the triangle next to the AHB icon in the far upper left), and select the Rough Smear, at the bottom of the list. Leave the settings for this as they are. Notice that by selecting the Rough Smear preset, the Smear tool is activated. Using the Rough Smear, dab at the edges of the vignette here and there, to simulate the look of wet-into-wet watercolor. When watercolor pigment is added to wet paper, soft edges like this occur. Don’t overwork it. Also, use the Rough Smear to blend some of the white “holes” in your painting. Again, a light touch is all it takes.
And that’s all there is to it! I find this method to be better at duplicating the look of watercolor than anything Painter has to offer, despite the large number of watercolor brushes Painter has. But that’s just my experience. I’d love to hear what you think.