Illustrator Tackle Twill

22 Nov
Illustrator Tackle Twill

Illustrator Tackle Twill

I’m sure you’ve seen tackle twill on a hoodie before. It’s a widely used embroidery technique that involves sewing down nylon twill to a garment with zig zag stitching. This tutorial will show you how to simulate a tackle twill look with Illustrator’s Appearance palette. I’ve found that most people don’t understand the Appearance palette and that’s unfortunate because it’s really powerful. When we’re done you will be able to apply this style to any text or shape within Illustrator.

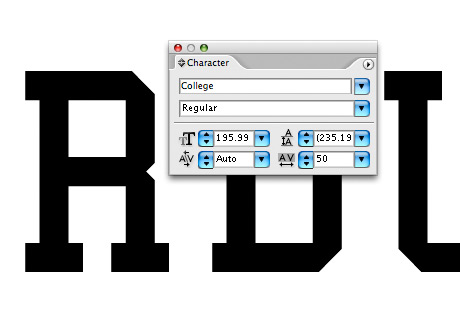
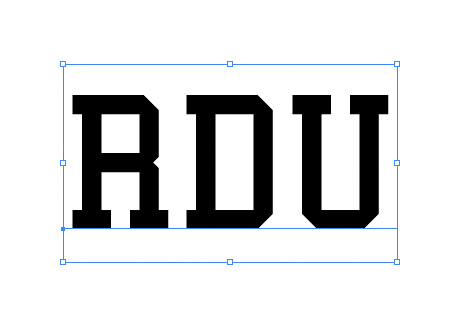
Step 1: Add some text to your artboard using a thick bulky font like College from DaFont.

Step 1

Step 1


Step 2: Increase the tracking on your text to add some space between the letters.

Step 2

Step 2


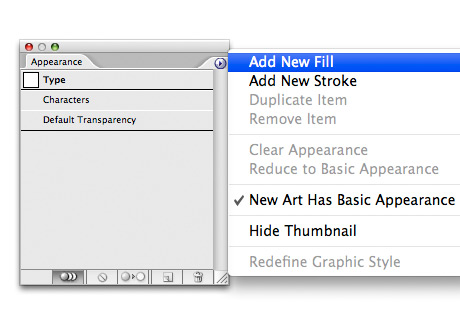
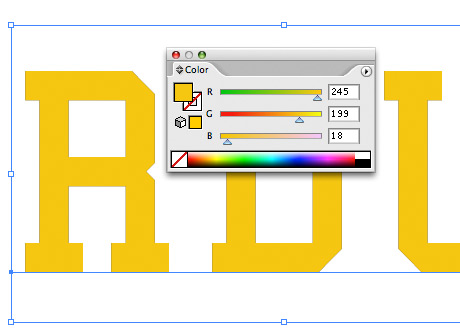
Step 3: Call up the Appearance palette and add a new fill to your text. Window > Appearance (Shift F6). Change the new fill color to orange-yellow.

Step 3

Step 3


New Fill Color

New Fill Color


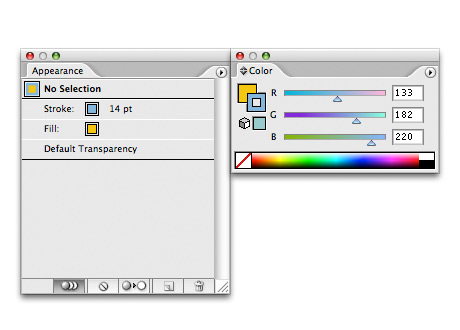
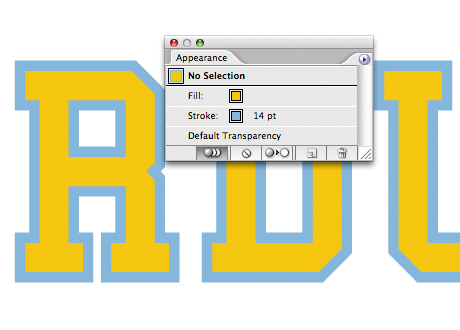
Step 4: Select the stroke of your text in the Appearance palette and change the color to light blue. Set the weight of the stroke to 14 pt.

Step 4

Step 4


New Stroke

New Stroke


Step 5: Now you’re probably saying to yourself, “This isn’t right! You can hardly see the yellow now.” To fix this, click-and-drag the new stroke below the orange-yellow fill in the Appearance palette. Problem solved!

Step 5

Step 5


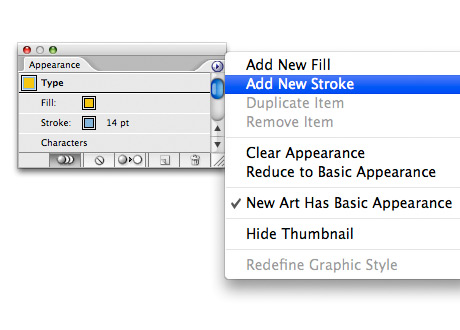
Step 6: Add another stroke to your text with the Appearance palette.

Step 7

Step 7


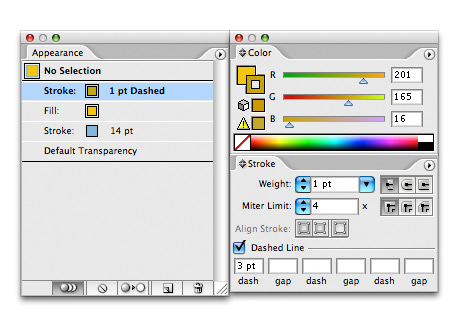
Step 7: Set the color of the new stroke to a dark yellow, the weight of the stroke to 1 pt, and add a 3 pt dash.

Step 7

Step 7


New Dashed Stroke

New Dashed Stroke


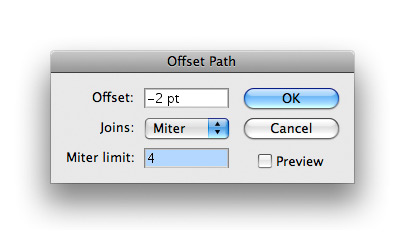
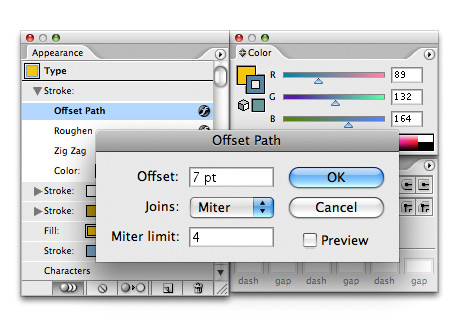
Step 8: Now we’ll offset the dashed stroke  -2 pt by applying the Offset Path effect. Effect > Path > Offset Path.

Step 8

Step 8


Dashed Stroke Offset

Dashed Stroke Offset


Step 9: Add a white 1 pt stroke to your text and offset it by 2 pt by following the same steps as above.

Step 9

Step 9


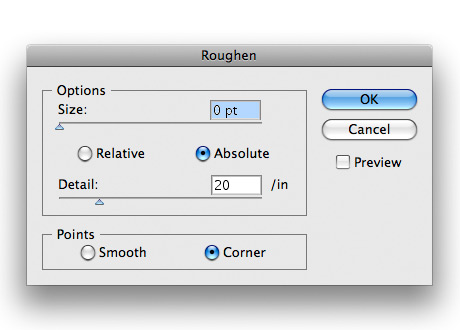
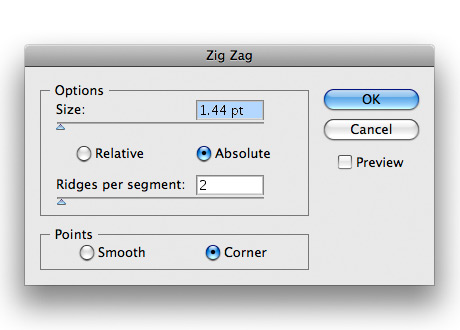
Step 10: To create the zig zag stitch you will add two more effects to the white stroke. First apply the Roughen effect which will add lots of equidistant points to our stroke path. Effect > Distort and Transform > Roughen. Now add the Zig Zag effect which will zig zag all of the extra points we just added. Effect > Distort and Transform > Zig Zag.

Step 10

Step 10


Zig Zag Effect Settings

Zig Zag Effect Settings


Almost Done!

Almost Done!


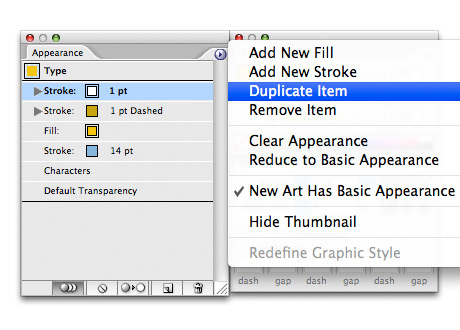
Step 11: Almost Done! Duplicate the white zig zag stroke and change its color to medium blue.

Step 11

Step 11


Medium Blue Stroke

Medium Blue Stroke


Step 12: Adjust the offset of the new medium blue stroke to 7 pt.

Step 12

Step 12


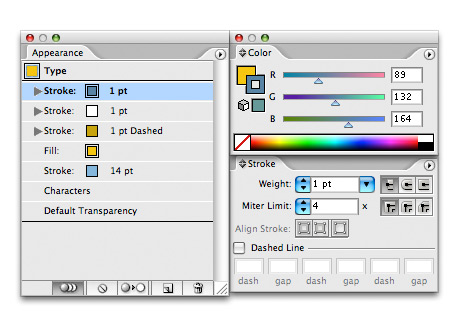
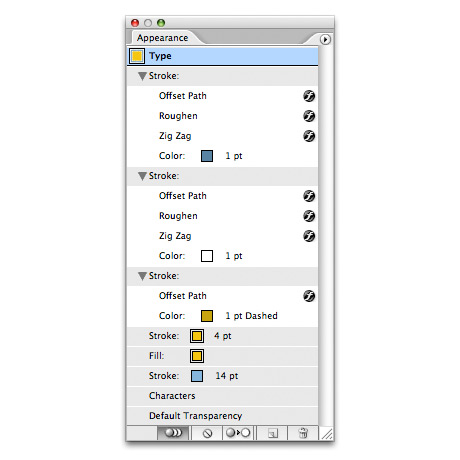
Step 13: Whoops, I forgot a step. Add one more stroke to your text to fill in the area between the yellow fill and the white zig zag stitch. Set the new stroke weight to 4 pt and the color to the same yellow as your text fill. Finally, click-and-drag the new yellow stroke below every other stroke and just above the text fill in the Appearance palette. Have a look at my final Appearance palette to see if you have everything in the right place.

Final Appearance Palette

Final Appearance Palette


Done… Download sample file(s).

Final Result

Final Result


Extra: By using the Appearance palette and Illustrator’s effect menu for every step of this tutorial you new tackle twill effect is self contained. This means you could drop this effect into the Graphic Styles palette and apply it to any text or shape you would like. It also means that every setting you applied during this tutorial can be changed within the Appearance palette. Be sure to try different settings and come up with your own tackle twill styles.

Alternative Look

Alternative Look

58 Responses to “Illustrator Tackle Twill”

  1. brown turk November 25, 2008 at 6:10 pm #

    AWESOME JOB BRO! excellent use of textures, thanks for sharing!

  2. Marcos Cortes (Dominican Republic) November 26, 2008 at 9:27 pm #

    Awesome, thanks for sharing. something new for me .

  3. Cloud No9 December 22, 2008 at 10:12 am #

    I’m rather new at Illustrator and perhaps I may need your help.

    In Step 8 (Offset Path effect. Effect > Path > Offset Path) I cannot apply the offset path effect to the type. Actually this option is inactive. Should I proceed outlining the type? I tried it by I could really control the stroke very easily.

    I would really appreciate your response. Thnx in advance.

  4. Josh December 22, 2008 at 10:34 am #

    Cloud No9, you’re probably going to the actual Offset Path command which is found under Object > Path > Offset Path. This command will always be inactive when working with text since it’s not an actual path object yet. The idea behind this tutorial is to create an effect that can be applied to text and then changed live all within the Appearance Palette. For this to work you must apply the Offset Path effect which is located under Effect > Path > Offset Path. Let me know if this helped.

  5. Cloud No9 December 23, 2008 at 2:55 am #

    Josh, you’re an angel! It really works! Thnx!

    Silly me. Apparently, I wasn’t really concentrated at that time. I’m not really familiar with all effects – I need more practice.

    Thnx again for your kind help and all the best for the new year! Take care!

    This blog ROCKS!

  6. Zach January 11, 2009 at 5:54 am #

    Where can i get this font?

  7. Josh January 11, 2009 at 7:32 am #

    The font is called College and can be downloaded at the website below.

    http://www.dafont.com/college.font

  8. Lisa January 15, 2009 at 4:05 pm #

    Good tutorial but I did stumble a bit close to the end even though I got done with it in a flash.

  9. phastel February 12, 2009 at 9:57 pm #

    I’m a loving this site… tnx a bunch dear ~ *flying kiss*

  10. Jason April 8, 2009 at 12:17 pm #

    How did you design or where did you find the background for this tutorial?

  11. josh June 20, 2009 at 2:54 pm #

    i have the same question as #12

  12. Josh June 21, 2009 at 10:03 am #

    I’ve attached a PDF file explaining how to make the background jersey tile you were asking about. It’s kind of hard to explain, so let me know if you have any questions.

    You can download the PDF here!

    Thanks,
    Josh

  13. Thrash November 3, 2009 at 5:51 pm #

    This absolutely is cool for text on tshirts… thanks! Great tut.

  14. cal November 4, 2009 at 11:33 am #

    it really sucks when you forget to put a step it just confuses me more.

  15. cal November 4, 2009 at 11:48 am #

    i cant get the last blue stroke to fit perfectly around the text

  16. Josh November 4, 2009 at 7:45 pm #

    Sorry you got confused but that’s the great thing about using the Appearance palette, you can always go back and make adjustments to an object without using the Undo command.

  17. Josh November 4, 2009 at 7:50 pm #

    cal, I can’t remedy your situation without seeing what you have so far. Check over your settings very closely to make sure they match mine exactly. All else equal, any stroke added to a path without a distortion effect should always follow the path exactly.

  18. Lefty Argonaut May 9, 2010 at 8:20 pm #

    Nice post man, will definitely come in handy at some point. Thanks!

  19. Urlaub September 4, 2010 at 2:12 pm #

    hi all

    my new page

    http://henneshen122.wordpress.com/

    cy

  20. Ramesh Vishwakarma November 10, 2010 at 8:12 am #

    Great tut dude….

  21. Ramesh Vishwakarma November 10, 2010 at 8:13 am #

    avu to kyare nahi hatu….. 🙂

  22. CHANCHOZDESIGN November 24, 2010 at 6:52 pm #

    How did you make the jersey look behind the alternative look

  23. Josh November 24, 2010 at 9:31 pm #

    Please check out the reply link here that I made to this same question a while back. It should help you with creating the background jersey pattern. Let me know if you have any more questions.

    Thanks,
    Josh

  24. huy December 23, 2010 at 12:16 pm #

    Thanks for the great tutorial Video . Love it

  25. Josh December 27, 2010 at 10:38 pm #

    My pleasure, I’m glad you enjoyed it! – Josh

  26. kAT March 6, 2011 at 11:49 am #

    I cant apply Offset path. Like it doesnt working. Anything I type thers no changes. My default settings for offset path in effects are 3537mm and when I set -2 or any other value, no changes at all.

  27. Alison Moore Smith March 12, 2011 at 4:14 pm #

    This is fabulous! I’m not really a graphics person and kept messing up, but eventually I got a perfect replica of my alma mater in my school colors.

    I appreciate the very clear, step-by-step directions. Very cool!

  28. Luke October 3, 2015 at 11:01 am #

    Single best way to do this. Thanks for posting it. I remember having to place little “v”s on text when I worked at Adidas. You saved a couple dozen people days of their lives.

  29. ReemeBels January 8, 2016 at 4:01 am #

    Hi! My name is Eugenia Newsom and I live in Ojai,CA. I have read your blog post about Illustrator Tackle Twill | The Design Playbook and I want to say that I am quite impressed with your professionalism on the subject!

  30. Sharon July 26, 2017 at 7:23 pm #

    Fantastic tutorial!! – Mine turned out great!!! Thanks so much.

Trackbacks/Pingbacks

  1. Vectips Monthly Roundup: November | Vectips - December 3, 2008

    […] Illustrator Tackle Twill […]

  2. Vectips Monthly Roundup: November | Castup - December 29, 2008

    […] Illustrator Tackle Twill […]

  3. Illustrator Tackle Twill | Tutorial Collection - June 25, 2009

    […] View Tutorial No Comment var addthis_pub="izwan00"; BOOKMARK This entry was posted on Friday, June 26th, 2009 at 7:16 am and is filed under Illustrator Tutorials. You can follow any responses to this entry through the RSS 2.0 feed. You can leave a response, or trackback from your own site. […]

  4. 40 Adobe Illustrator Text Effect Tutorials « Tech7.Net - October 25, 2009

    […] Tackle TwillTackle twill is a widely used embroidery technique that involves sewing down nylon twill to a garment with zig zag stitching. This tutorial will show you how to recreate the tackle twill look with Illustrator’s Appearance palette. […]

  5. mono-stock» Blog Archive » Illustratorで文字エフェクトいろいろ - October 29, 2009

    […] Tackle Twill […]

  6. 40 Adobe Illustrator Text Effect Tutorials | SeanBurdick - October 30, 2009

    […] Tackle TwillTackle twill is a widely used embroidery technique that involves sewing down nylon twill to a garment with zig zag stitching. This tutorial will show you how to recreate the tackle twill look with Illustrator’s Appearance palette. […]

  7. Die besten Adobe Illustrator Tutorials | Dunged - February 9, 2010

    […] Schatten Effekt Tutorial: 6.) [Illustrator] Bling Bling Text Tutorial: 7.) [Illustrator] (Gestickt) Textilverarbeitung Tutorial: 8.) [Illustrator] Strudel Effekt Tutorial: 9.) [Illustrator] Retro Text Tutorial: 10.) […]

  8. 40 Adobe Illustrator Text Effect Tutorials « Alanalanya's Blog - September 21, 2010

    […] Tackle Twill Tackle twill is a widely used embroidery technique that involves sewing down nylon twill to a garment with zig zag stitching. This tutorial will show you how to recreate the tackle twill look with Illustrator’s Appearance palette. […]

  9. Showcases of Adobe Illustrator Text Effect Tutorials | YusraBlog - January 18, 2011

    […] the comments.Trendy Retro TypeEnvironmentally Friendly Green TypeBling Text EffectBlue Print TypeTackle TwillGradient StrokesCool Water EffectFun Eye Catching TextOld School Type – Line GradientsLetterpress […]

  10. 40 Must Learn Text Effect Tutorials in Illustrator - January 31, 2011

    […] Here is a tutorial on how to simulate a tackle twill look with Illustrator’s Appearance palette. Visit Source […]

  11. 40 Must Learn Text Effect Tutorials in Illustrator | Feegk - January 31, 2011

    […] Here is a tutorial on how to simulate a tackle twill look with Illustrator’s Appearance palette. Visit Source […]

  12. 40 Must Learn Text Effect Tutorials in Illustrator | The best Tutorials - January 31, 2011

    […] Here is a tutorial on how to simulate a tackle twill look with Illustrator’s Appearance palette. Visit Source […]

  13. 40 Must Learn Text Effect Tutorials in Illustrator | TheBestchoise.com - February 1, 2011

    […] Here is a tutorial on how to simulate a tackle twill look with Illustrator’s Appearance palette. Visit Source […]

  14. 40 Must Learn Text Effect Tutorials in Illustrator | WebFree.ro - February 1, 2011

    […] Here is a tutorial on how to simulate a tackle twill look with Illustrator’s Appearance palette. Visit Source […]

  15. Learn Text Effect Tutorials in Illustrator « DesignQuickPoint - March 26, 2011

    […] Here is a tutorial on how to simulate a tackle twill look with Illustrator’s Appearance palette. Visit Source […]

  16. 40 فێركاری تێكست ئیفێكت بۆ ئیلستراتۆر « PDP - May 8, 2015

    […] Here is a tutorial on how to simulate a tackle twill look with Illustrator’s Appearance palette. Visit Source […]

  17. 40 Must Learn Text Effect Tutorials in Illustrator – WordPress Coders and Articles - December 1, 2016

    […] Here is a tutorial on how to simulate a tackle twill look with Illustrator’s Appearance palette. Visit Source […]

  18. 40 Adobe Illustrator Text Effect Tutorials - noupe - July 24, 2018

    […] Tackle TwillTackle twill is a widely used embroidery technique that involves sewing down nylon twill to a garment with zig zag stitching. This tutorial will show you how to recreate the tackle twill look with Illustrator’s Appearance palette. […]

  19. 40 Adobe Illustrator Text Effect Tutorials | The JotForm Blog - July 24, 2018

    […] Tackle TwillTackle twill is a widely used embroidery technique that involves sewing down nylon twill to a garment with zig zag stitching. This tutorial will show you how to recreate the tackle twill look with Illustrator’s Appearance palette. […]

  20. Comic Sketch Action Kit Generator - August 17, 2018

    Comic Sketch Action Kit Generator

    Comic Generator is very easy to use. You need to insert your images, which will automatically take it�s place in the Comic page of your choice. Then use our library of speech / text balloons and power FB words (Boom, Bang, Rooar, Crack, Wham�). Use our…

  21. help Your relationship - March 25, 2020

    help Your relationship

    Illustrator Tackle Twill | The Design Playbook

  22. check it out - January 27, 2022

    check it out

    Illustrator Tackle Twill | The Design Playbook

  23. makita 7 angle grinder - January 27, 2022

    makita 7 angle grinder

    Illustrator Tackle Twill | The Design Playbook

  24. straps for crossbody bags - January 27, 2022

    straps for crossbody bags

    Illustrator Tackle Twill | The Design Playbook

  25. leather satchel for men - January 28, 2022

    leather satchel for men

    Illustrator Tackle Twill | The Design Playbook

  26. versace home carta da parati - January 30, 2022

    versace home carta da parati

    Illustrator Tackle Twill | The Design Playbook

  27. Lab 3: Adobe Illustrator Typography – Cartographic Design Portfolio (Brittney Semone) - November 17, 2022

    […] The color scheme used was Michigan State University, “Spartan Green,” (acquired from a quick Google search) and shades, black and white, to not distract from the Spartan Green. I reduced, “Michigan State University,”  to it’s lettermark initials. I chose to give the letters a stitch effect, simulating college logos embroidered onto sweatshirts, shirts, blankets, etc.Tutorial used:https://thedesignplaybook.wordpress.com/2008/11/22/illustrator-tackle-twill/ […]

  28. Life Requires - January 17, 2024

    Life Requires

    Illustrator Tackle Twill | The Design Playbook

Leave a comment