Business cards are one of the staples of any working graphic designer. In this tutorial we'll take the Rockable Press brand we worked through in Part 1 of this set of tutorials and apply it to create and print business cards with UPrinting.
Business Cards - Step 1
As we'll be doing tomorrow in the upcoming Brochure tutorial we'll begin by going to the printer that we're going to be using to get our item specs.
So we head over to UPrinting and click on Business Cards and decide on the following specifications:
-
Size: 2" x 3.5"
- Stock: 14pt Cover Matte
- Color: 4 Color Both Sides


Step 2
Next we need to find and download the appropriate template. We're going to be making these business cards in Illustrator, so go to Templates and then click on Adobe Illustrator and then on Business Card Templates and choose the 3.5" x 2" horizontal template.


Step 3
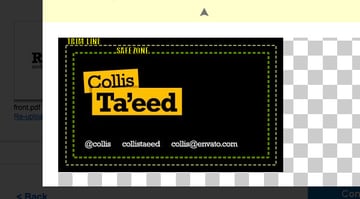
Opening up the template in Illustrator reveals it to be a three layer file. On the bottom layer are the instructions and on the top are guides. The middle layer is where you place your artwork. If you check the Document Setup you will find the file is 3.75" x 2.25". The extra space is for our bleed area and you can see it in the template file as the greyed out area.
Additionally you should note the Safe Zone which is where our artwork needs to stay inside of to ensure it all gets printed properly.


Step 4
Now we add our artwork. These business cards are going to be really simple, on one side we'll keep them plain white with the Rockable logo and URL. On the other side we'll make them black and put the card holder's name (me!) written using the same styling as we used on our book covers. And then on the black side we'll add some details.
There aren't too many choices to make because our styleguide from the previous tutorial has determined the colour specifications, font choices and general style. One note with font sizes, it's generally not a good idea to get any smaller than 7pt as it can get a bit unreadable. If you're unsure just run a test print on your local printer and decide if everything looks legible.
So to add the artwork just click on the middle layer on the template file and add your items there. I added a second middle layer so that the first one contains the white side of the card and the second contains the black side.


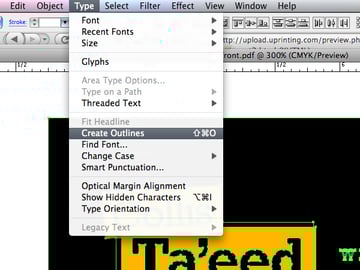
Step 5
At this point it's worth creating outlines of all our text before we make PDFs just in case something needs to be edited. So just select everything on the two layers and go to Type > Create Outlines.

Step 6
Back at UPrinting, we scroll down the Business Cards page (with the appropriate settings in from earlier) and click Order. The site asks for a back and front which we upload.

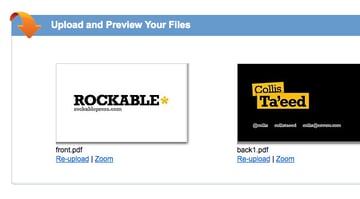
Step 7
Be sure to click on the Zoom link to see a preview of the artwork and just to confirm that it all looks OK. You'll notice that the faint grey text appears to have vanished. Actually later the prepress team wrote to say they didn't think it would appear. But I went ahead anyway and it did come through (happy days!)

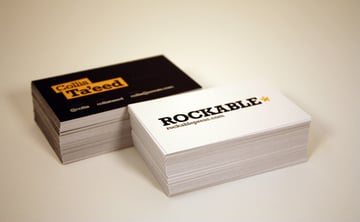
Printed!
And here we are with the cards printed and delivered! And I should give a shout out to Scott Wills who took these awesome photos for me!