


Twice a month we revisit some of our reader favorite posts from throughout the history of Phototuts+. This tutorial was first published in September, 2009.
In this article Miguel will be taking you through the process of a portrait-based outdoor photoshoot on a budget. The only things you need to recreate this collection of images are yourself, a friend or client, a camera with a lens and the great outdoors. This set of tips will show you that you don't need an expensive setup of lenses, reflectors and lights to create stunning portraits to be proud of.
1. Introduction
This series of portraits was recently taken for a local client to serve as promotional shots for his solo musical project. His brief to me was that he wanted the photographs to not necessarily feature himself as the main focus, but rather of the beautiful surroundings with himself within them. He didn't want the photos to be cliché or cutesy, and he requested that they were to be as natural as possible.
In the following steps I hope to show you what it takes to nail an outdoor photoshoot with as little equipment as possible, cover the difficulties you might encounter, and share several killer tips for working in the field—no pun intended! You can catch the full collection of these images on Flickr.
2.Equipment and Props Used
-
Canon 400D Digital SLR
camera with standard 18-55mm lens kit. For this purpose, try to use a DSLR for best results, but any digital camera can be used as long as it has some manual control of exposure.
- Model/subject with an extra change of clothes. One reason it's smart to bring an extra set of clothes is that if you get one outfit dirty within 15 minutes, you don't have to call off the rest of the shoot since you'll have a backup change of clothes. Another reason you might do this is purely for variety. Different outfits instantly make your set of photos more versatile as a package, and this is a bonus for both your portfolio and the client's promotional material.
- Adobe Photoshop, for post-processing the photographs.
Step 1
Choosing the right time and weather conditions
Believe it or not, a sunny day is a pain for taking portraits more often than not. You get models squinting in the sunlight, nasty blown-out skin highlights as well as incredibly difficult to tame exposure—you either end up with shaded areas that are too dark or brightly lit areas that are too bright. It's a nightmare!
Slightly duller and cloudier lighting can be the best to diffuse the light evenly, and even if the photos look dull in-camera you can always add the needed punch later in Photoshop. Remember—it's next to impossible to bring back detail in a photo. This applies to blacked-out shadows and blown-out highlights, so ideally you'll want tonal information in both ends of the light spectrum.
Time-wise, the best period of the day to shoot is just after sunrise, or for the lazy, just before sunset. This time period skips the intense afternoon sun that creates harsh lighting conditions and it can create lovely long shadows due to the sun being so low in the horizon. But make sure it isn't too close to sunset either, as light escapes quicker than you realize. A good rule of thumb I have is to go out and shoot approximately one-and-a-half to two-hours before sunset. This set of photos took place between 17:30 and 19:30 during early August in the UK.


Step 2
Camera settings
For the vast majority of the photographs, I shot in Av mode which adjusts the shutter speed automatically to calibrate against the desired aperture. During this mode, you'll want to have your aperture on about 5.6 to make sure you still get nice, sharp focus, though you can go as open as your lens allows if you find the shutter speed is slower than 1/30.
If you still find that with the widest aperture your shutter speed is still too slow, you may need to increase the ISO at the cost of some grain in the image (and DSLR grain is not the good type of grain).
Many would advise you to use a tripod, but I personally feel the dynamics of doing a natural photoshoot with a tripod to be too slow and cumbersome. Ideally, you need to constantly move around, be creative, get down low and up high from one shot to the next, which isn't possible with a tripod. It definitely feels less organic and you want to keep a fast paced, positive uplifting atmosphere with your model.
Having said that, it doesn't hurt to be prepared if you need to capture that one shot that seems to come out blurry every time.
Another thing I'd like to mention is that I find the automatic metering (be it with shutter, aperture or full automatic) will come out too bright. If you have the option, move the exposure metering down a couple of notches so the automatic modes create a slightly more low-key photograph. I tend to find the shadow areas are easier to recover light detail from than the overly bright areas.


Step 3
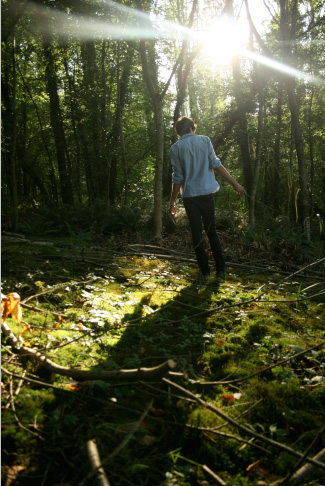
When you are in the woods at this sort of time, you can usually find pools of light on the floor created by the sunlight leaking through the trees, which breaks up the shadows they cast. The aforementioned long shadows created by a low sun can be integrated within these 'pools' of light to create interesting light compositions.
Setting your lens on its widest angle setting and getting close to the floor will emphasize the length of the shadow—as you can see in the image below. When making light and shadow your main concept in an image like this, having your subject face away from the camera and letting the sun create a rim of light around the figure can add to the charm of the image.


Step 4
Don't be afraid of the dark side
In areas of little light where the foliage is slightly denser, you can still position your subject to be mainly illuminated from behind by the sun, creating a nice rim light effect that can pop part of your subject from the background in these dim situations.


Step 5
Try to add depth to your composition
When composing a photograph like this, one of the first steps I tend to take is to find a foreground to help add depth to the photograph. It's nice to always have a foreground, middle ground and background in an image. If you get nice and low, you can usually find foliage to frame your subject. If you can incorporate a layer between the lens and the subject, that's perfect. Try it!


Step 6
Be creative with your focus
This step goes hand-in-hand with the previous. If you experiment with focusing on the foreground rather than your middle ground, you can be pleasantly surprised with the results. Doing so will add variety and interest to some of your photos, and I think you'll agree that just because the model isn't the main focus, this image is still just as good as the rest.


Step 7
Experiment with tilting your camera sideways slightly. This can instantly make the feel of your image very different. It adds a certain edge that can make your shot.


Step 8
I previously mentioned not to be afraid of the dark side. This applies equally to the bright side. You can position your subject so that he or she is facing the sun sideways, then position yourself in front of him or her and adjust your angle until you get a slight lens flare. There is nothing wrong with a bit of lens flare, but please use this sparingly! When used well, it can create a nice washed-out vintage dreamy effect.


Step 9
A low angle can work well when trying to emphasize a figure
In this shot I tried to make the model the focus point so that he demands attention, and getting down low and using the tree trunk as a lead to the top of the image helped me achieve that. When shooting from below you tend to make a person seem menacing and authoritative, and similarly when you photograph someone from above they tend to be diminished and made to seem less important.


Step 10
Some photographs work better as black and white images
In this particular shot, the original colors seemed to suck the life out of the photo. In Photoshop you can desaturate an image and then give it a subtle color tint. This will turn your photo into a more 'artsy' shot. Like in the example below, it makes the difference between binning a shot and keeping it in the final collection. When you think a photo doesn't really work for you but there's something about it that makes you wonder what could be done to salvage it, I suggest trying to desaturate it to see how it works in black and white.


Step 11 - Post-Processing
Over the next few steps I'll show you how I normally edit shots such as these, and the techniques I used when trying to bring that glowing warm essence of a summery forest to life before handing the shots over to the client.
The first thing you do when you open an image in Photoshop is to crop the image if needed. Next, you may want to duplicate the original layer into a new layer so you can always strip it back to the original if needed at any point, even if you mainly use adjustment layers.
Step 12
You may need to adjust the contrast using a Curves adjustment layer, but the contrast of this image is pretty well balanced from the camera as it is. In that case, you would proceed to create a new Gradient Map adjustment layer, and tone it so that it goes from a warm orange to a lighter, yellower tone.


Step 13
Bring the opacity of the Gradient Map layer to about 30% (or whatever looks best with your image). You can now start to see a more vintage and washed out tone.

Step 14
Create a new Curves adjustment layer and adjust it so as to darken the shadow areas of the image, and set this adjustment layer's mode to Luminosity.


Step 15
A neat tip to help force attention on the middle of the photo is to create a new empty layer and fill it with Black, then get the Eraser tool with a soft round brush set to about 20% opacity, and start to erase into the main focus of the image so as to darken the edges of the photo. One thing I'd advise you to do is to always erase light areas such as light sources (the sun in my case), as otherwise they will look obvious when a vignette is applied to them.

Step 16
Drop the Black layer to around 15%, as this effect looks best when used subtly. The Layers palette should look something like the one below.


Step 17
Once you've saved your .Psd copy of the image you can flatten the layers, resize the image for web—which in this case is 600px high—and then slightly sharpen it by going to Filter -> Sharpen -> Sharpen. If the image looks overly sharp, you can fade the last applied effect by pressing Cmd+Shift+F, and in this example I set fade to 40%.
That's it! You can then save your image. However, if you're applying this look to a lot of photographs you could save a template version as a .Psd file right at the step before you applied the vignette, so that the adjustment layers are all still editable. Once you have another document open, you can simply drag these adjustment layers to the new image and adjust them as needed.


3. Download Source File
Miguel has kindly provided the template he used to post-process his photo series. Download .Psd (2.2mb)
4. Conclusion
There are a few more tips that I thought I ought to mention before wrapping up:
- Be trigger happy. Take along a few gigabytes worth of memory cards, because you never know just how well a photoshoot can go. You may find yourself using up dozens of photos trying to nail just one shot.
- Remember to have fun and to have a good relationship with your model. If neither of you communicate, your model may start to feel uncomfortable and the quality of the photoshoot will ultimately suffer as a consequence.
- Know your camera! It is beyond useful knowing how to properly operate your camera and the shooting modes it has to offer.
- Know the basics of photography such as what affects exposure and some compositional concepts such as the rule of thirds.
- Abstain from using in-camera effects such as sepia or black and white. You can always do this in Photoshop with a hundred-times more control, but you can't get color back once you shoot without it.
- If you don't have Photoshop but want to recreate the same soft warm color-tone used in my photos above, a great little trick you can use while shooting is to hold the lens of a pair of brown gradient sunglasses in front of your camera's own lens, as seen in the photos here.
Once again, you can see the full collection of images submitted to the client at the Flickr set here.


