

Facebook style information box with jQuery
Update: Paceville.com is now online. The functionality of this article can be seen in people’s profiles, for instance here.
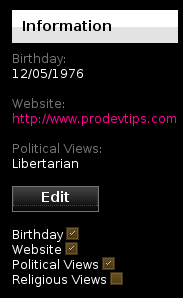
On Facebook there is a big information page in each profile, there is also a smaller one to the left and this time the requirement was to create exactly the same functionality.
We need to show certain information that the user wants to show there, and also having a small control box with check boxes that when checked or unchecked will send an Ajax call to the server to update which fields are shown.
For that I had to create an extra connection table in Joomla, like this:
CREATE TABLE IF NOT EXISTS `jos_community_fields_left` (
  `user_id` int(11) NOT NULL,
  `value_id` int(10) NOT NULL,
  UNIQUE KEY `idx_user_fieldid` (`user_id`,`value_id`),
  KEY `field_id` (`value_id`),
  KEY `user_id` (`user_id`)
) ENGINE=MyISAM DEFAULT CHARSET=utf8;
Note the combo key there, using user_id and value_id. We’ll get to just exactly how this new table is used later in the server side listing.
Let’s take a look at the HTML that renders in my profile at the moment, when I first load the page:
<div>
	<div id="display-33" class="">
		<span class="grey">Birthday:</span><br/>
		<span>12/05/1976</span>
	</div>
	<div id="display-28" class="">
		<span class="grey">Website:</span><br/>
		<a href="http://www.prodevtips.com">http://www.prodevtips.com</a>
	</div>
	<div id="display-84" class="">
		<span class="grey">Political Views:</span>
		<span>Libertarian	</span>
	</div>
	<div id="display-85" class="hide">
		<span class="grey">Religious Views:</span>
		<span>Atheist</span>
	</div>
</div>
<button id="toggle_controls" class="btn_grey">Edit</button><br/><br/>
<div id="info_controls" class="hide">
	<div>
		<span>Birthday</span>
		<input type="checkbox" id="control-33" checked="checked" /> <br/>
	</div>
	<div>
		<span>Website</span>
		<input type="checkbox" id="control-28" checked="checked" /> <br/>
	</div>
	<div>
		<span>Political Views</span>
		<input type="checkbox" id="control-84" checked="checked" /> <br/>
	</div>
	<div>
		<span>Religious Views</span>
		<input type="checkbox" id="control-85"  /> <br/>
	</div>
</div>
As you can see we hide whatever I didn’t want to show for the start, through the use of a CSS class called hide. The only contents of that class is display: none at the moment.
Next we have the control “box” which, as you can see, is hidden per default.
Let’s go through the jQuery that manages all of this:
function getId(el, sep){
	sep = sep == '-' ? sep : '_';
	var arr = el.attr('id').split(sep);
	return arr[1];
}

jQuery(document).ready(function(){
	jQuery("#toggle_controls").toggle(
			function(){jQuery("#info_controls").show("slow")},
			function(){jQuery("#info_controls").hide("slow")}
	);
	jQuery("input[id^='control-']").click(function(){
		var curId = getId(jQuery(this), '-');
		if(jQuery(this).attr('checked')){
			jQuery("#display-"+curId).show("slow");
			jQuery.post("/ajax.php", {func: "addInfoLeft", value_id: curId});
		}else{
			jQuery("#display-"+curId).hide("slow");
			jQuery.post("/ajax.php", {func: "deleteInfoLeft", value_id: curId});
		}
	});
});
The first one is simple, we simply hide/unhide the control box when the Edit button is clicked.
The second click assignment will get the id of each check box, it will then use that id to show/hide the corresponding information in the info box, it all depends on whether the check box was checked before it was clicked or not.
Note that we perform the GUI changes before we execute the Ajax call, a common trick to make the interface seem really fast, the downside is that if the Ajax call can’t terminate successfully the user will think that he/she just hid a piece of information when in fact it never managed to hide itself. It’s got its pros and cons…
Depending on the status of the check box we either call the method addInfoLeft or deleteInfoLeft in our previously discussed plgCommunityExt class:
function deleteInfoLeft(){
	$id = $this->getUser()->id;
	$this->exec("DELETE FROM jos_community_fields_left WHERE user_id = $id AND value_id = {$this->postArr['value_id']}");
	echo "ok";
}

function addInfoLeft(){
	$id = $this->getUser()->id;
	$this->exec("INSERT INTO jos_community_fields_left (user_id, value_id) VALUES($id, {$this->postArr['value_id']})");
	echo "ok";
}
Not much to add here, I think it will all get much more clear if we take a look at the PHP which renders the information box to begin with:
function fetchInfoLeft($id){
	$id = $this->getUser($id)->id;
	$sql = "SELECT DISTINCT evalues.*, efields.fieldcode, efields.name FROM jos_community_fields_values evalues, jos_community_fields as efields
			WHERE evalues.id IN(SELECT value_id FROM jos_community_fields_left WHERE user_id = $id)
			AND efields.id = evalues.field_id";
	$this->assign('info', $this->setKey($sql, 'fieldcode') );
	return $this->fetch('left_info');
}
So we will get the JomSocial info like normal with an extra twist, we will only get information that’s being linked to in our jos_community_fields_left table.
Related Posts
Tags: ajax, facebook, Javascript, jomsocial, Joomla, jquery, PHP