
There are many options available for configuring gradients generated with AS3 code. In this article, we'll explore various options with an interactive app that you can use to change these options on the fly.
Play Time
Play around with the options in the SWF above. The left rectangle shows you the resulting gradient as it would appear when drawn into a 50x50 rectangle. The right rectangle shows the matrix with the current setting. Compare the two while exploring all the settings and it will all make sense.
When you've created a gradient that you like, hit Click here for code to see an AS3 code listing which you can copy and paste into your own project to generate the gradient you've made.
In the code generation extra variables have been added so you can easily alter the appearance of the gradient.
-
gradientScaling, use this to increase the size. -
gradientOffsetX, use this to move the gradient horizontally. -
gradientOffsetY, use this to move the gradient vertically.
Gradient Overview
To create a gradient, you need use the graphics object of a Shape, or any class it subclasses. Then we need to create the gradient fill, by calling
1 |
|
2 |
graphics.beginGradientFill() |
These parameters are required:
type:Stringcolors:Arrayalphas:Arrayratios:Array
These parameters are optional:
matrix:Matrix = nullspreadMethod:String = "pad"interpolationMethod:String = "rgb"focalPointRatio:Number = 0
I will go though each parameter later. If you'd rather play around with it, trying to figure it out yourself, I've made a SWF just for that reason, and it can even generate functional code for the gradient you've made. Check it out at the top of the article.
For full documentation on creating gradients, see the LiveDocs on the topic.
Gradient Type
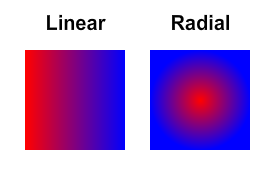
Set the gradient type with: flash.display.GradientType
Colors, Alphas, Ratios
These three arrays need to match up. So if you want three colors, you also need to supply three alphas and three ratios.
The colors array needs hexadecimal values. (like 0xFF0000 for red)
The alphas array needs numbers from (and including) 0 to 1.
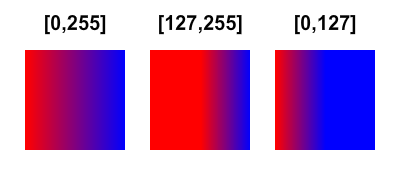
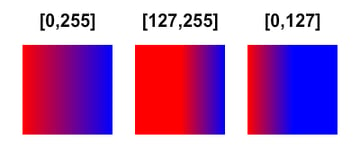
The ratios array needs numbers from (and including) 0 to 255. These need to be in correct order, so [100,0,200] is not valid, but [0,100,200] is.
Here is an example of what happens when you change the ratios:
Matrix
The matrix defines how the gradient will look. If you do not define it, it will have a width of 200px. Instead, if you want to control how the gradient will look, you will need to create a new matrix:
1 |
|
2 |
var gradientMatrix:Matrix = new Matrix ( ) ; |
Then you need to create a gradient box on the matrix, by calling:
1 |
|
2 |
gradientMatrix.createGradientBox |
The following parameters are required:
width:Numberheight:Number
These parameters are optional:
rotation:Number = 0tx:Number = 0ty:Number = 0
width is the width of the matrix (not affected by matrix rotation).
height is the height of the matrix (not affected by matrix rotation).
rotation is the rotation of the matrix, in radians.
tx is the horizontal offset of the matrix (not affected by matrix rotation).
ty is the vertical offset of the matrix (not affected by matrix rotation).
Spread Method
If the matrix in some way doesn't cover up the whole area you draw, the rest will have to be filled. There are three different ways of managing this:
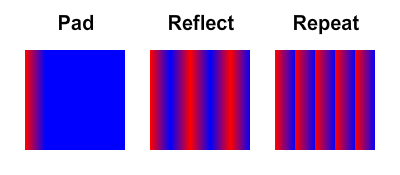
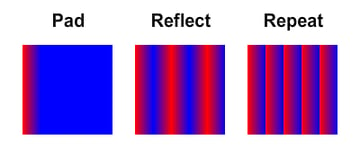
Set the spread method with: flash.display.SpreadMethod
Interpolation Method
This is the way the color transition is calculated, there are two options:
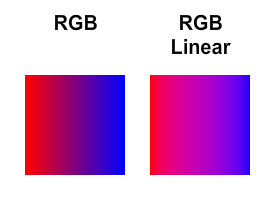
Set the interpolation method with: flash.display.InterpolationMethod
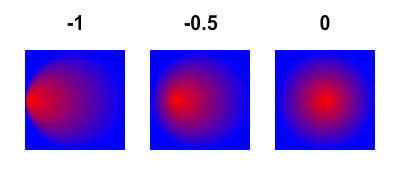
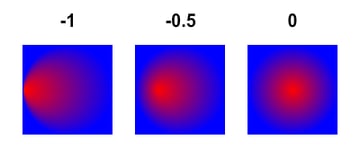
Focal Point Ratio
This only has an effect if you are using radial gradients. It accepts values from, and including, -1 to 1. If you supply a number over 1, don't worry, it will default to 1. This is also affected by rotation (so you can make it to be in the top by setting the focal point to -1, and rotation to Pi/2).
Drawing
When you're finished, you need to draw the fill. This can be performed by any of the graphics fill drawing methods, like beginFill().
If you are not using (0,0) as your start point for the drawing method, you need to remember to change the tx and ty values of the matrix.
Conclusion
Now you should be ready to go on new adventures with code generated gradients.
Thanks for reading!


