
Infrared photography is the technique of capturing light not visible to the naked eye. Infrared (IR) light lies between the visible spectrum and radio waves. The look of these IR photos is distinct and can be stunning. In this tutorial, we are going to create a fake an IR effect with Adobe Photoshop.
What is infrared photography?
There are three ways to capture IR photos. The first method is to have your camera converted to capture infrared light. This is quite expensive (approximate $200-500) and once converted the camera cannot take normal pictures. I would only advise you to convert your camera if you are serious about IR photography.
You can also use a film camera with special infrared film. This type of film is quite expensive and requires special handling, but shooting IR photos with it requires no modification to your camera.
Finally, most digital cameras are some what sensitive to IR waves, so special IR filters can be purchased that filter out all the the visible light leaving only IR light. These filters dramatically reduce the waves hitting the sensor of your camera, therefore they greatly increase exposure times. For more information on infrared filters, look at our previous article here. You can also view 25+ examples of IR photography here.


Before and after images
Original image
Let's dive into a applying an IR look to an existing digital color photo. The original image can be found on sxc.hu, a brilliant free stock website. Credits go to Alfi007 for the photography. You can download the image here.
Please note I picked this photo for one good reason, and that reason is that this image contains a great deal of blue objects (the sky and lake). When choosing your photo, please note that photos without any strong blue colors can result in a completely different look than the one below. Have a look at the other images at the end of this tutorial to see the differences.
Remember that IR images made with filters require long exposures. If you truly want to mimic this, then you will need to make sure you have blurry water/clouds in your image. A good way to lengthen normal exposures under bright lighting conditions is to use a Neutral Density Filter.


Step 1 - Open up your image
Open up your image inside of Adobe Photoshop. I am using CS5 but you should be able to use every version from CS2 up.
Duplicate the image layer. Either go Image > Duplicate layer or use the handy shortcut CMD/CTRL + J.
Then invert the colors of the image by hitting CMD/CTRL + I. You should see something similar to the image below.


Step 2 - Colour
Simply change the blending mode of this layer to colour. At this stage your image should have a nice orange and blue tone. If you're image looks drastically different from this one, you may want to consider jumping to the end of the article to see some of the other effects that are possible with this technique.


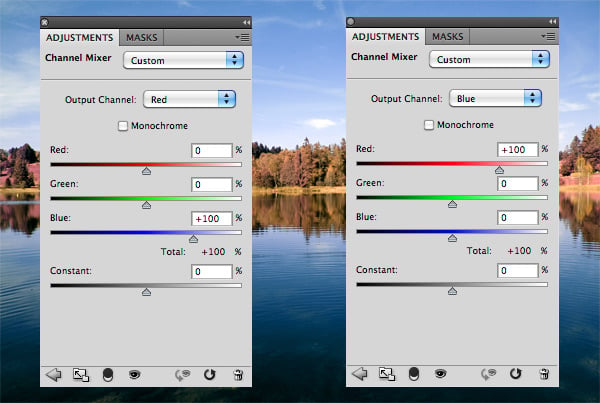
Step 3 - Channel mixer
Select Layer > New Adjustment Layer > Channel mixer, or select the tri-coloured icon in the adjustment layers panel.
In the channel mixer, firstly select the color red, and move the red slider to 0. Move the blue slider to +100.
Then select the blue channel. This time, do the opposite. Increase the red to +100 and move the blue to 0.
On the green channel, just double check that the green slider is on +100.


Step 4 - Hue and saturation
This step is going to vary with what photo you are using. We need to edit the pink/red color and convert it a white/yellow color. We can do this by changing the red channel in the hue and saturation panel.
Select Layer > New Adjustment Layer > Hue and Saturation. Select the red channel. Reduce the saturation down so the result is almost grey. Following this, adjust the hue slider until you get a hint of yellow. I also found that increasing the lightness up to around +50 helped as well. Feel free to play around with the other channels slightly to get the best results.


Step 5- Add a photo filter
Select Layer > New Adjustment Layer > Photo Filter to add a cool blue photo filter. I used one of the default cooling filters at the density of 23%.


Step 6 - You're finished
To finish, I simply created a new layer and then applied the image. (Image > Apply Image). I then blurred the water to make it look more silky and smooth to simulate a long exposure shot.


Other results:
This image showcases a result with a similar sky, but also featuring rocks in the foreground. Overall there is not really a great change. This is due to the lack of plants and water which are most affected by the IR treatment. Find the original image here.


With this image, the grass changed to a pink color instead of red. So as well as the red channel in the hue and saturation adjustment layer, I also had to edit the magentas. You can find the original image for the next example here.


Next, we have a beach shot with a lot of blue shades. The settings used for this image are the same as in this tutorial.


The following image started with little or no blue tones. The final image is almost resembles a black and white photo.


Conclusion
I hope you have enjoyed learning how to create an IR effect in Photoshop. You'll notice that it can be tricky to consistent results.
This technique is perfect for those perfect sunny days when the sky is nice and blue, but if I were you I would look into purchasing an IR filter and start experimenting. They are great fun and are a very practical way to capture IR. Leave Photoshop for when you forget your filter or use it on photos you've already taken!
Post your results using this technique or your real IR photos in the comments below! Also if you have any other tips to share please don't be afraid to post those as well!


