
Whether you want to get more serious about professional studio photography or you want to expand your current lighting setup, this tutorial is meant to give you an introduction to the different types of basic lighting equipment. Hopefully you'll come away with enough knowledge to aid you when shopping for new gear.
Lighting equipment can fall into one of three major categories: the light sources themselves, modifiers that control the spread of light, and grips or stands that support the lights.
Light sources
Professional studio light sources generally fall into one of two categories: you can get a kit with a flash head and a power pack, or you can get a monolight kit.
A head and power pack kit consists of the flash head and a small power pack that acts as the generator that supplies energy to the flash head. The flash head contains flash tubes that emit light once supplied with high voltages.
There are two kinds of power packs: symmetric power packs and assymetric power packs. Symmetric power packs split power equally between multiple flash heads. Assymetric power packs allow the user to vary the power supply to different flash heads.
Monolights, on the other hand, are compact substitutes for a power pack/flash head combinations. Their size limits their power, but they are often desired for their portability.


Having all the controls on the power pack makes it easier to change the settings of multiple flash heads in one place quickly. Monolights come with the controls built directly into the light itself. So if you have multiple monolights, you'll need to control and adjust the settings of each one separately. Head/power pack kits also offer faster flash durations than monolights, which can really come in handy when you want to freeze action during fast motion. They also have faster recycle times.
If you're shooting outdoors or with complicated modifier setups, you are going to need a lot of power to overcome the sun or the light loss caused by the modifiers. Head/pack systems have a big advantage in the power department. Whereas, if you're shooting indoors or inside your studio, monolights will probably be more than enough for regular work.
With each option, you can find equipment prices that vary widely. Be sure to also check out used gear, as you can often find good deals on lighting kits that can serve you well. Whichever your choose, keep in mind that the most durable equipment is made mainly of metal rather than plastic.
Most lights, regardless of the brand or model, provide heads that come in the form of a strobe surrounded by a reflector. Some, like the Profoto Acute/D4 flash heads, come with a zoom reflector which slides and locks at your chosen position allowing you to further control the spread of light. Their zoom reflector, like many others, provides the ability to attach a honeycomb grid for an even more focused spread, or other kinds of light modifiers used for different effects.


If your flash head does not come with a zoom reflector, you can find many types of wide or narrow reflectors sold as accessories. Wide reflectors produce a larger pool of light and a softer light quality, narrow reflectors produce smaller pools of light and a harsher light quality.
Most strobe lights allow you to completely remove the reflector and attach different kinds of light modifiers.
Link to best-selling monolights on Amazon
Light modifiers
The most common types of light modifers are umbrellas and softboxes.
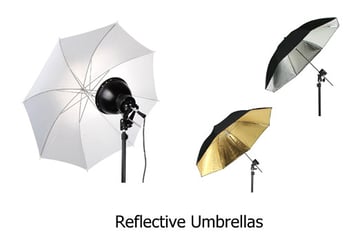
Reflecting umbrellas produce a diffused and soft light due to the larger size of the reflecting surface. They are mounted in such a way that the strobe light is actually facing away from the subject or model. Light flies from the strobe head hitting the inside of the umbrella and then bounces back towards the subject.
There are silver-lined, white, and gold tinted umbrellas. Silver-lined umbrellas are the most efficient and can focus light more narrowly than the other types. White umbrellas offer a wider spread of reflected light, and gold umbrellas produce a warm tone.

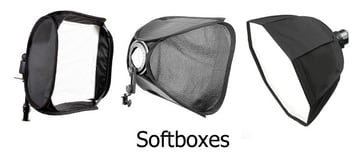
Softboxes on the other hand are usually square or rectangular. They are lightweight boxes that come with a reflective inside and a translucent front. Softboxes come in different shapes and sizes and are attached to the front the strobe over the light source. Light emitted from the strobe head gets reflected inside the walls of the softbox and diffused through the box's translucent front creating a soft, but more focused light source illuminating the model or scene.

The difference between reflecting umbrellas and softboxes is that the spread of light with a softbox is more contained. With an umbrella on the other hand, light can spill beyond the boundaries of the reflective surface affecting the amount of light getting back to the subject. Spilled light can also hit walls and ceilings indoors causing it to reflect and bounce all over the place. An umbrella simply isn't as controllable as a softbox.
Some other tools that control and modify the quality of light are barn doors, snoots, and honeycomb grids. These are attached directly to your strobe head by mounting to the reflector that comes with (or is bought for) your strobe, as discussed above.
Snoots are conical shaped tools that narrow the distribution of light. These can be used to produce a very focused, harsh light. They are often used like a spot light or to light the background. They are also very handy as a rim or hair light to illuminate the model from the back.
Barn doors are flaps surrounding a strobe that can be opened or closed to control the light and prevent it from spilling. They don't produce a concentrated and direct light like snoots, but they can come in handy depending on your needs.
Honeycomb grids, as the name suggests, are basically honeycomb shaped metallic grids that direct the light for a more focused spread. These come in different degrees. The smaller the grid cells the tighter the holes through which the light travels, and in turn the more focused the light becomes.
Flags are another type of light modifiers. A flag is any kind of opaque object placed in the way of light to better direct it, to prevent lens flare or to prevent it from spilling. A semi-translucent flag is called a scrim and is used to cut down on light spill.


Link to best-selling reflectors on Amazon
Link to best-selling photography umbrellas on Amazon
Link to best-selling flags on Amazon
Link to best-selling softboxes on Amazon
Link to best-selling barn doors on Amazon
Grips and stands
Stands and grips are used to support your light sources, strobes, and even light modifiers or backdrops.
There are two main types of light stands: lightweight stands and C-stands which are more heavy duty. Both types come in varying sizes, lengths, and prices. Heights can usually be adjusted. Sandbags can also be attached to weight the stand and better stabilize your lights.
When you shop for a lightweight stand, the ones with an air-shock are superior. The extra few bucks you pay will go a long way in protecting your expensive lights when you accidentally loosen a knob. The air-shock will soften the fall of your light, minimizing or even eliminating any damage. Also, make sure you get one with a wide footprint (meaning the legs of the stand spread far apart) so that your setup is stable and doesn't fall over.
You can get a good lightweight stand for around 70 bucks.
C-stands are very good, but they comes at a price. They are heavy duty and very stable. C-stands typically don't have air-shocks, so you need to pay attention while loosening your knobs so you don't harm your gear.
C-stands are frequently used in the video industry due to their durability and stability. They can come with a number of attachments like boom arms that can be mounted onto the stand. These arms allow you to add reflectors, scrims, flags and other modifier and rotate them to any angle you wish.
The c-stand is strong enough to hold backgrounds and seemless white paper in addition to lights. They are also very useful when you're shooting outdoors in windy conditions because their weight adds to their stability. You can get a c-stand with an attachments kit for less than 200 bucks, sometimes far less.


Link to best-selling light stands on Amazon
Conclusion
Whichever path you take and whichever brands you choose when building or expanding your lighting setup, be sure you get the best quality for your budget. Also, choosing items with widely available accessories and parts will help you out later.
Lighting equipment can be very expensive, so make sure you get the tools that are right for you. Start with the most basic and important items, then build up little by little, adding more as the need arises.
It's also a good idea to try renting equipment prior to actually making a purchase. You can try it out and make sure that it fills your need. You don't want to go out and spend all you got on something that turns out to be wrong for you.
Feel free to name your favorite lighting equipment and tips for shopping for that equipment in the comments!


