
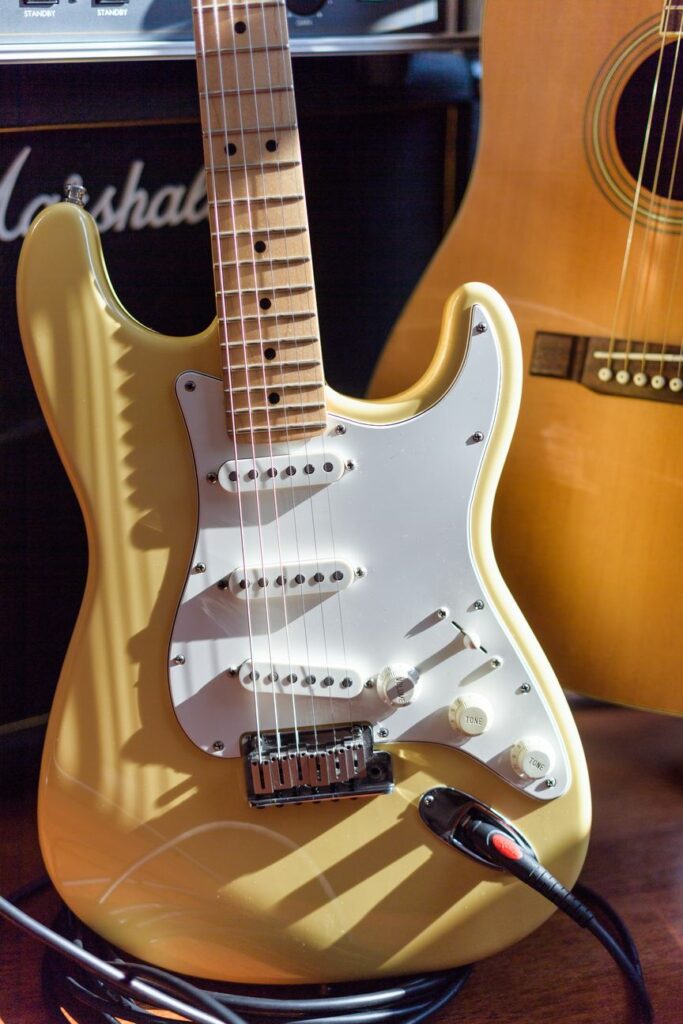
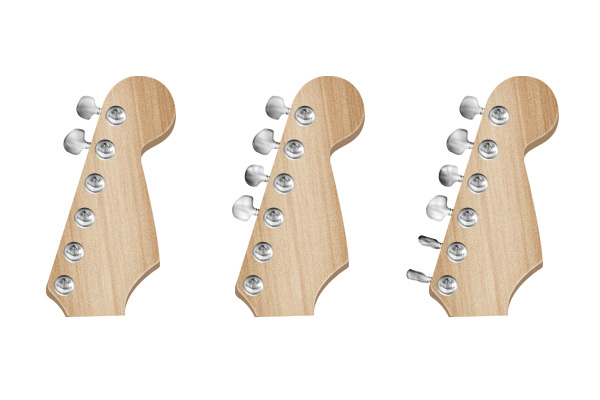
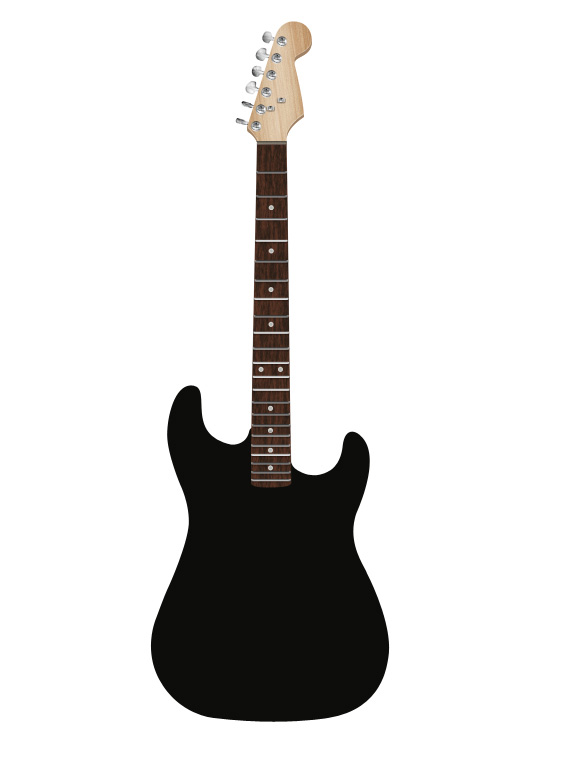
Preview
Step 1: Draw the Guitar’s Headstock
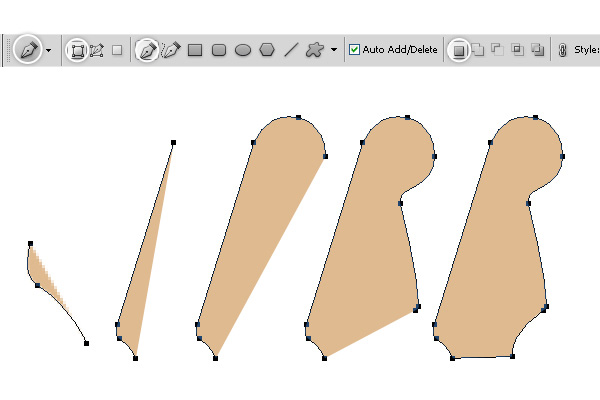
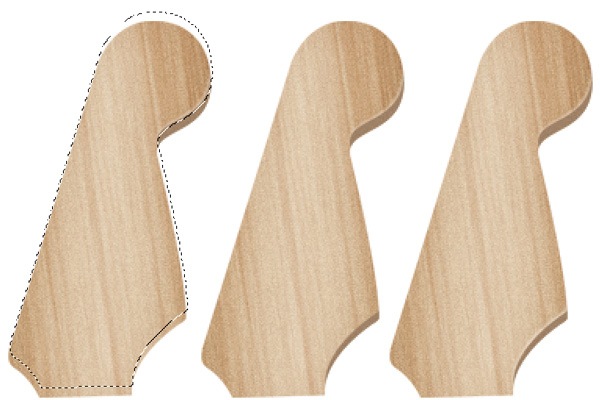
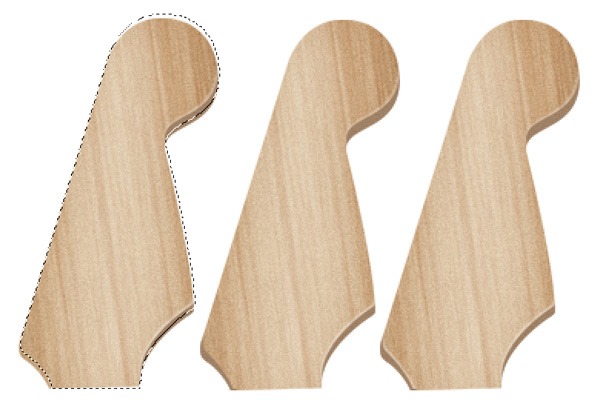
Create a new document with the following dimensions: 2,048×3,072px. Unlock the default white background by double-clicking on it in the Layers Panel, then rename it to “Bg”. 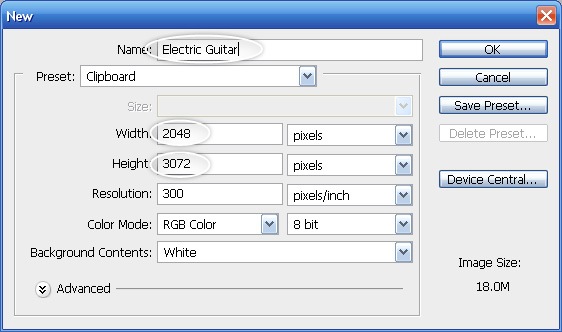 Let’s create the basic shape of the headstock of our guitar. Select the Pen Tool (P) and make sure to set it up in the Options Bar as shown below. Afterwards, draw the shape as you see it below.
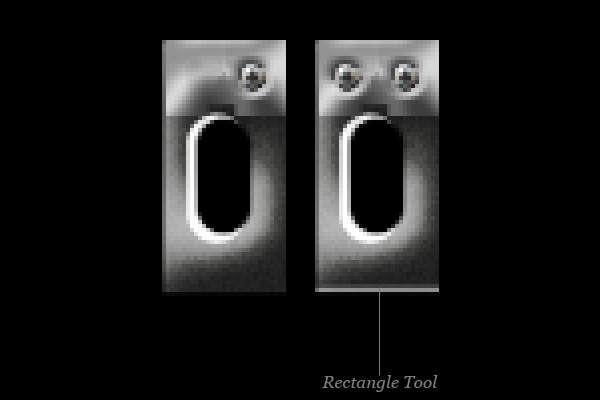
 Next, create a new layer, choose the Rectangular Marquee Tool (M) and then draw a rectangle with the size of 417x287px. Then, change your Foreground color to #966a39 and Background color to #cdac85.
  Go to Filter > Render > Clouds and the layer will then be automatically filled with the filter.
 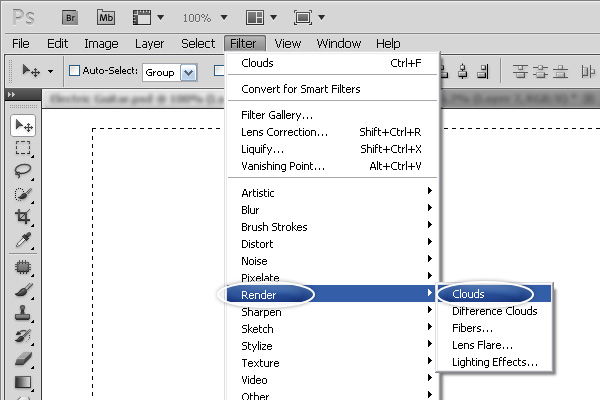 Let’s use another filter: Go to Filter > Render > Fibers.
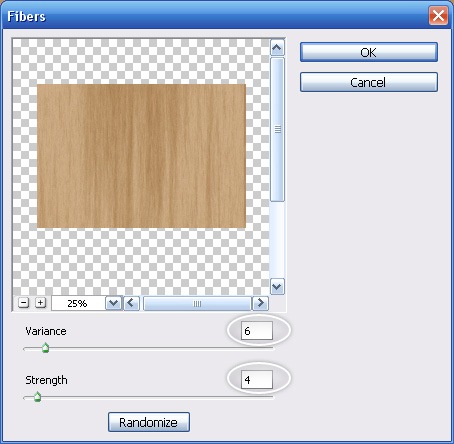
 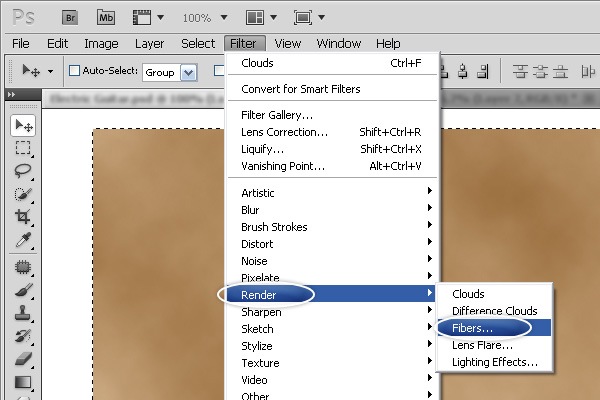 Use the following settings for the Fibers filter:
- Variance: 6
- Strength: 4
 You will be able to achieve this result, which will be used as a surface texture later on:
 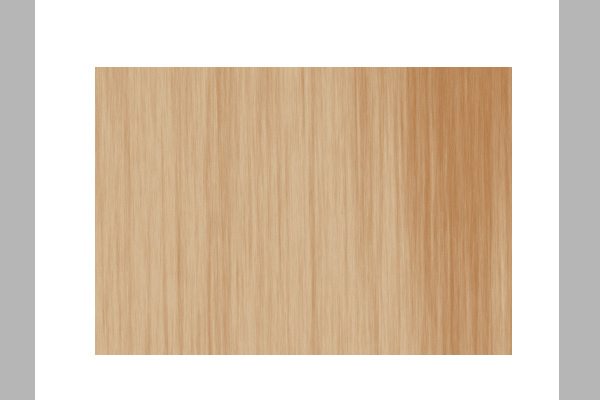 Let’s rotate the texture a little bit by first pressing Ctrl/Cmd + T to activate Free Transform (or you can just go to Edit > Free Transform, which achieves the same thing).
 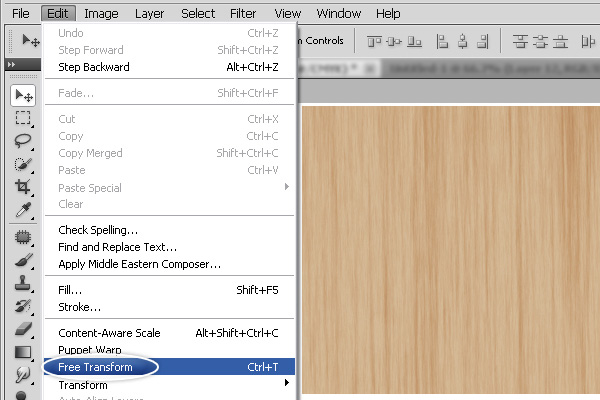 Rotate the texture as shown below:
 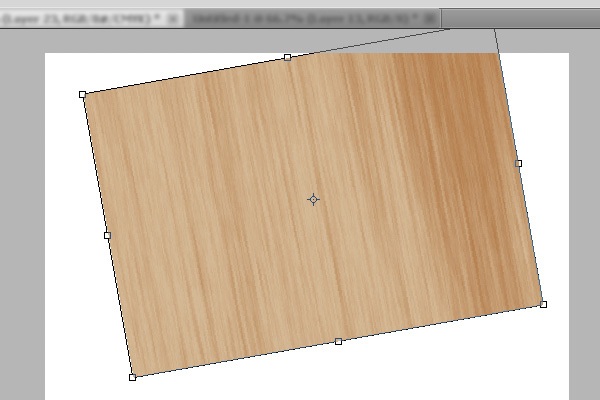 Now that we have the texture layer and headstock shape, let’s merge both of them. Create a selection around the headstock shape by Ctrl-clicking/Cmd-clicking on the layer’s thumbnail in the Layers Panel.
 Then click on the texture layer to make sure it’s the active layer. Next, go to Layer > Layer Mask > Reveal Selection.
 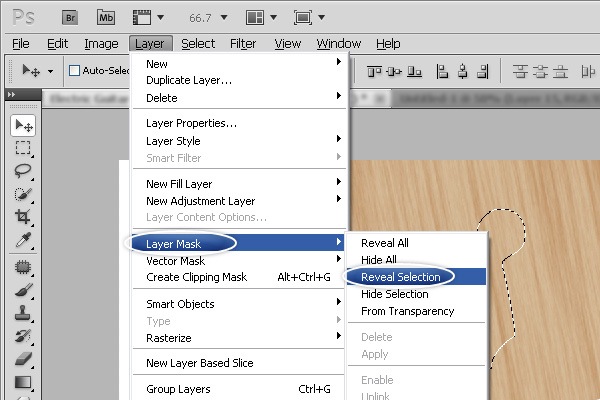 The layer mask will hide all parts of the texture layer that are outside of the selection, resulting in the following:
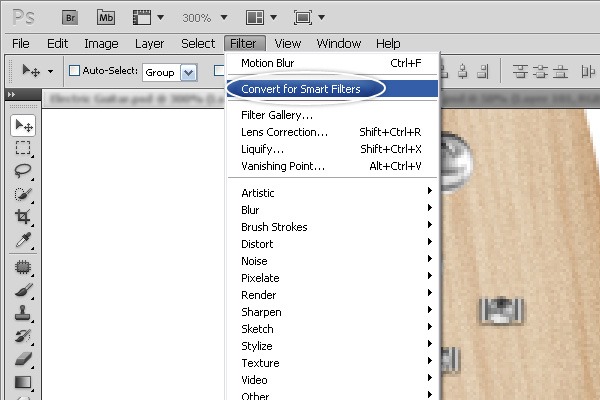
 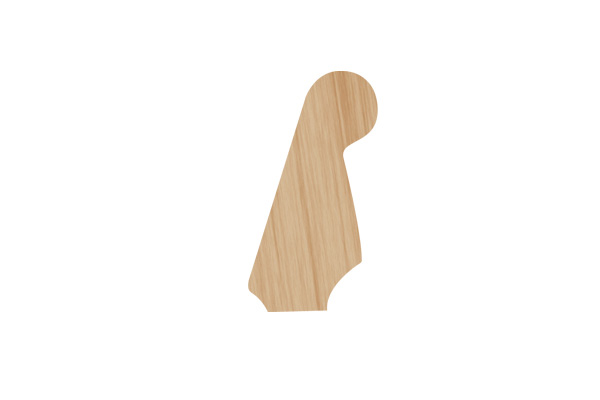 Convert the texture layer for Smart Filters by going to Filter > Convert for Smart Filters.
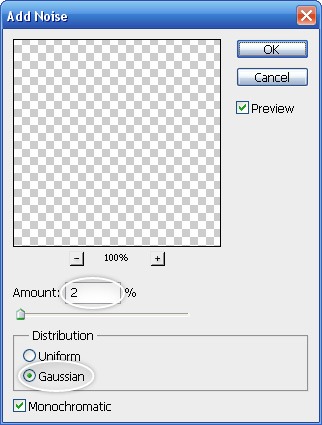
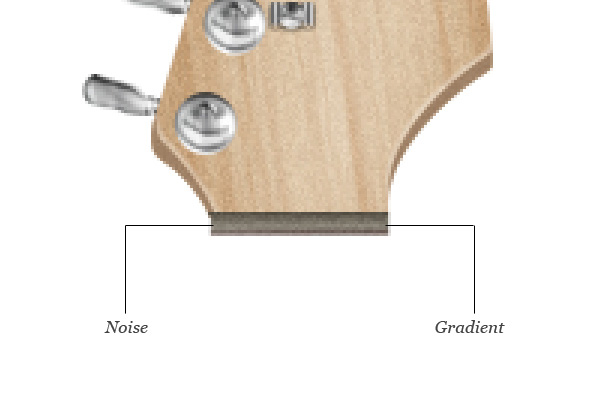
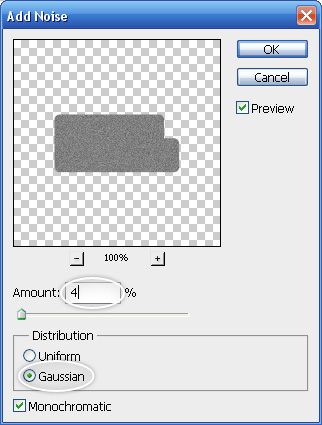
This will make sure that our filters our non-destructive, preserving our original layer data. 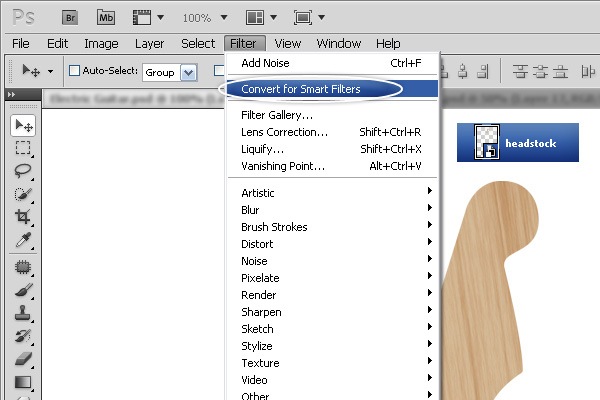 We need more texturing to really achieve a photorealistic look, so go to Filter > Add Noise and use the settings shown below.
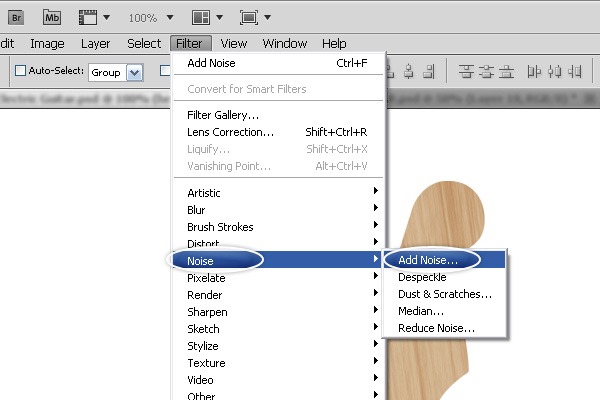
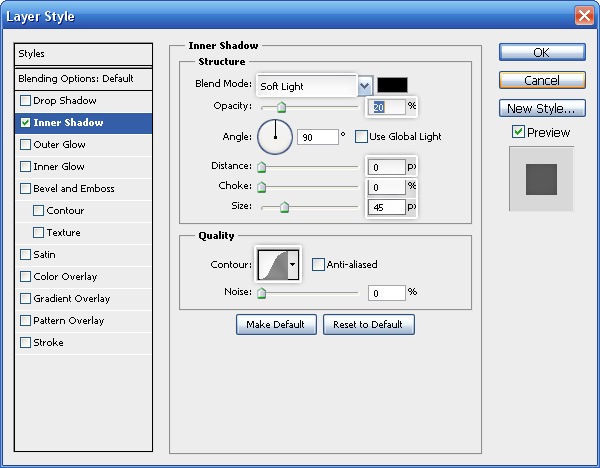
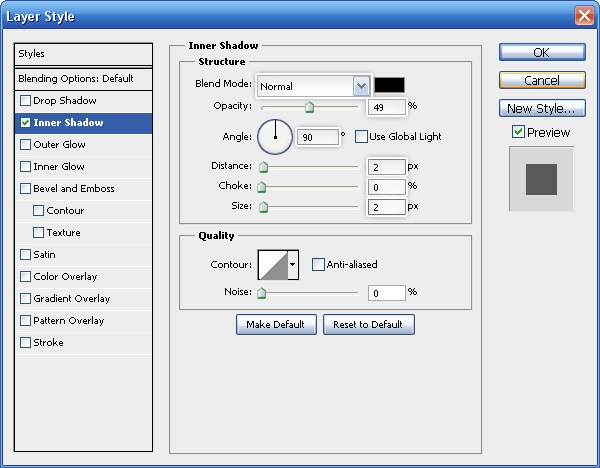
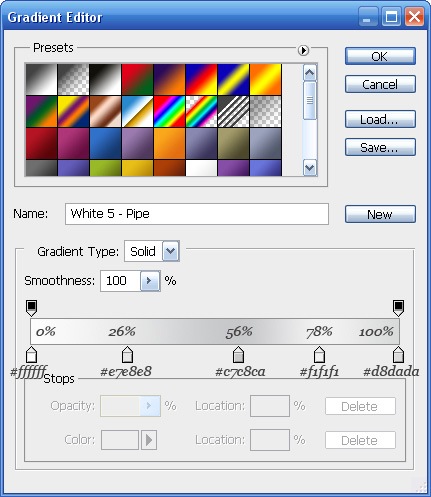
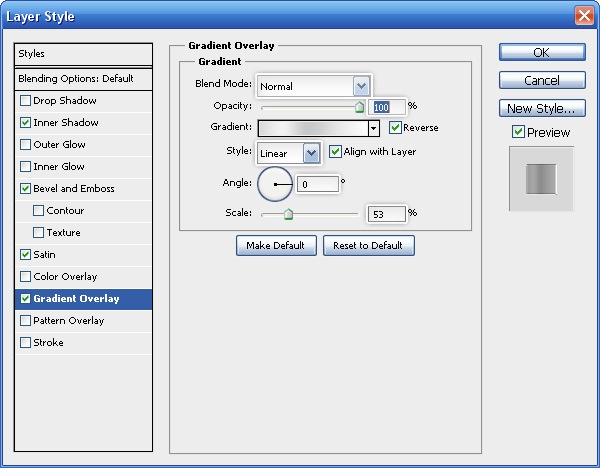
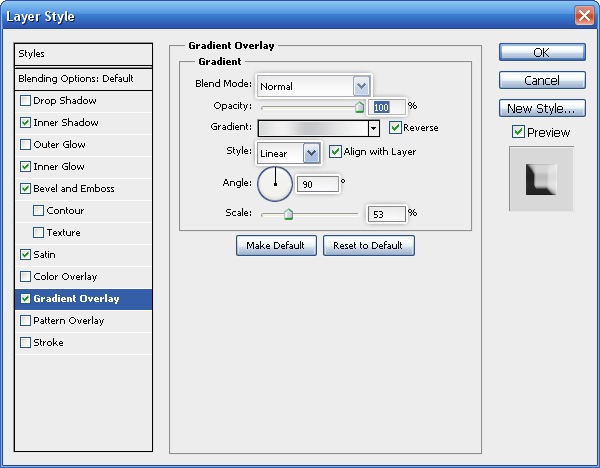
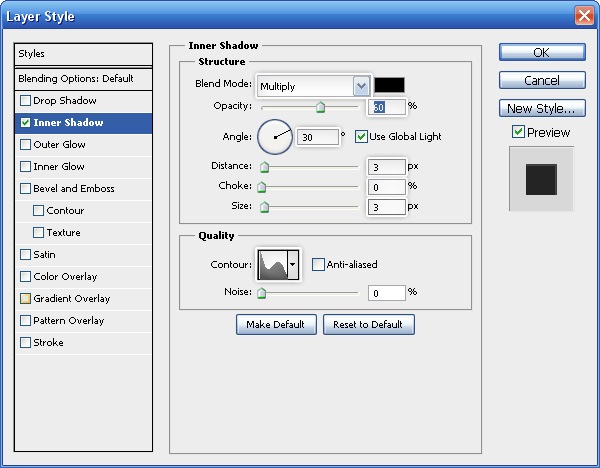
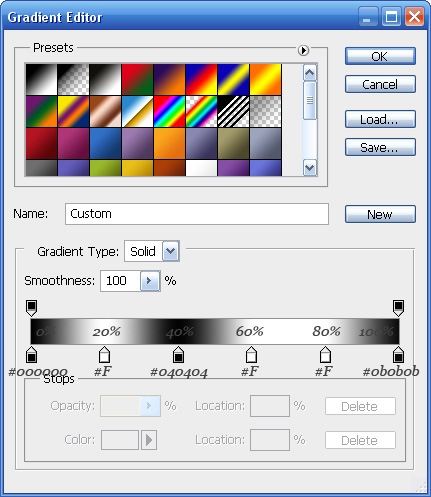
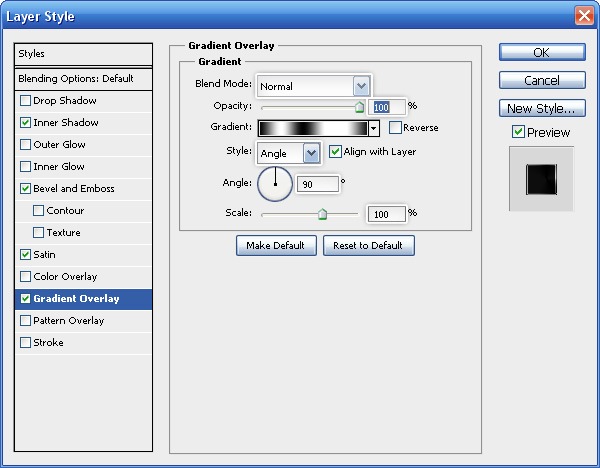
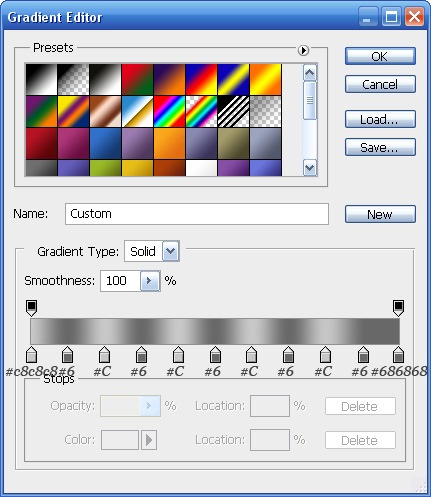
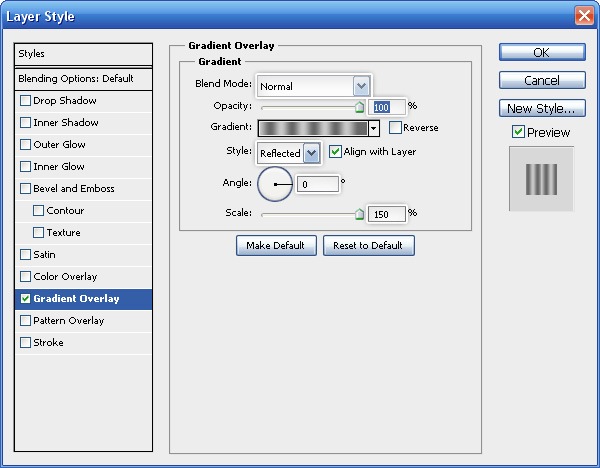
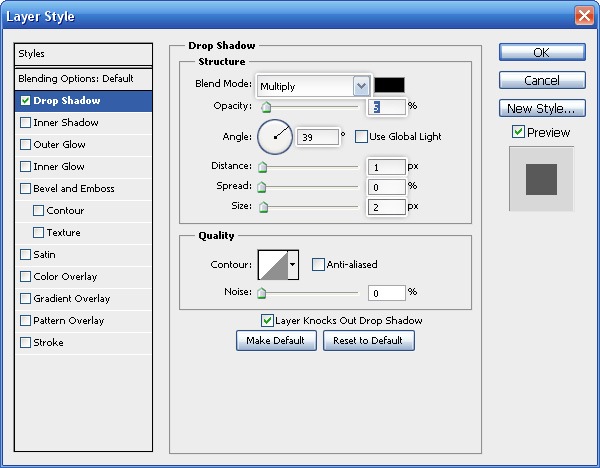
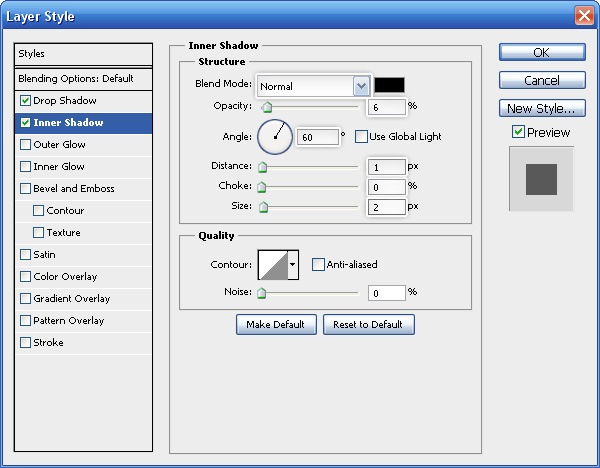
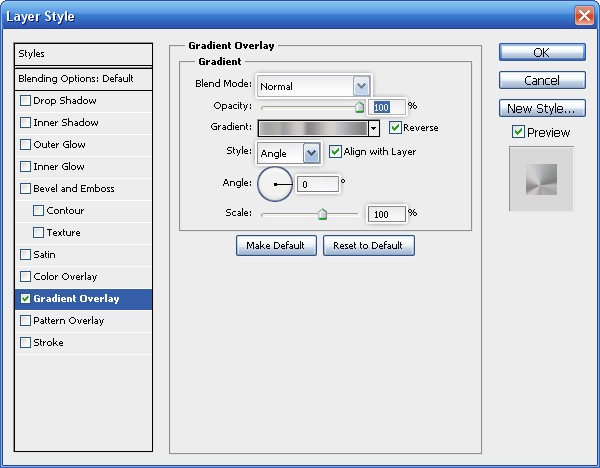
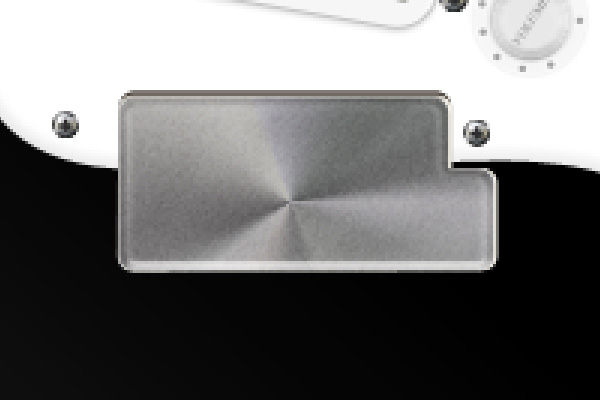
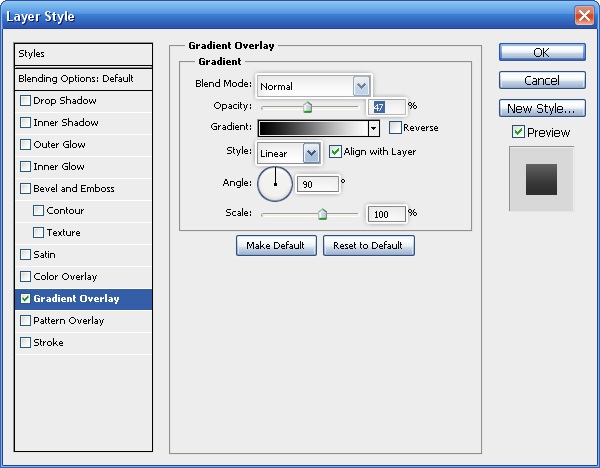
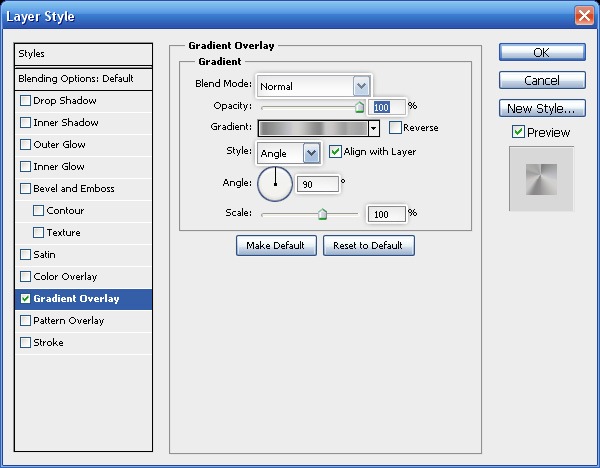
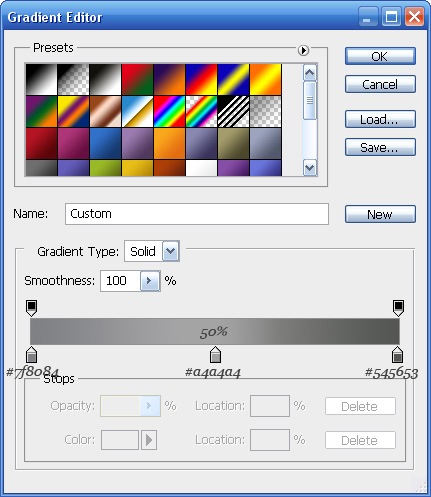
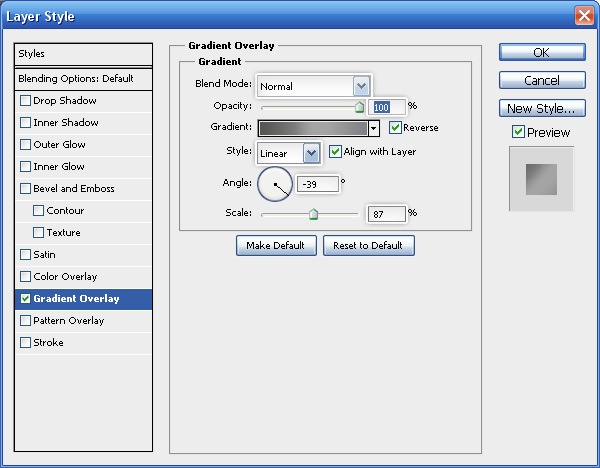
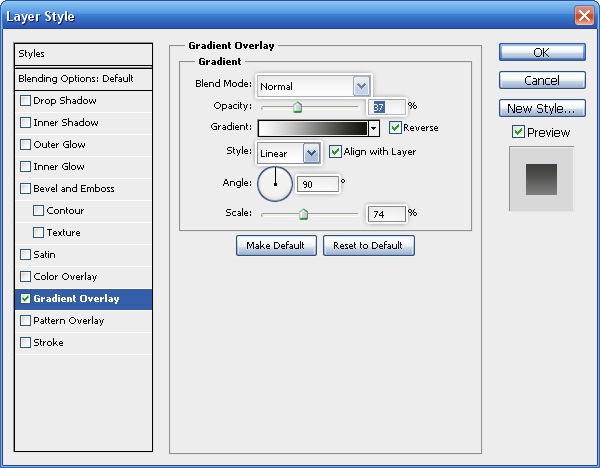
 Next, let’s give the headstock an Inner Shadow and a Gradient Overlay layer style in order to reinforce the realism of it.
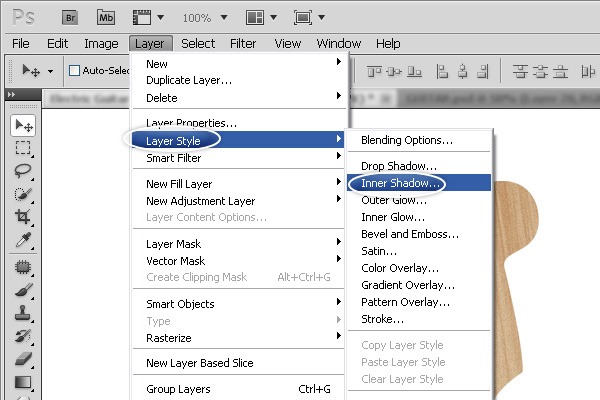
Inner Shadow
Gradient Overlay
 You will have this result:
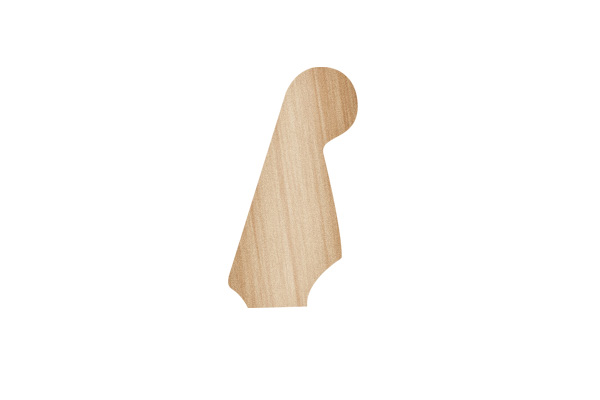
Step 2: Give the Headstock Some Depth
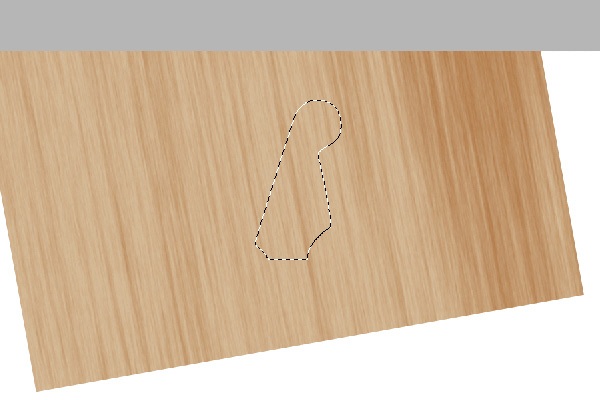
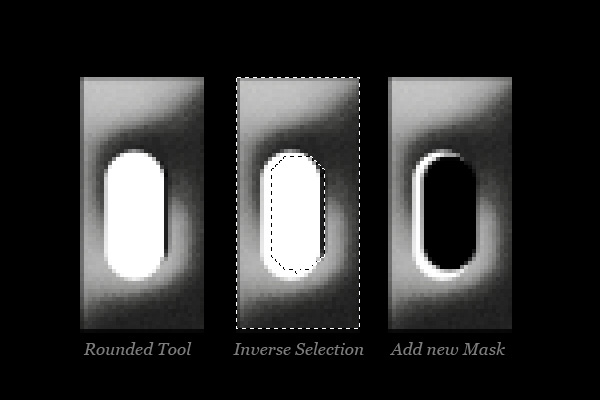
Place a selection around the headstock, then move the selection as shown below. 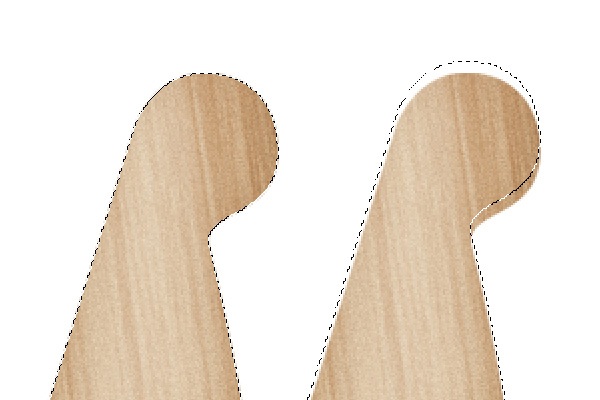 Invert the selection by choosing Select > Inverse (Shift + Ctrl/Cmd + I).
 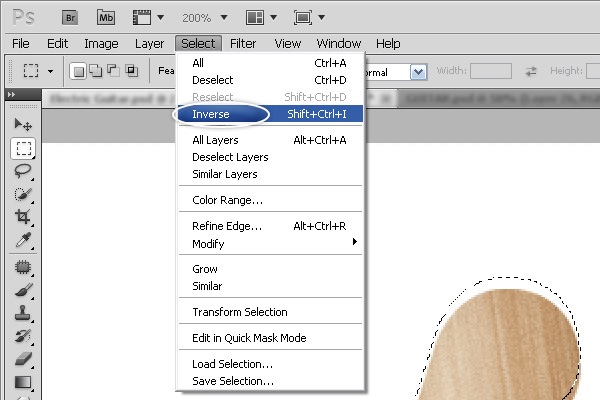 Create a new layer below the headstock layer (rename the layer to “Shadow”).
Next, choose your Brush Tool (B) and set it up as shown below. 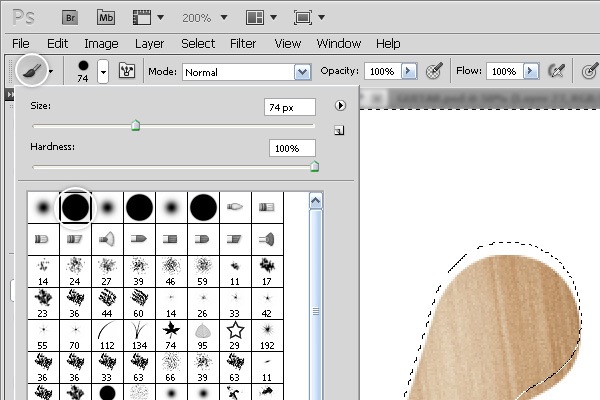 Use the Brush Tool to paint on the new layer.
 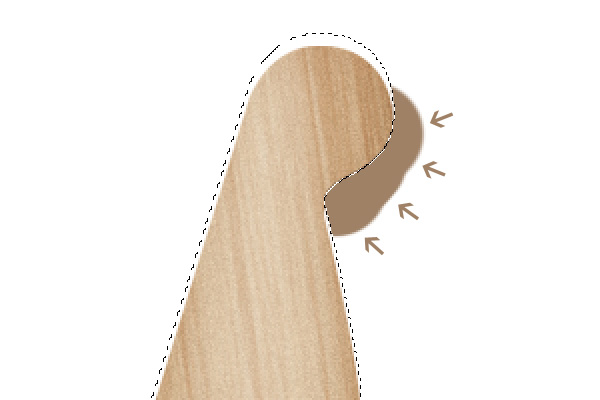 Move the selection a bit (as shown below).
Add a layer mask by going to Layer > Layer Mask > Hide Selection. 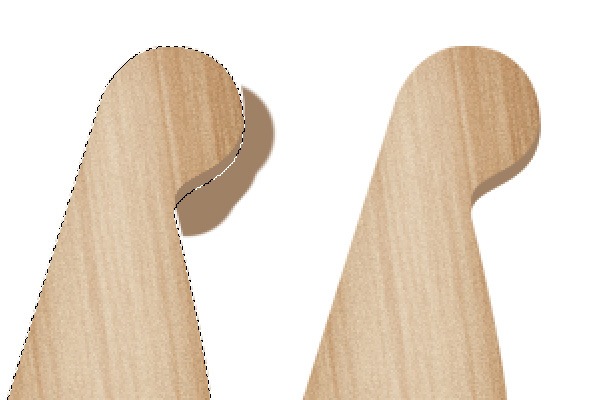 Convert the layer for Smart Filters.
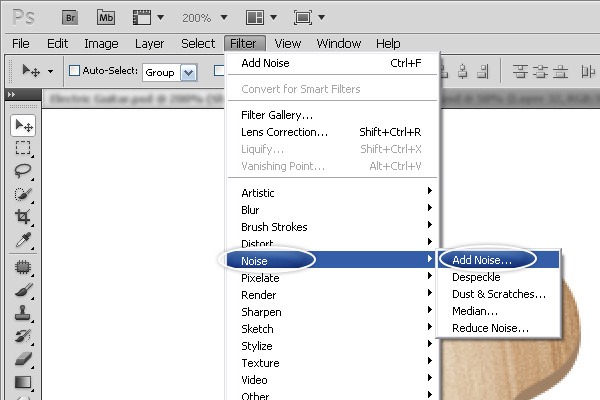
 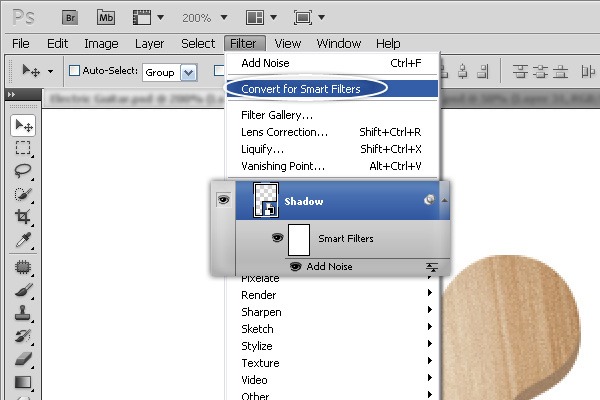 Go to Filter > Noise > Add Noise.
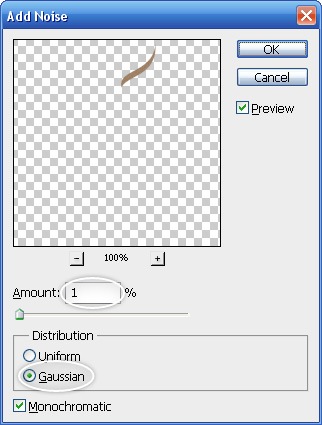
 Use the following settings for the Add Noise filter.
- Amount: 1%
- Distribution: Gaussian
- Monochromatic: Checked
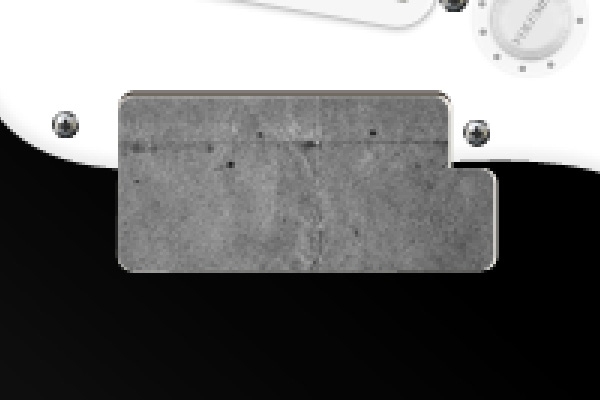
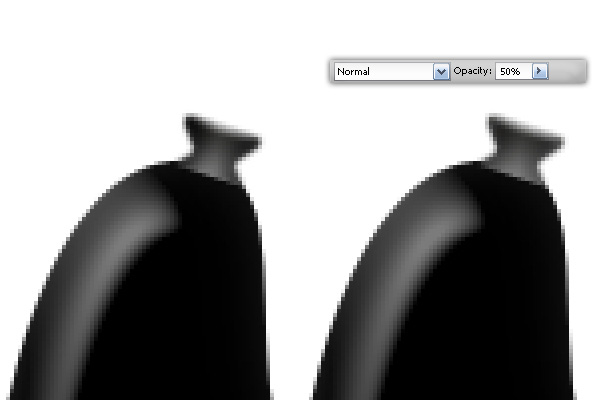
 Create a new layer. Create the selection shown below, use the Blur filter, then reduce the layer’s Opacity to 25%.
 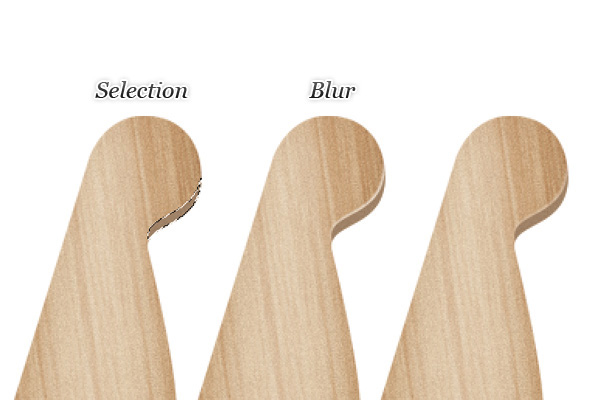 Do the same process above to add some depth to the lower-right and lower-left portions of the headstock.
Step 3: Make Machine Heads
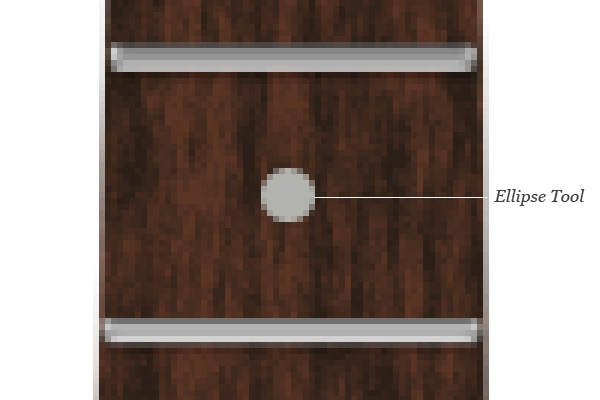
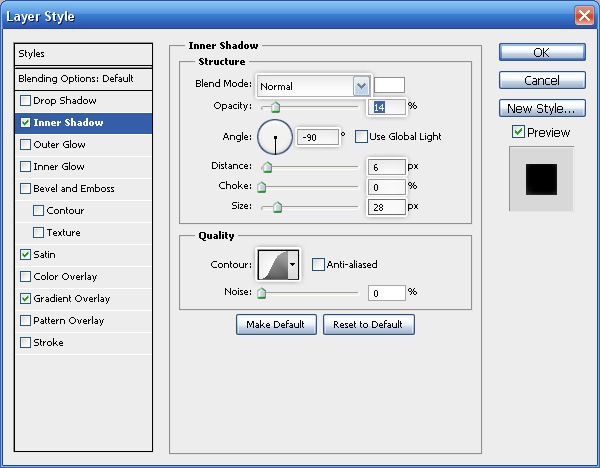
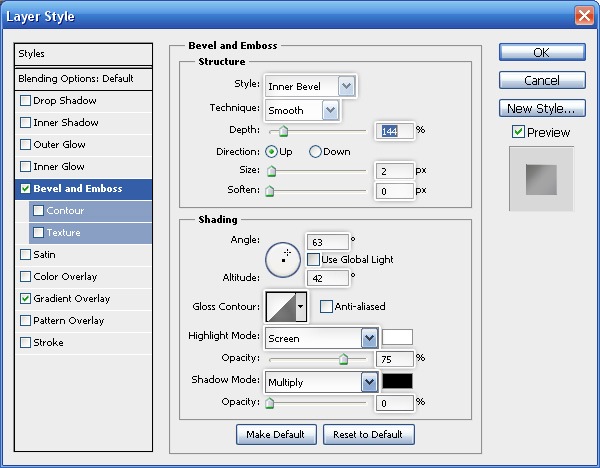
Let’s give our headstock some chrome, starting with 6 machine heads (also known as tuners) that are used to change the tune of the guitar strings. Switch to the Ellipse Tool (U) to draw a small circle. 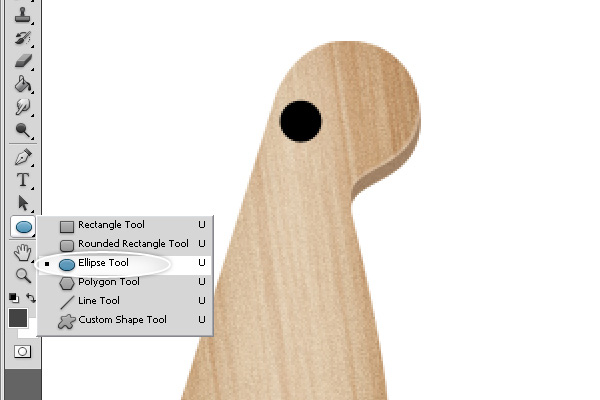 Double-click on the layer in the Layers Panel to open the Layer Style dialog window.
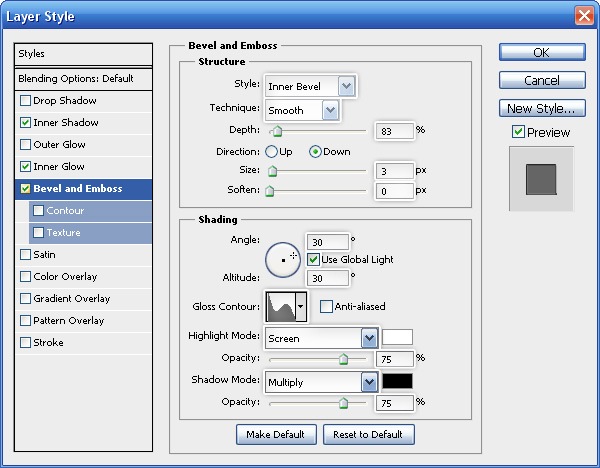
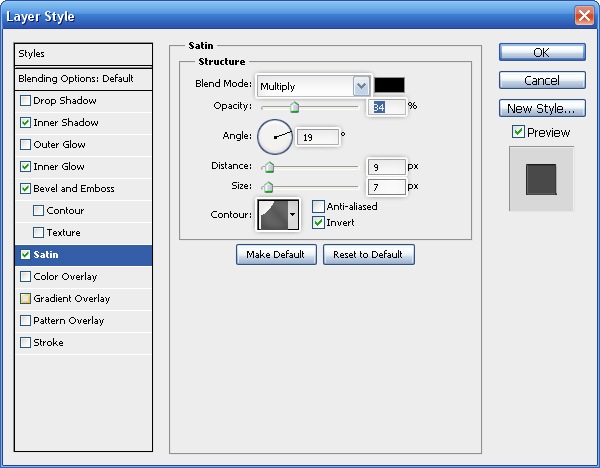
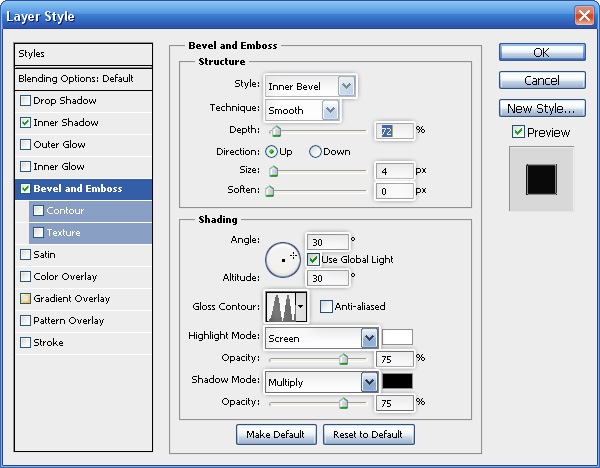
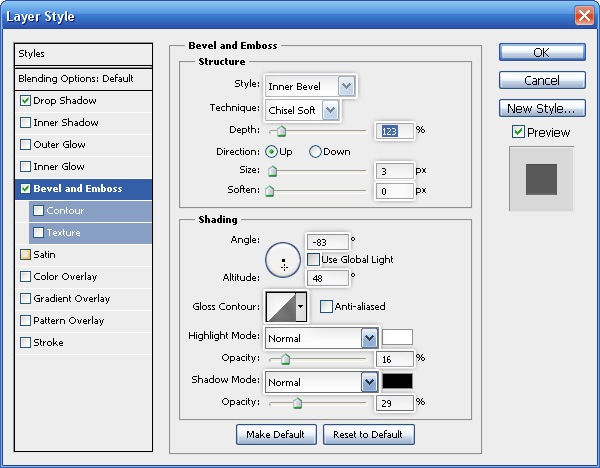
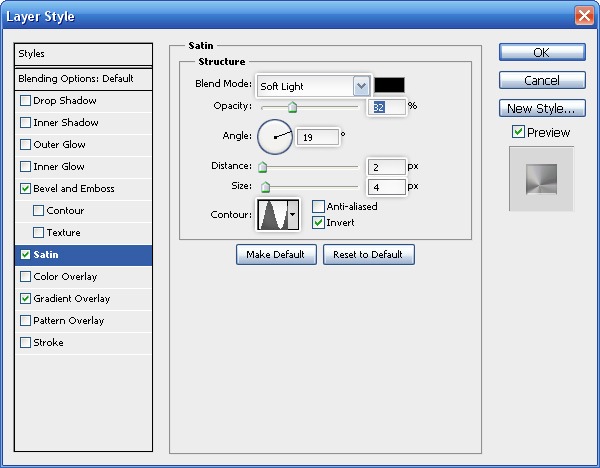
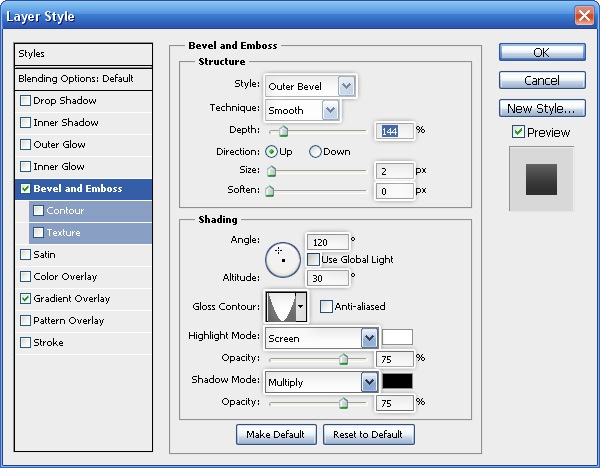
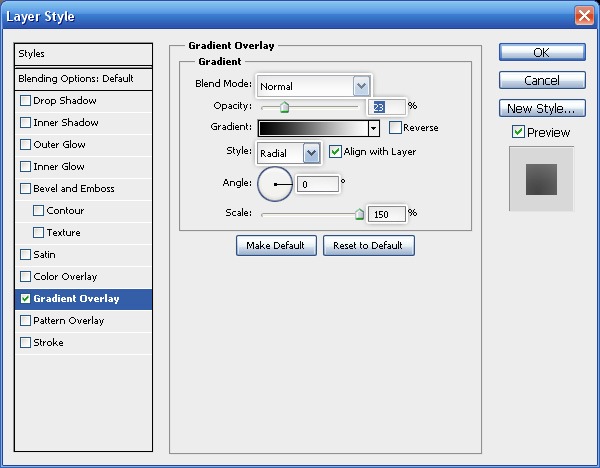
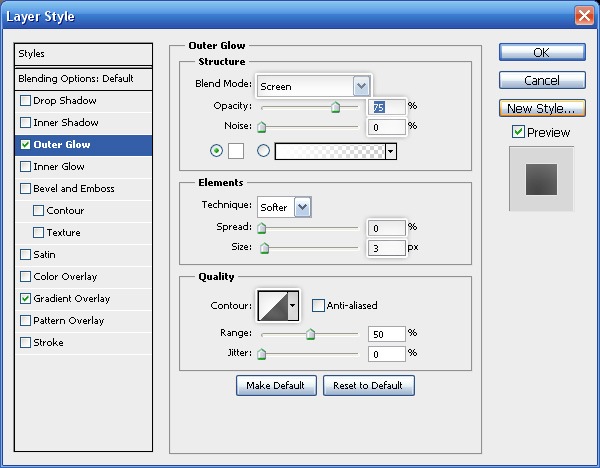
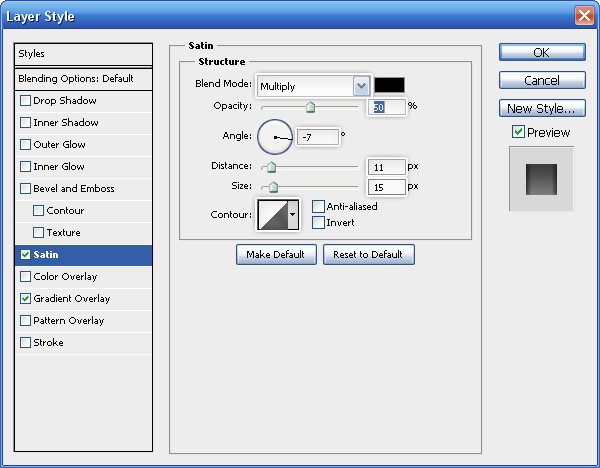
We will apply the following layer effects: Inner Shadow, Bevel and Emboss, Satin and Gradient Overlay.
Inner Shadow
Bevel and Emboss

Satin

Gradient Overlay
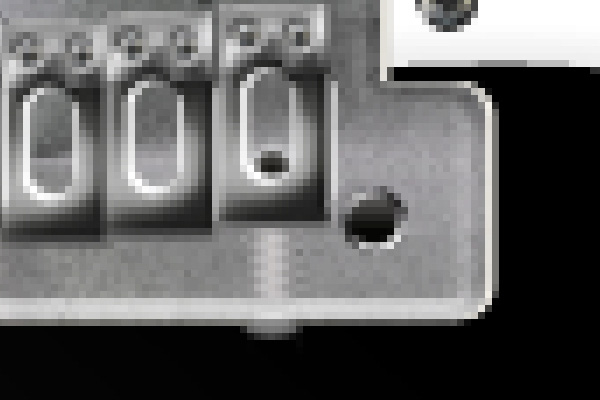
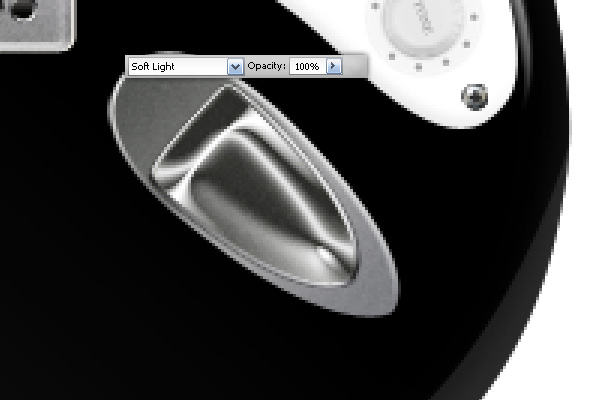
 This is what our machine head should look like now:
 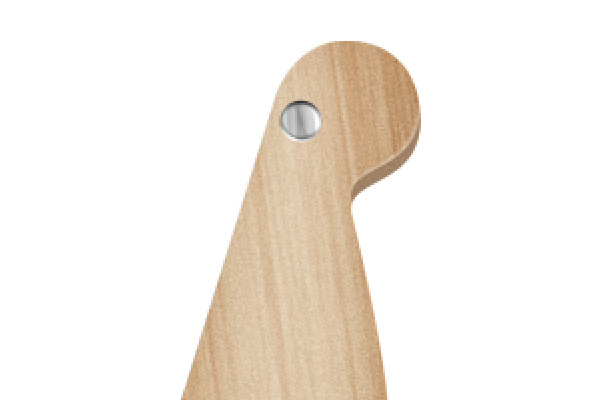 Create another circle on top of the first one using the Ellipse Tool (U).
 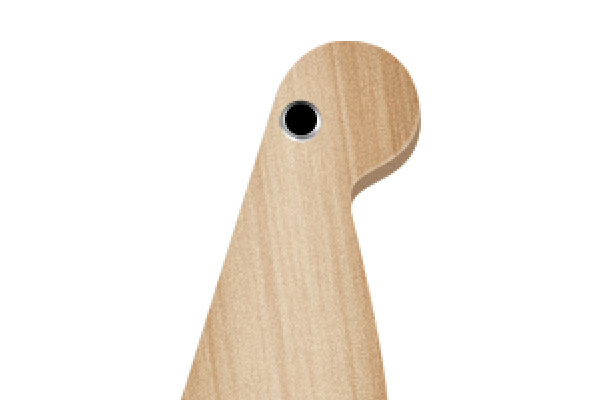 Add a new mask to the circle layer by clicking the Add layer mask button at the bottom of the Layers Panel.
 Select the Gradient Tool (G) and modify its settings in the Options Bar as needed.
 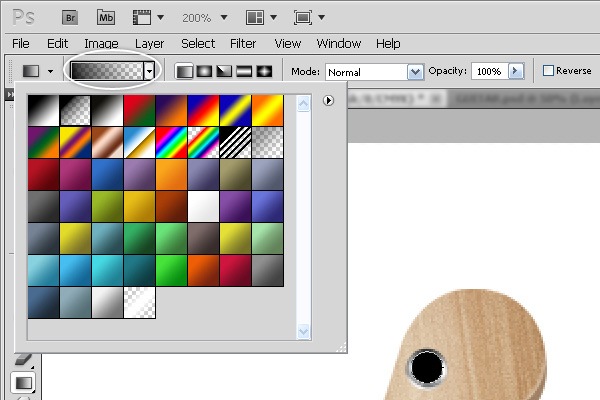 Use the Gradient Tool to create a gradient on the layer mask we just created to hide a part from the circle shape — do so by dragging from the top of the circle towards the bottom.
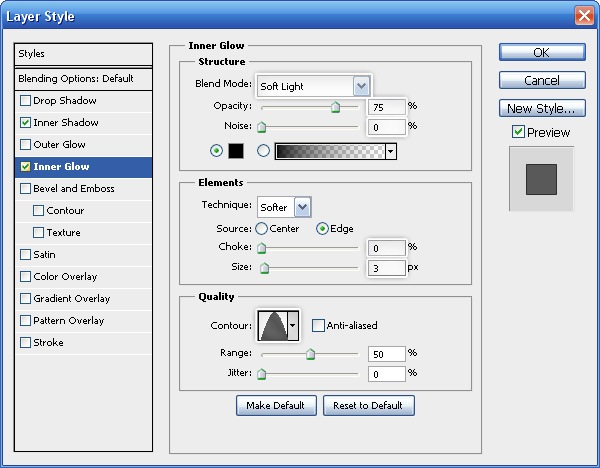
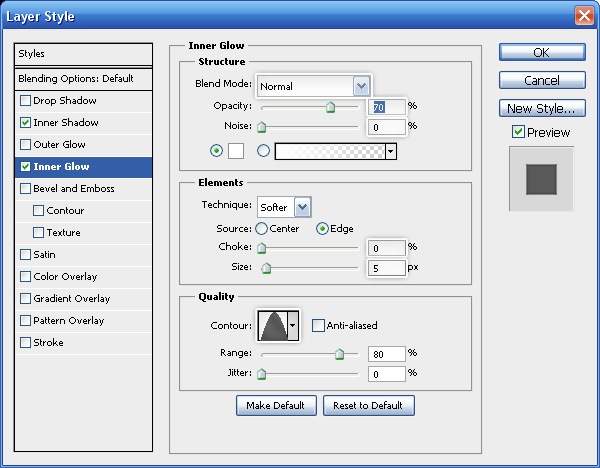
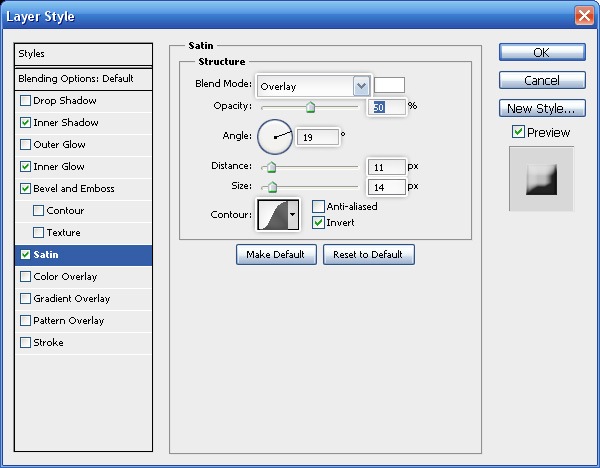
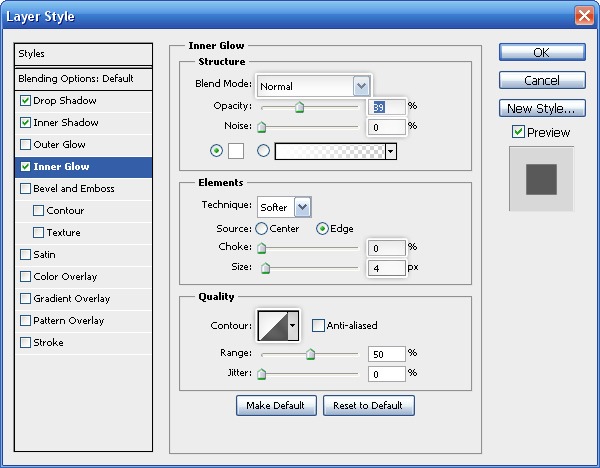
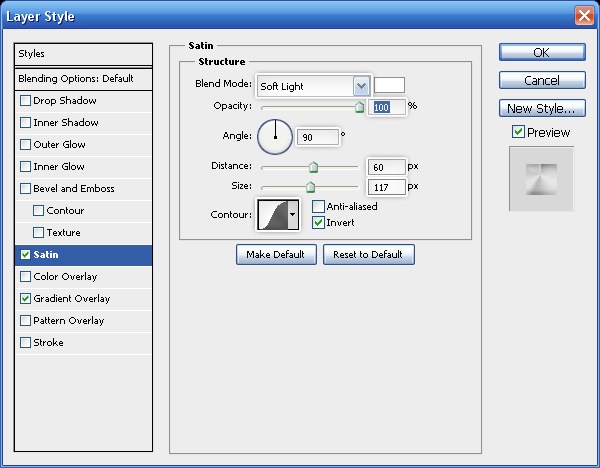
 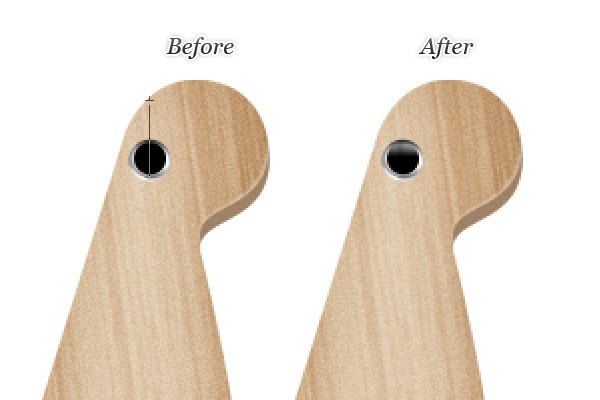 Give the layer these effects: Inner Glow, Bevel and Emboss, Satin and Gradient Overlay.
Inner Glow

Bevel and Emboss

Satin
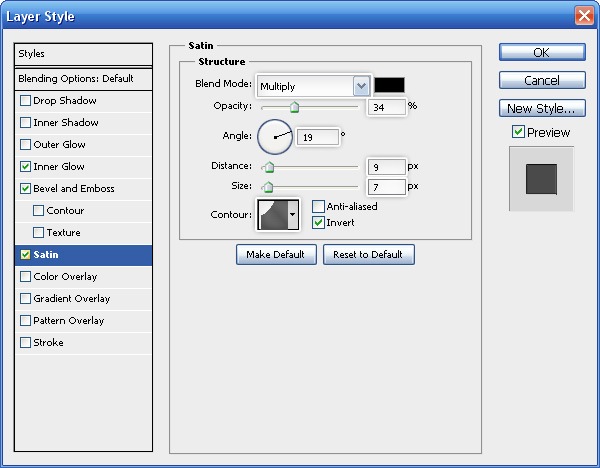
Gradient Overlay
 Create a third circle on top of the others.
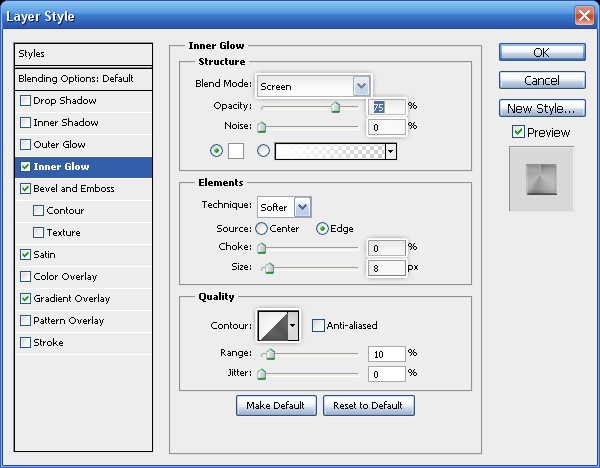
 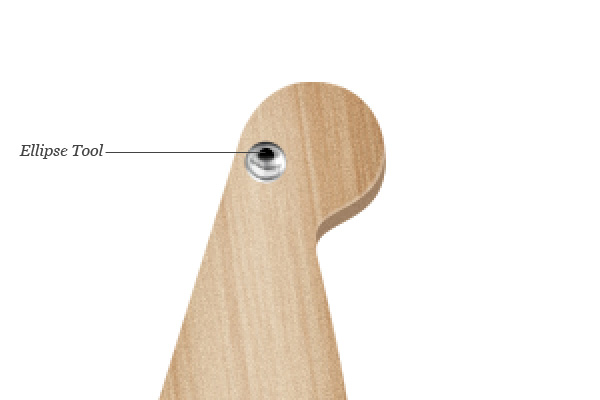 Apply these layer effects: Inner Shadow, Inner Glow, Bevel and Emboss, Satin and Gradient Overlay.
Inner Shadow

Inner Glow

Bevel and Emboss
Satin
Gradient Overlay
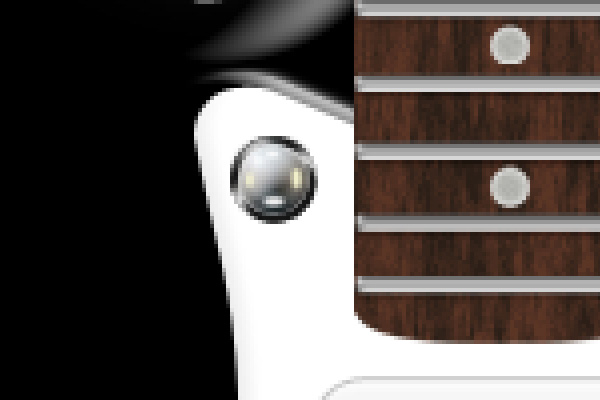
 Here is the result of the layer style we just applied:
 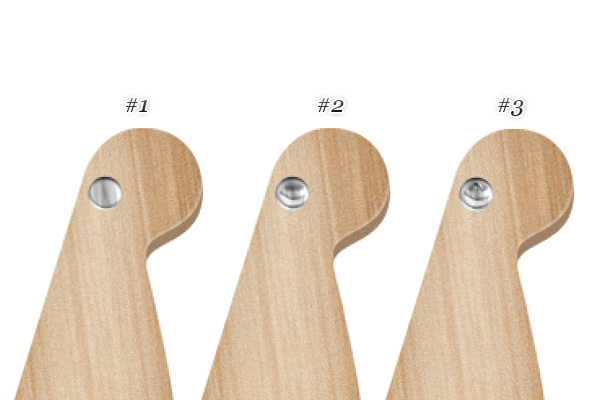 Put all the layers related to the machine head in new layer group by selecting them and pressing Ctrl/Cmd + G.
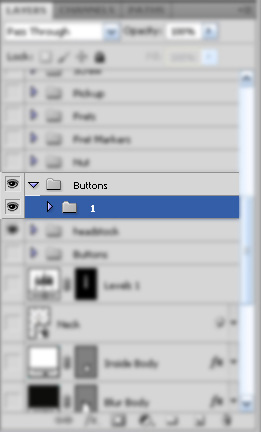 Make 5 copies of the machine head layer group so that we have a total of 6 machine heads. Position them as shown below.
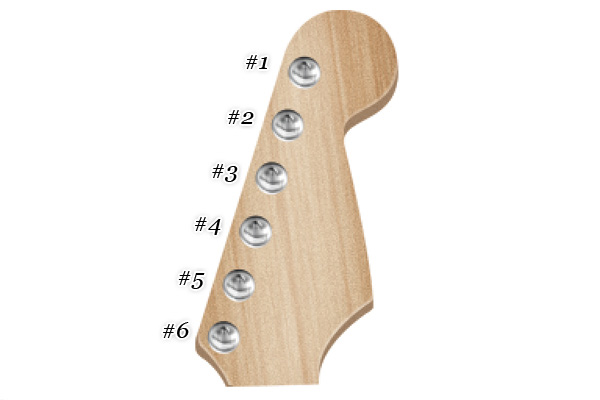
Step 4: Draw the Tuning Pegs
The tuning peg is attached to the machine head and can be rotated by the guitarist to increase or decrease the tension in the guitar strings resulting in the alteration of the tune.
We will need 6 of these. Select the Pen tool (P) and draw a tuning peg shape as shown below. 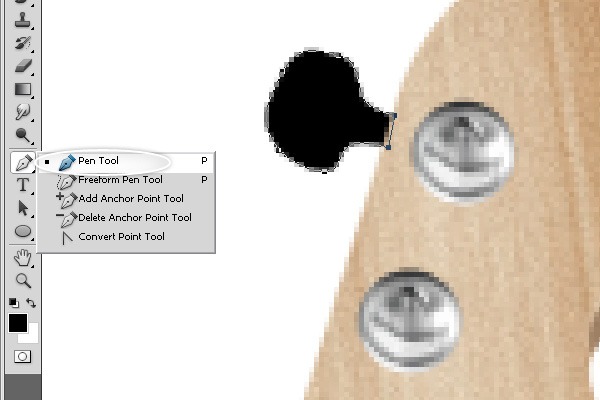 Give the shape the following layer effects: Inner Shadow, Inner Glow, Bevel and Emboss, Satin and Gradient Overlay.
Inner Shadow

Inner Glow
Bevel and Emboss

Satin

Gradient Overlay
 Use the Pen Tool (P) to draw a little shape at the bottom of the tuning peg.
 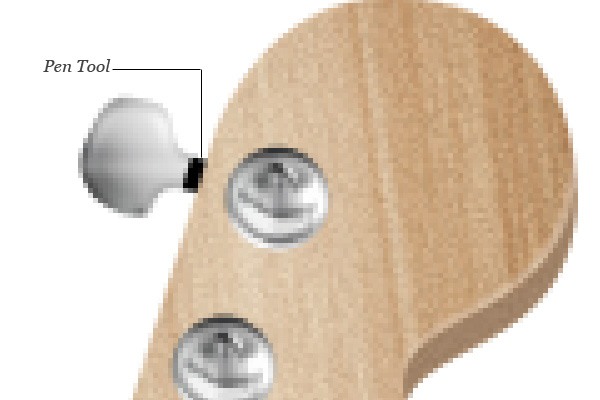 Give the layer the following layer effects: Inner Shadow, Bevel and Emboss, Satin and Gradient Overlay.
Inner Shadow
Bevel and Emboss
Satin

Gradient Overlay
 This is the result of the layer style you just applied:
 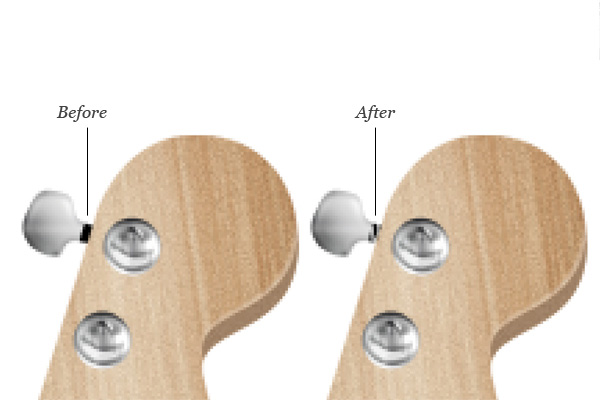 Place a selection at the edge of the tuning peg as shown below, create a new layer, and fill it with gray (#8d8c8a) by going to Edit > Fill.
Then reduce the layer’s Opacity to 30% to get the desired effect. 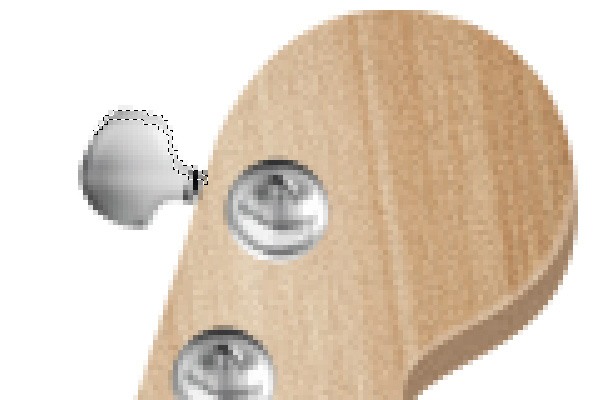
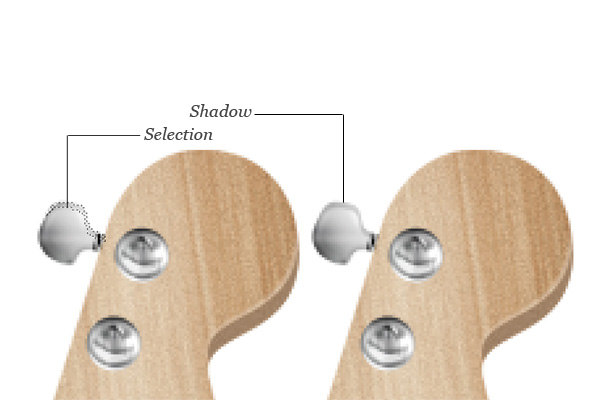 Let’s make the tuning peg closer to reality by adding some shadows on its surface; use the Brush Tool (B) to draw the shape below on a new layer.
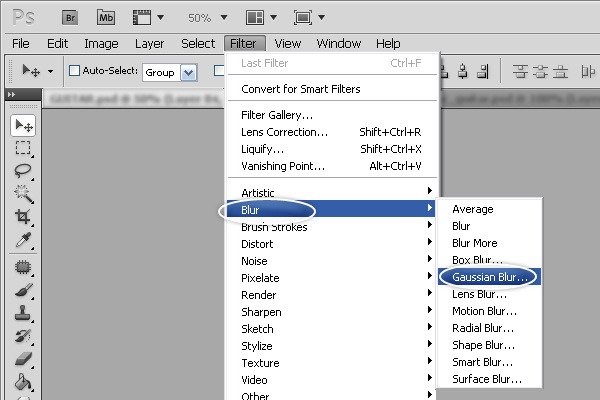
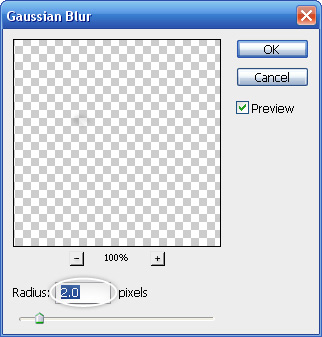
  Go to Filter > Blur > Gaussian Blur and set the filter to 2.0px Radius.
 Change the layer’s Opacity to 50%.
  Use the same technique using a lighter color to add highlights to the tuning peg’s surface.
 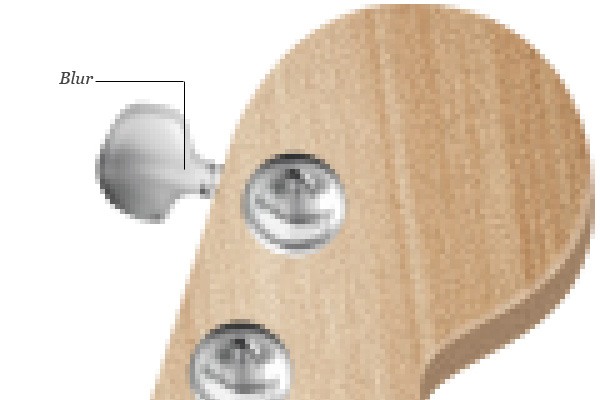 Repeat the process above to create more tuning pegs in various rotations.
Step 5: Draw Additional Chrome on the Headstock
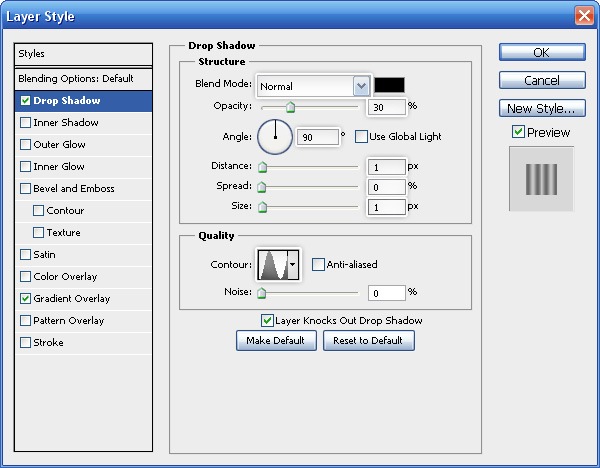
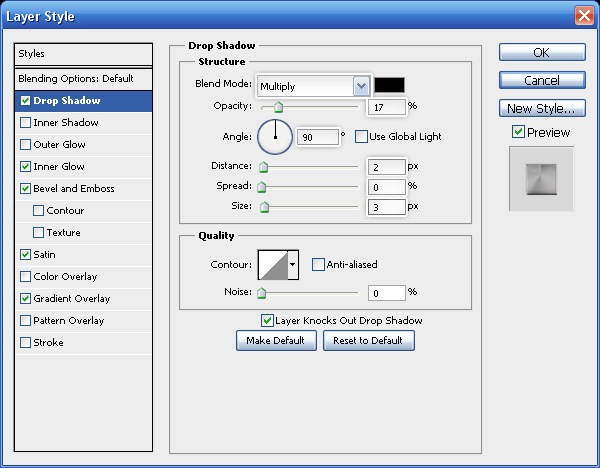
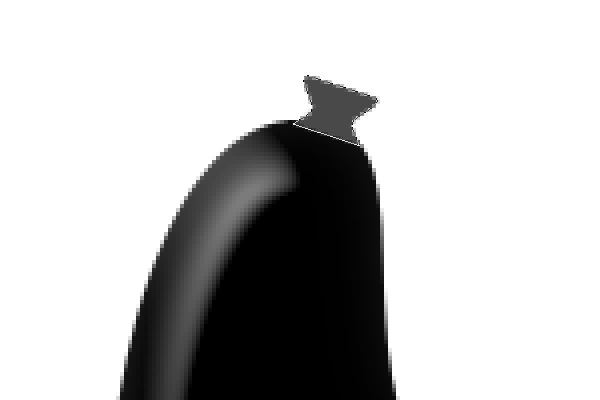
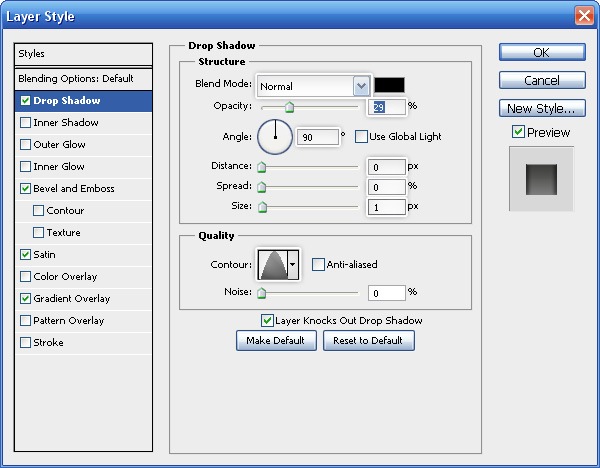
Select the Pen Tool (P) and create the small rectangular shape below. 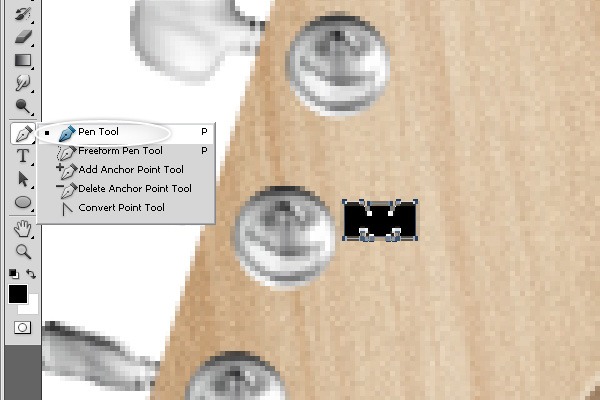 Give this layer a Gradient Overlay and a Drop Shadow.
Gradient Overlay
Drop Shadow
 This is the result of the layer style you applied above:
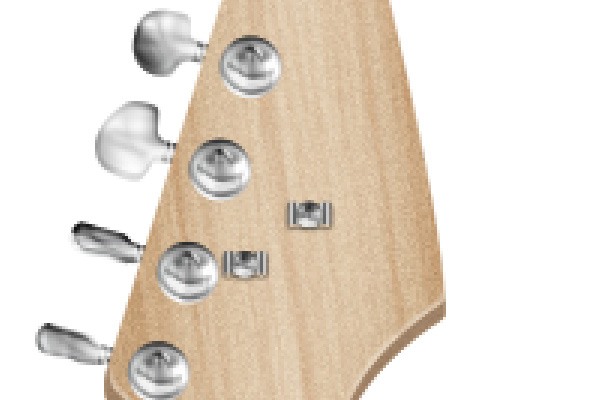
 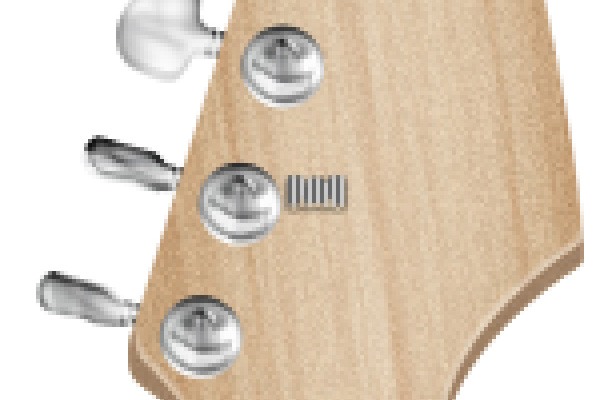 Duplicate one of the machine head layer groups and then reduce the duplicate’s size using Free Transform.
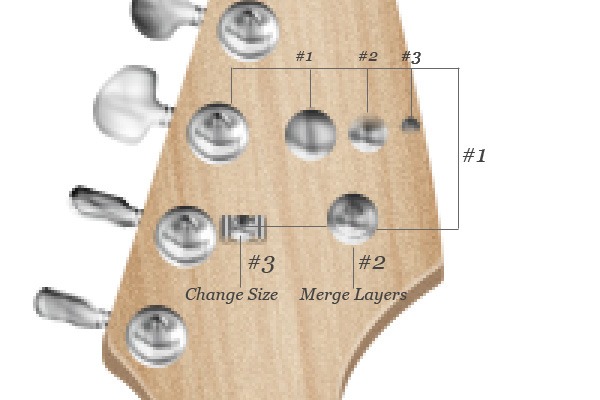 Give it a shadow by first converting the group for Smart Filters and then applying a Drop Shadow layer effect afterwards.
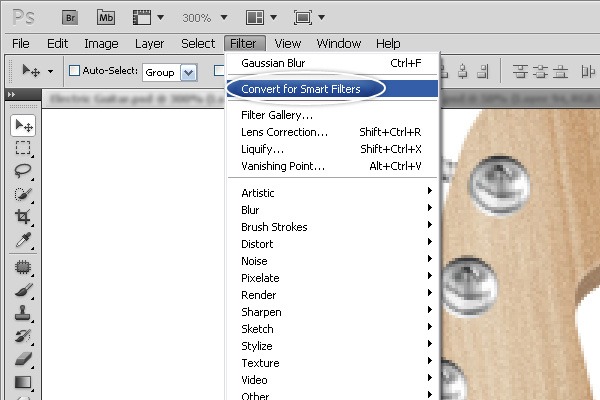
 Move it in place using the Move Tool (V).
 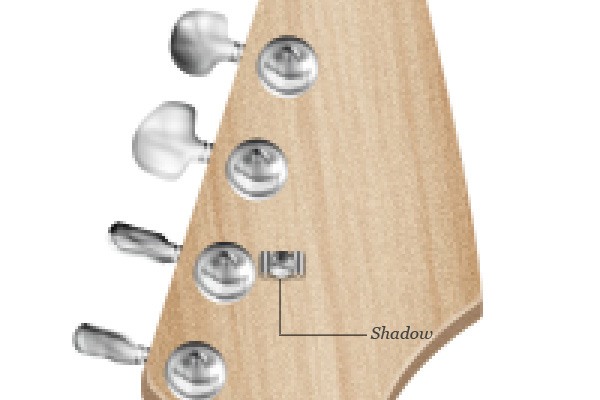 Create a copy and move it a little bit higher on the headstock.
Step 6: Draw the Nut
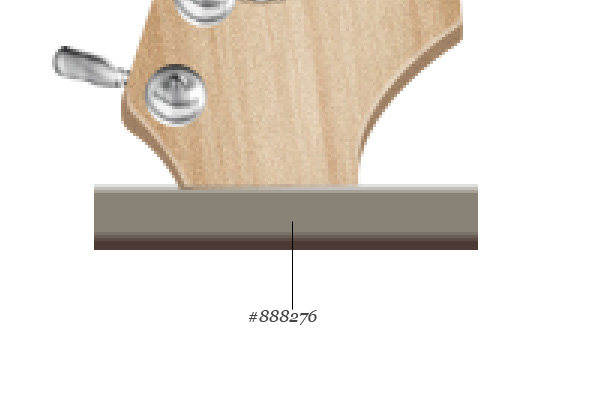
The nut is a horizontal bar at the bottom of the headstock that helps hold the guitar strings in place; it’s usually made of bone or plastic. Use your Rectangular Marquee Tool (M) to create a rectangular selection, create a new layer and then fill the layer with a brown color (#4b3a33). 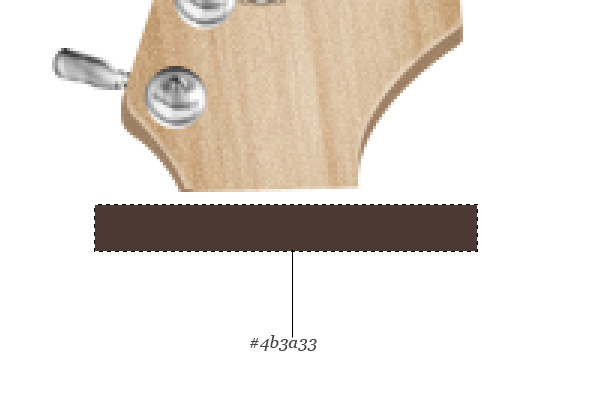 Create another layer and fill it with a gray color (#888276).
 Select both layers and alter the size using Free Transform (Ctrl/Cmd + T) so it fits exactly at the bottom of the headstock.
 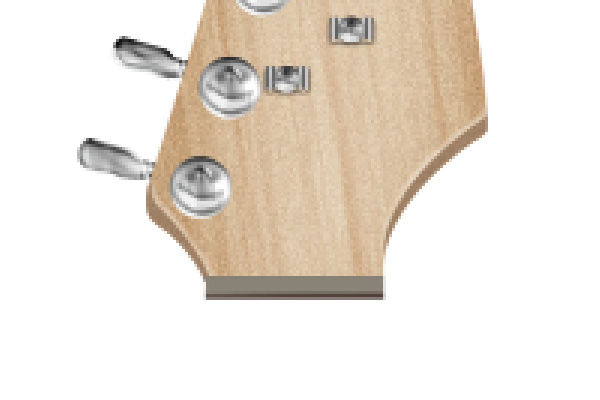 Let’s give the nut some texturing by adding noise to the layers. First, select both layers in the Layers Panel and convert them for Smart Filters.
 Go to Filter > Noise > Add Noise.
 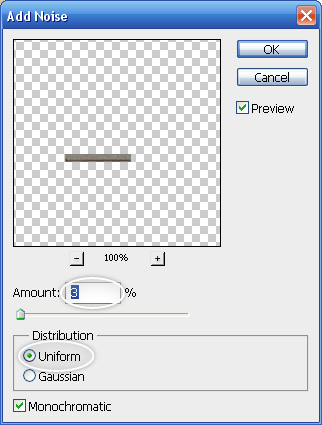 Give it a Gradient Overlay.
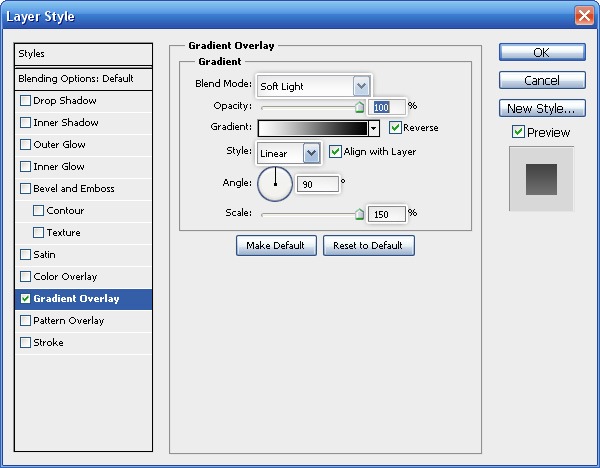
Step 7: Draw the Guitar’s Neck
Select the Pen Tool (P) and create the guitar neck shape.
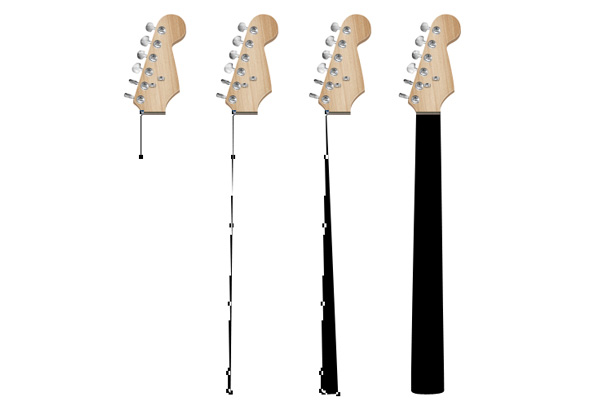 After you create the guitar neck, convert it for Smart Filters. Then, convert the layer to a Smart Object by right-clicking/Cmd-clicking on the layer in the Layers Panel and choosing Convert to Smart Object in the contextual menu that appears.
 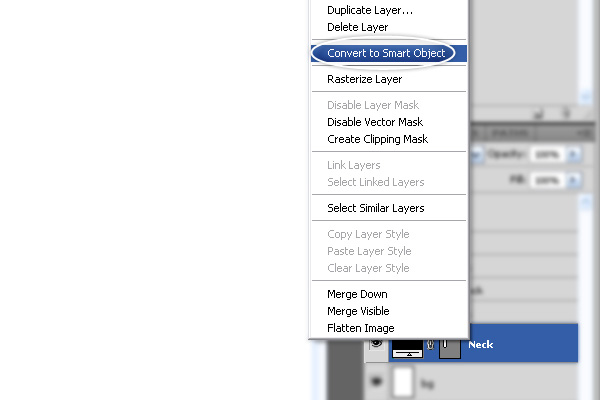 Change your Foreground color to a dark brown (#372920) and your Background color to a lighter brown (#684130).
We need to do this to set up the filter we’ll be applying next. 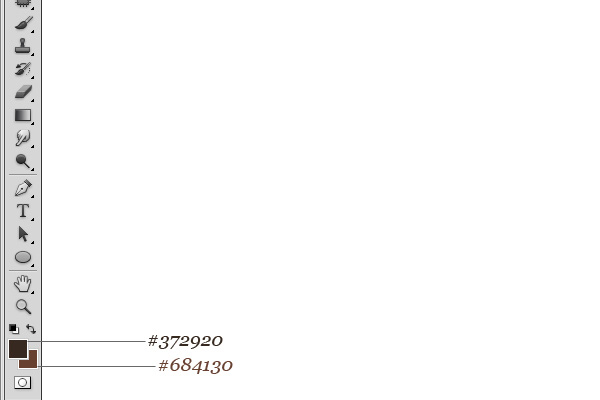 Let’s apply the filter by going to Filter > Render >Fibers.
 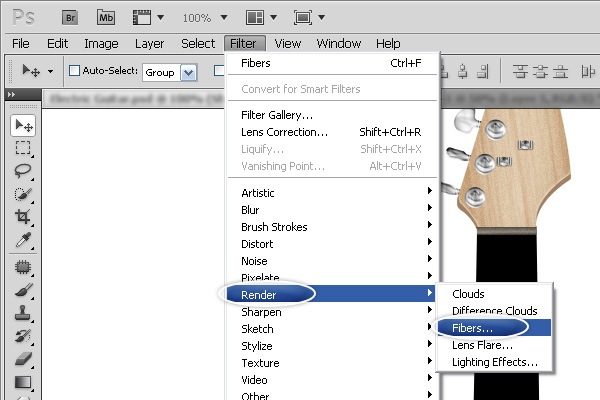 Using the following settings: Variance: 32 Strength: 4
 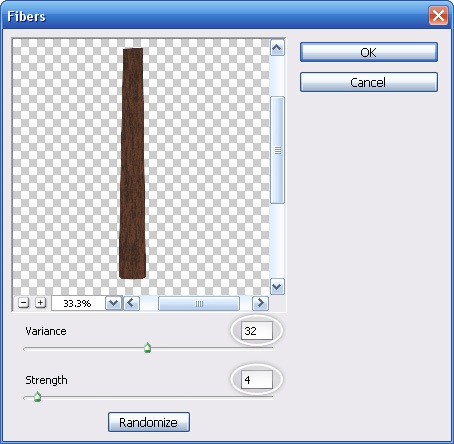 Let’s adjust the color of the guitar neck after the filter using an image adjustment.
Select the shape layer and then click on the Create new fill or adjustment layer button at the bottom of the Layers Panel to reveal a list of fill and adjustment layers and then choose Levels from the list. 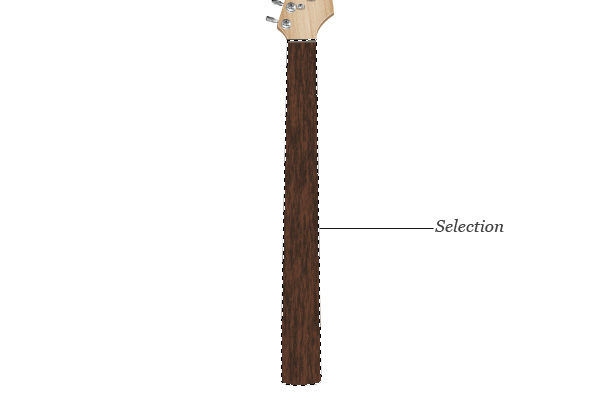
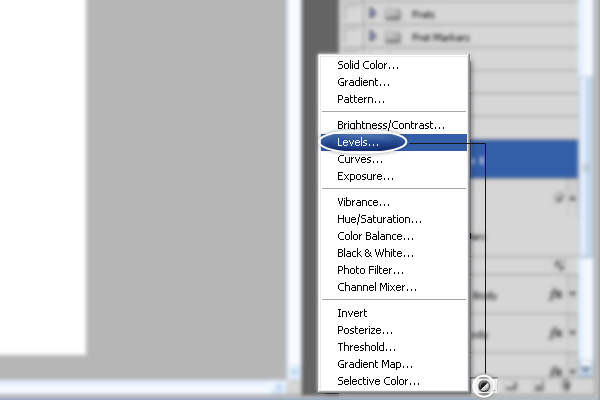 Use the image below to see what settings to use in the Adjustments Panel for our Levels adjustment layer.
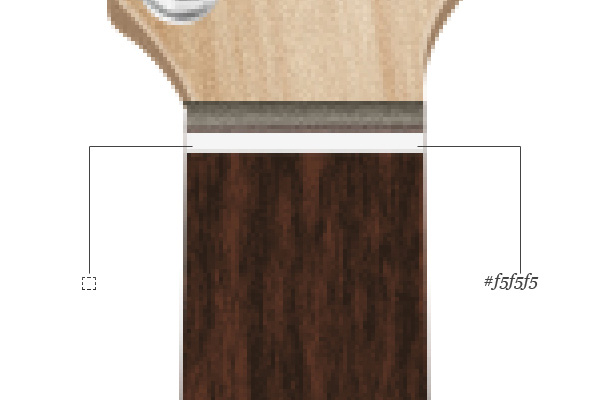
 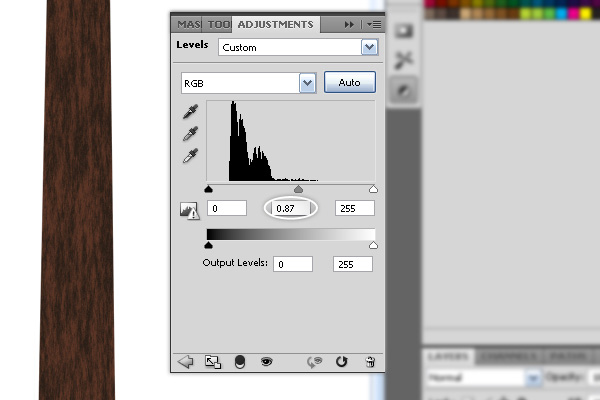 Use your Rectangular Marquee Tool (M) to make a smaller selection at the bottom of the nut, then on a new layer, fill it with an off-white color (#f5f5f5).
Step 8: Draw Frets on the Neck
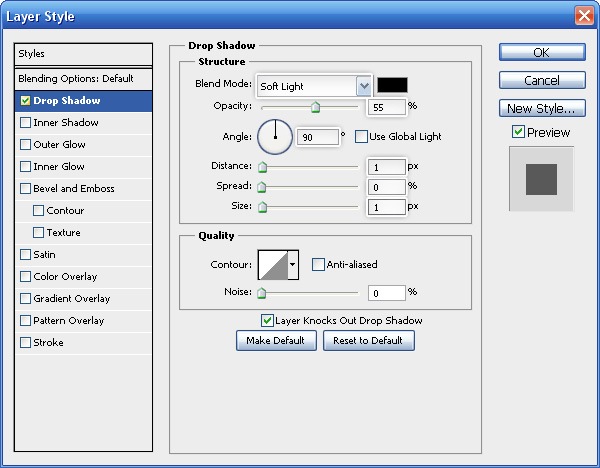
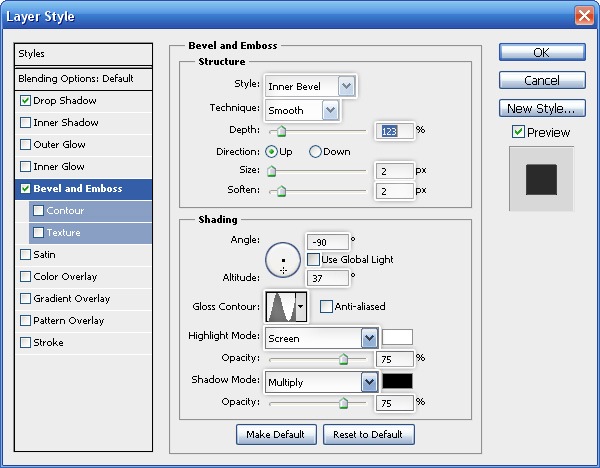
Use the Rectangle Tool (U) to draw a thin, horizontal shape across the neck of the guitar.  Give the layer a Drop Shadow and a Bevel and Emboss layer effect.
Drop Shadow
Bevel and Emboss
 This is the result of the layer style you applied to the fret shape layer:
 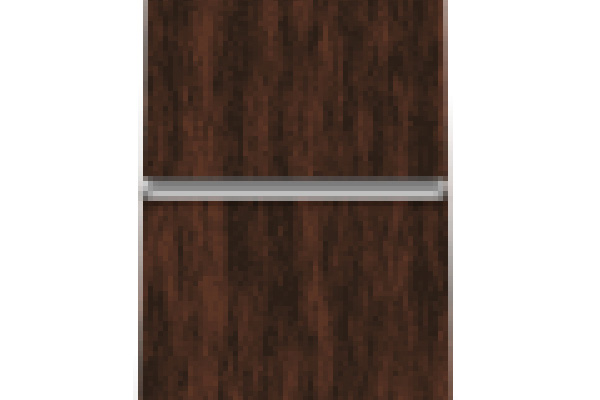 Guitars usually have 22 frets, so copy the fret shape we just created 21 times.
Move them in their proper place and use Free Transform (Ctrl/Cmd + T) to modify their widths as needed. 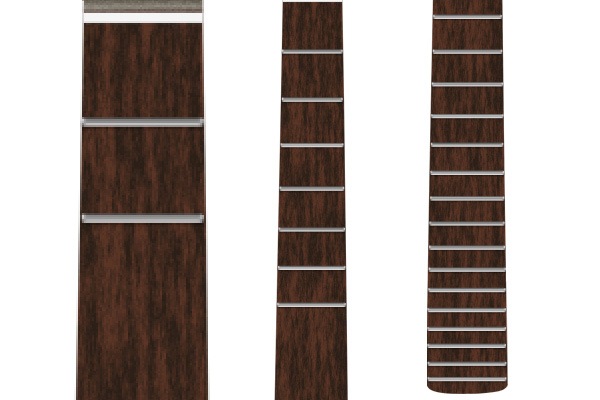
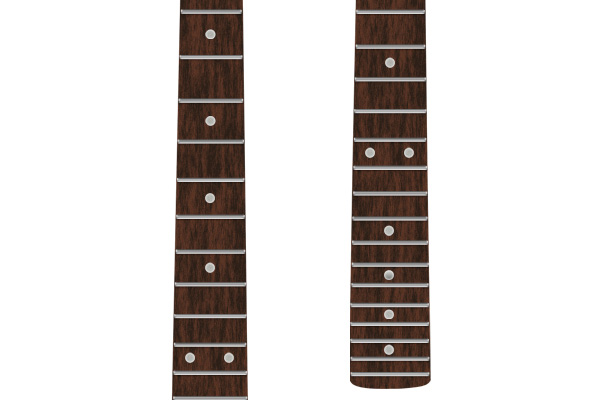
Step 9: Add Fret Markers
Select the Ellipse Tool (U) and draw a small circle in between frets. Change the color of the shape to a gray color (#b2b3ae).
 Double-click on the layer to open the Layer Style dialog window and then give the layer an Inner Glow.
  Run the Noise filter on the layer.
 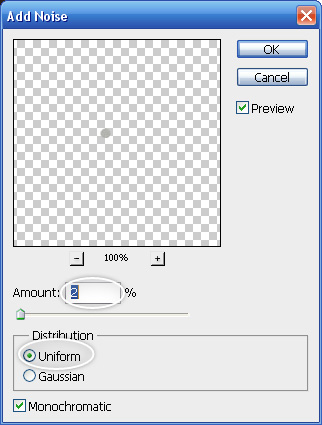 Create more fret markers and position them accordingly.
Step 10: Draw the Guitar’s Body
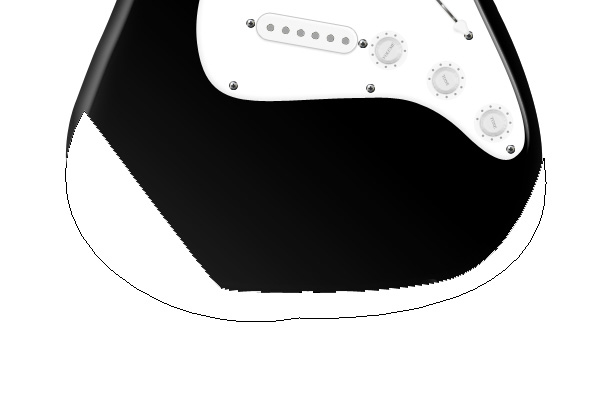
Use the Pen Tool (U) to create the guitar body shape (make sure to set the fill to black). Use the following images to help you draw the shape. 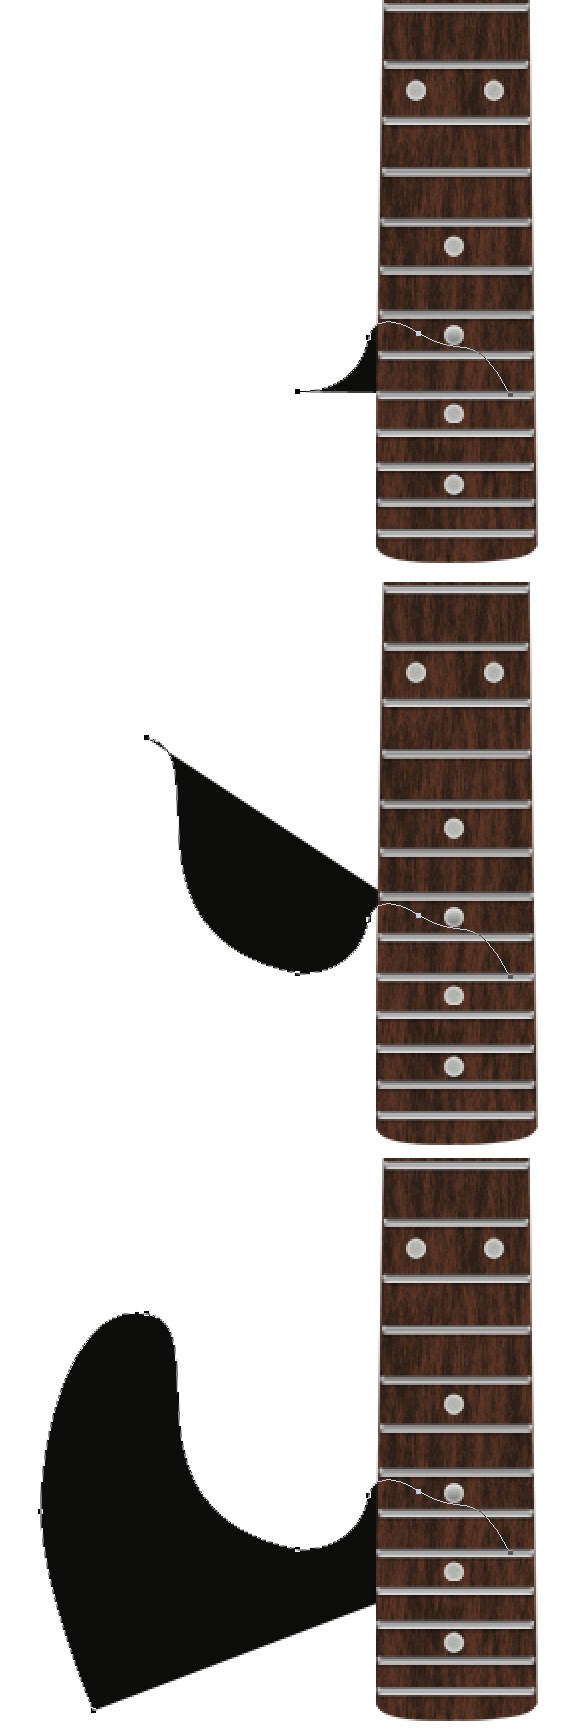
 After you draw the shape, apply the following layer effects: Gradient Overlay, Satin and Inner Shadow.
Gradient Overlay

Satin

Inner Shadow
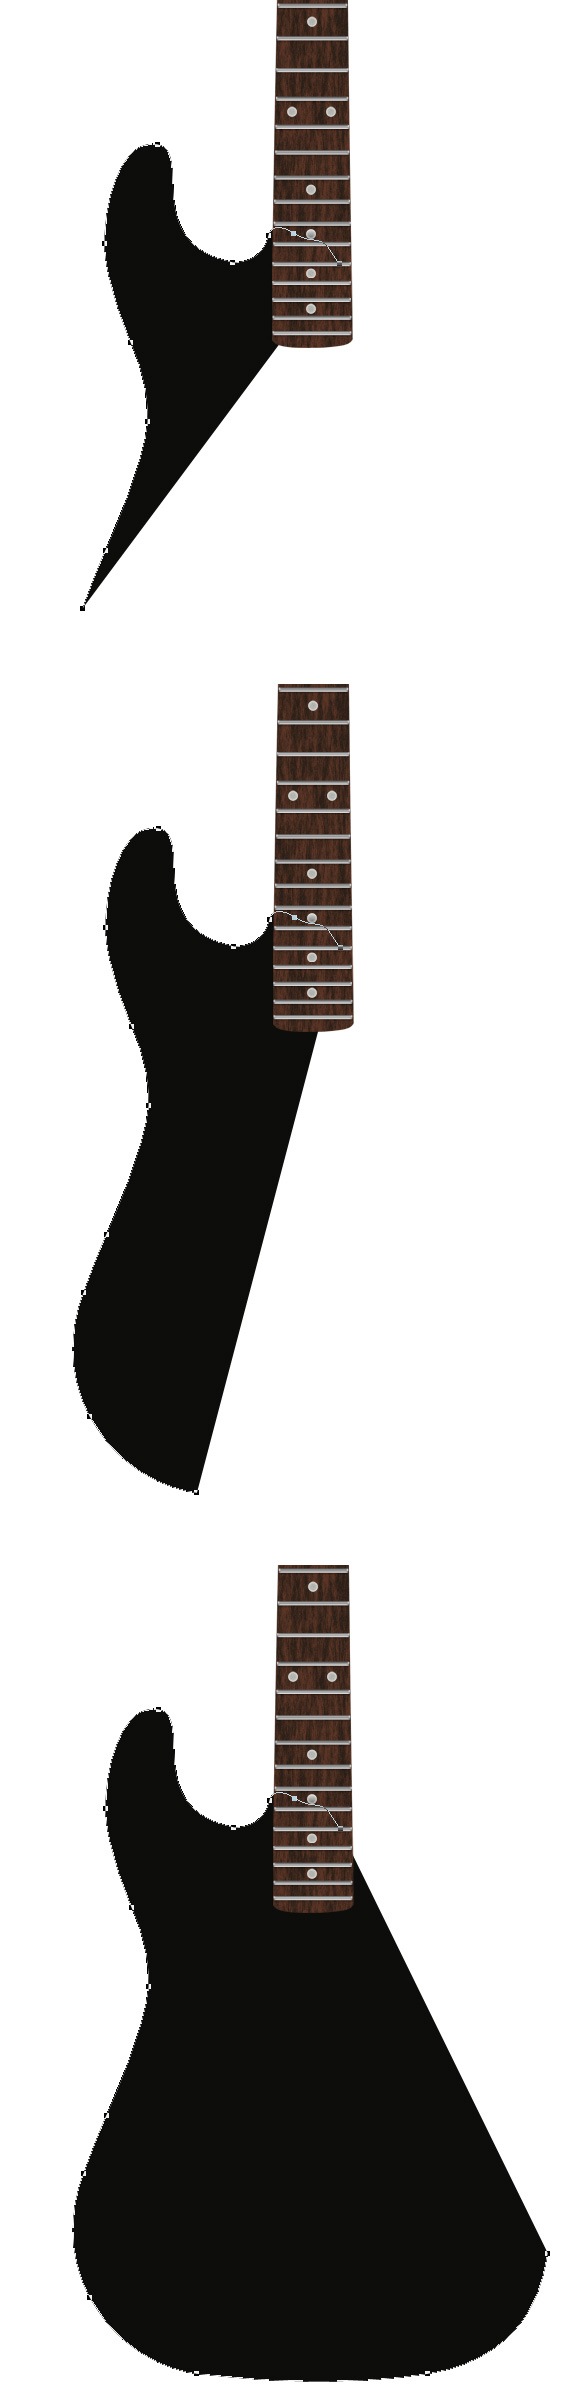
 Let’s make the body more realistic. Duplicate the guitar body layer.
 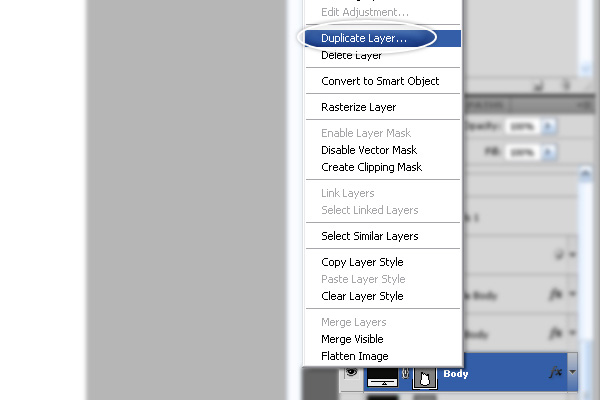 Before moving forward, set the Fill opacity of the layer we just duplicated to 0%.
After doing that, give the layer a Bevel and Emboss layer effect. 
Step 11: Draw the Pick Guard
The pick guard is a plate on top of the guitar body that protects the surface from scratches. It’s usually made of plastic and is screwed on so that you can replace it any time, typically when it gets too scratched, worn or broken.
The pick guard on our electric guitar will be white, which is the classic color of pick guards on Stratocaster-type electric guitars (though you can get pick guards in various colors and surface finishing). Select the Pen Tool (P) and start drawing the pick guard (as shown below). 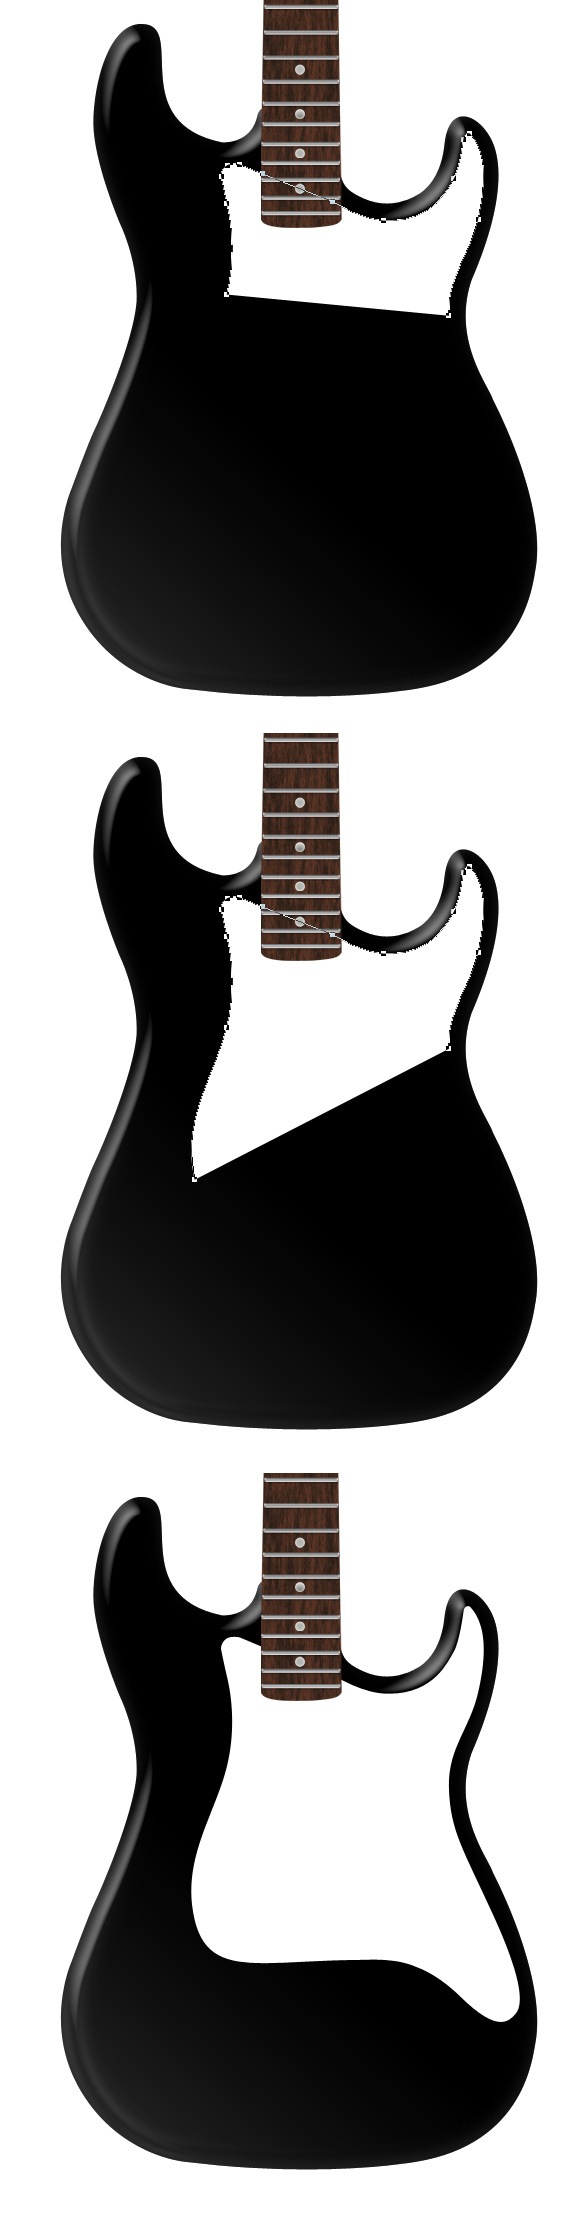 After you create the pick guard’s shape, we will give it a Bevel and Emboss to make it appear elevated, giving our guitar body some depth.
 This is the result of the Bevel and Emboss layer effect you applied above:
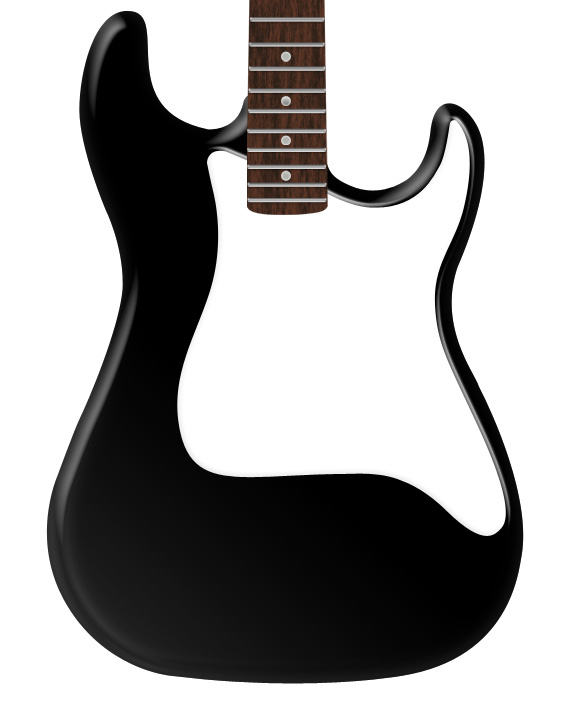
Step 12: Draw the Guitar’s Pickups
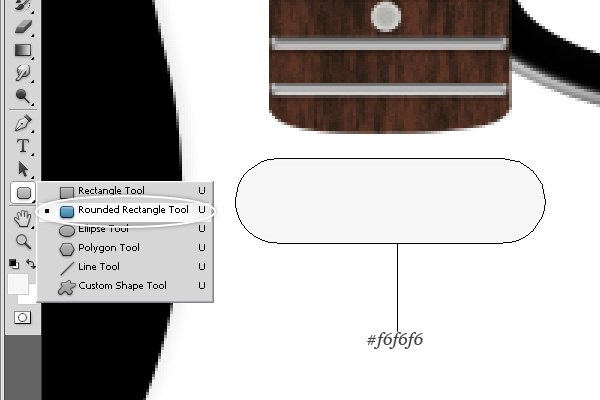
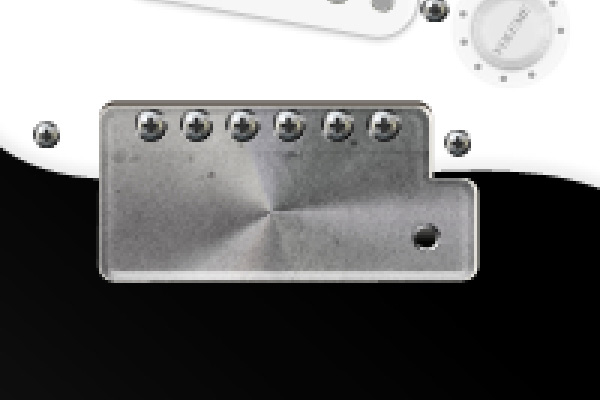
Next up, we will draw pickups, which are a set of receivers that picks up the vibrations of the guitar strings, allowing electric guitars to make music that can be amplified using an external sound system like an amplifier. Use the Rounded Rectangle Tool (U) to create the guitar bass pickup. Set the Fill color of the tool to an off-white (#f6f6f6) and draw the shape shown below.
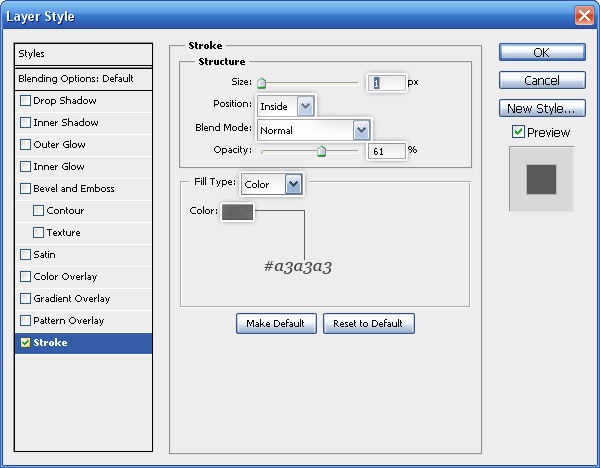
 Let’s give this shape layer these layer effects: Stroke, Inner Shadow and Drop Shadow.
Stroke
Inner Shadow

Drop Shadow
 Use the Ellipse Tool (U) to make 6 circles inside the shape (corresponding to the 6 strings of a guitar).
 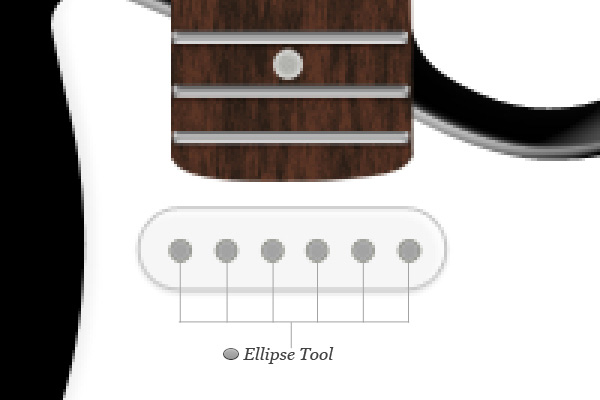 Place all the layers of the bass pick up into a new layer group, name the layer group “Bass Pickup”, duplicate the “Bass Pickup” layer group 2 times, and then rename one of the duplicates to “Medium Pickup” and the other to “Treble Pickup”. Use the Move Tool (V) to position your pickups as shown below. Notice that the lowest guitar pickup, the “Treble Pickup”, is slightly angled; use Free Transform (Ctrl/Cmd + T) to rotate it in order to match the results below.
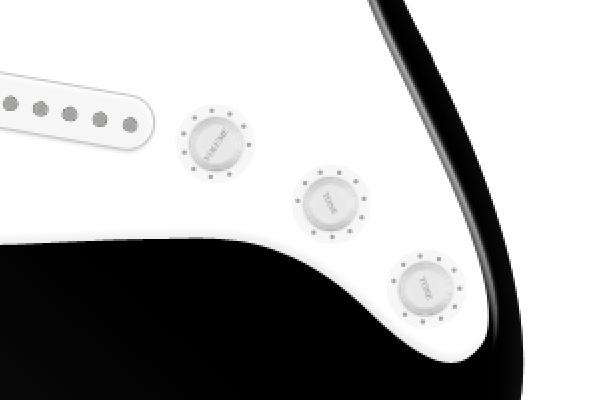
Step 13: Draw Tone/Volume Controls
The tone and volume controls are round knobs (made of plastic or metal, depending on the electric guitar) that can be rotated to control the volume.
Each pickup has its own volume control, which can allow the guitarist to fine-tune his sound. To start, choose the Ellipse Tool (U) from the Tools Panel and make a small circle on the right of the lowest pickup. 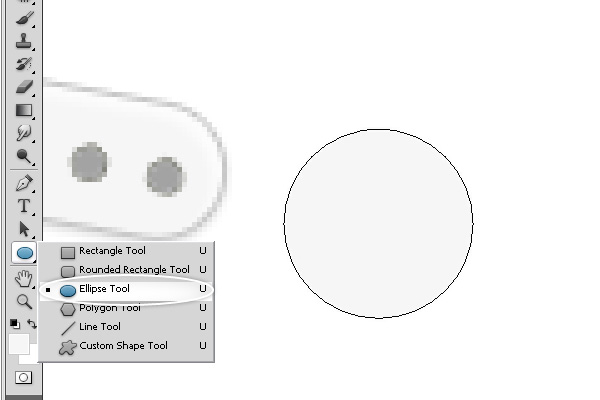 Give the layer these effects: Drop Shadow and Inner Glow.
Drop Shadow

Inner Glow
 Use the Ellipse Tool again to make very small circles arranged in a circular fashion, inside the bigger circle.
 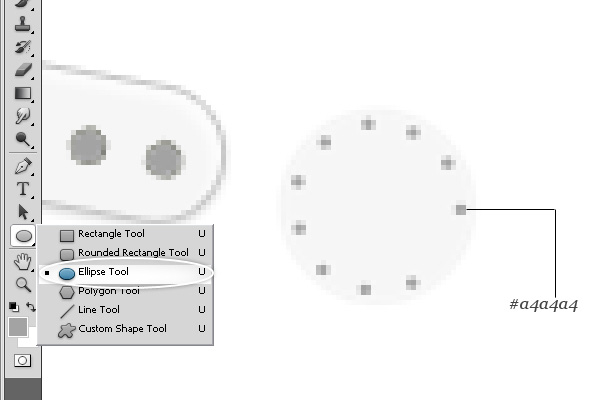 Create an inner circle using the Ellipse Tool (U).
  Let’s give the inner circle these layer effects: Drop Shadow, Bevel and Emboss and Satin.
Drop Shadow

Bevel and Emboss
Satin
 This is what the tone/volume control should look like now:
 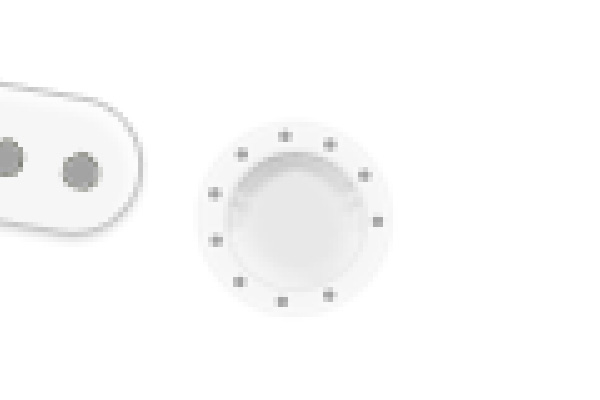 Duplicate the inner circle shape and then change the Fill of the duplicate layer to 0%.
 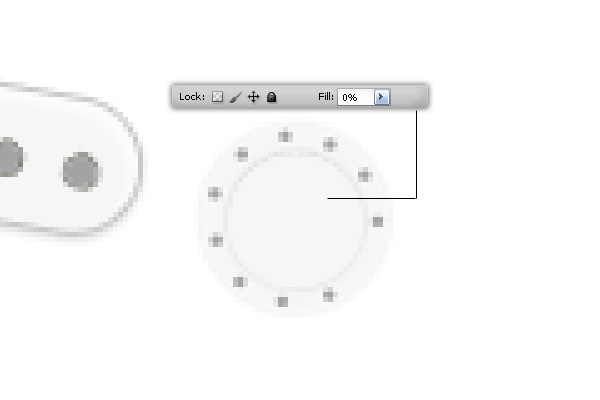 Give it a Bevel and Emboss layer effect.
 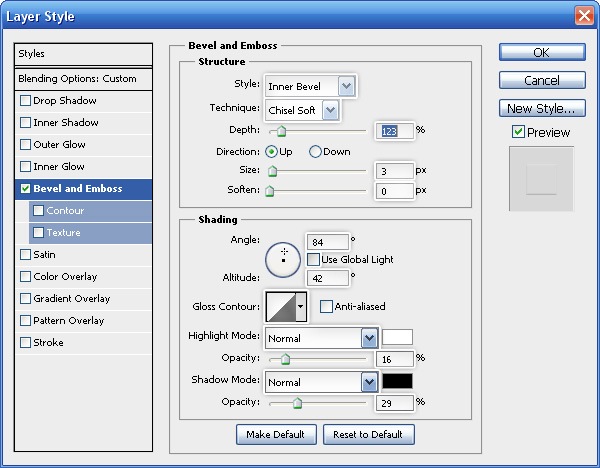 This is the result:
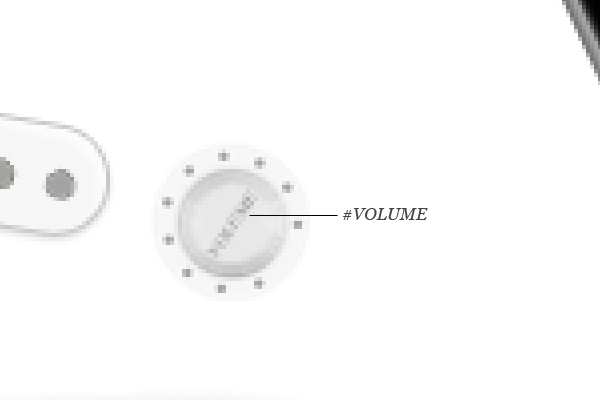
 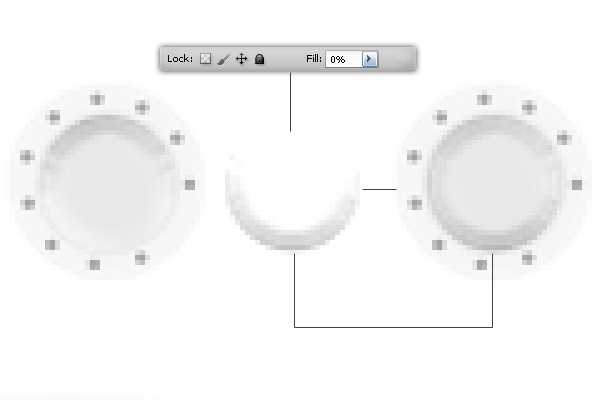 Use the Horizontal Type Tool (T) to write the word “VOLUME” at the center of the volume control.
 Place all layers inside a new layer group called “Volume Control”. Duplicate the “Volume Control” layer group twice, renaming them both to “Tone”. Use Free Transform to rotate the other controls to give them variations. Also change the text from “VOLUME” to “TONE”.
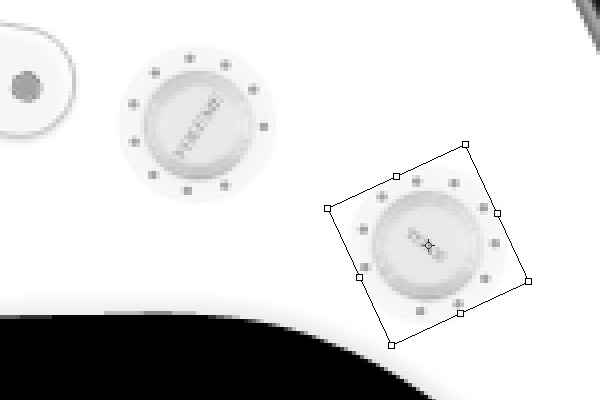
Step 14: Draw the Pick Guard Screws
Earlier, when we created the guitar’s pick guard, I said that it was bolted onto the guitar body by screws. We’ll create realistic screws in Photoshop, and the technique I’m going to show you can be used in numerous ways. Let’s start by drawing a small circle using the Ellipse Tool (U).
 Let’s give the small circle these layer effects: Inner Shadow, Inner Glow, Bevel and Emboss, Satin and Stroke.
Inner Shadow

Inner Glow
Bevel and Emboss

Satin
Stroke
 Use Lasso Tool (L) to make the selection shown below inside the circle.
 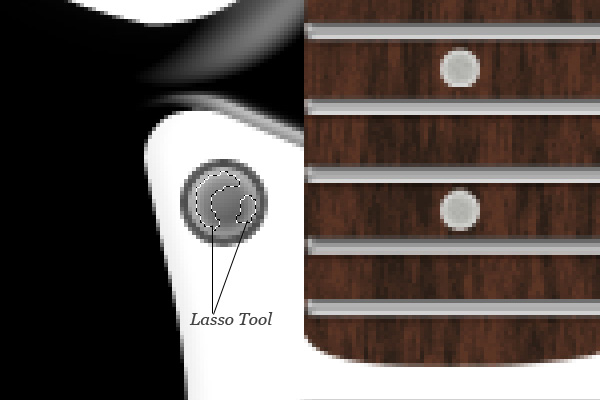 On a new layer, fill the lasso selection with white (#ffffff) and also change the Opacity of the layer to 50%.
 Create another circle inside the screw, and then give it a Bevel and Emboss layer effect.
 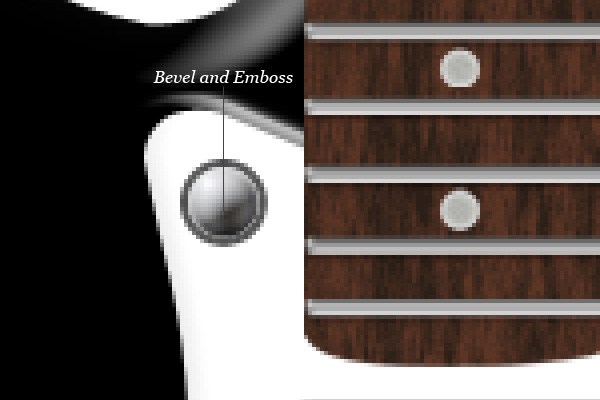 Create highlights manually by using the Lasso Tool (M) to make the highlight’s shape, filling the selection with white on a new layer, then using the Blur filter to soften the edge.
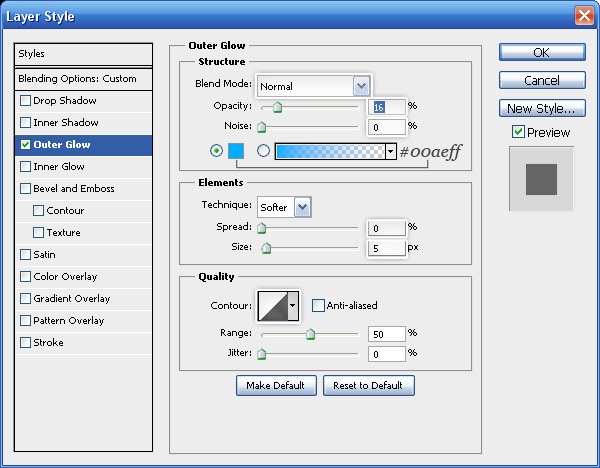
 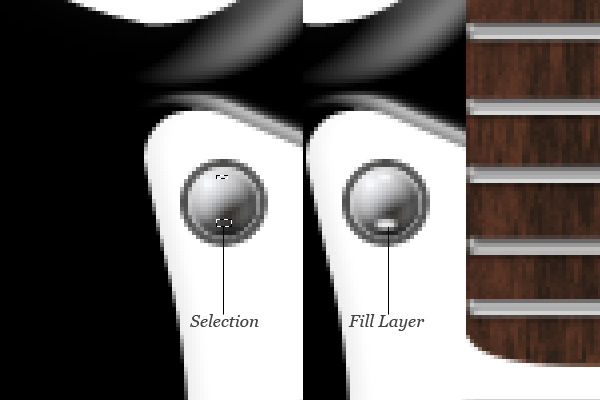 Let’s add an Outer Glow layer effect by going to Layer > Layer Style > Outer Glow.
 This is what we have thus far:
 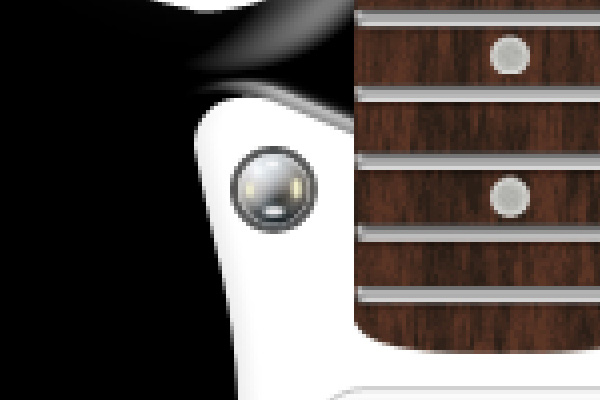 Create another circle using the Ellipse Tool (U).
 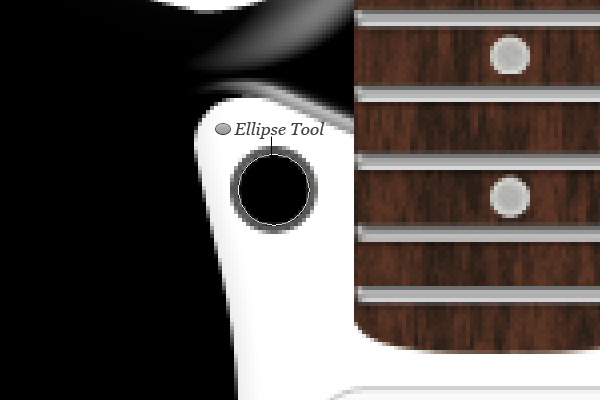 You have to change the Fill of the layer to 0% to make it a transparent shape.
 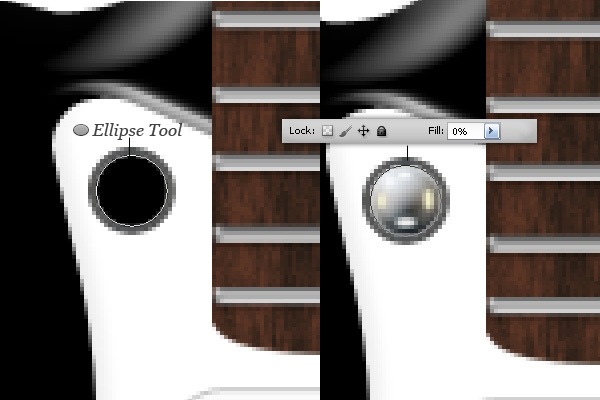 Next, give it a Bevel and Emboss layer effect.

 We now need the grooves inside the screw. Use your Rectangle Tool (U) to create a vertical rectangle (shown below).
 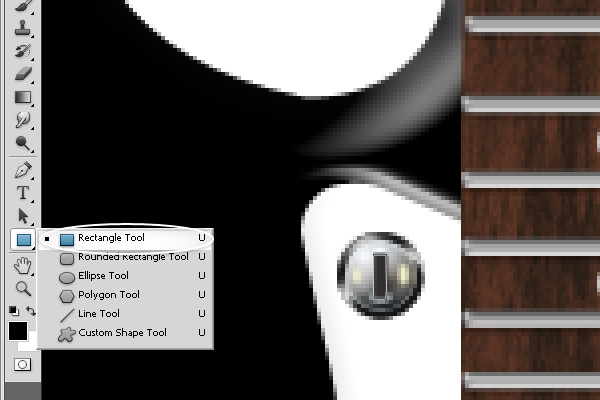 Next, we will duplicate the rectangle.
To do so, we must use the Path Selection Tool (A) to select all 4 anchor points at the corners of the rectangle.  Once selected, copy the path (Ctrl/Cmd + C) and then paste (Ctrl/Cmd + V). Right-click inside the shape and a contextual menu should appear; choose Free Transform Path in the menu, right-click again and choose Rotate 90o CCW.
  Use the Path Selection Tool (A) to select the shape.
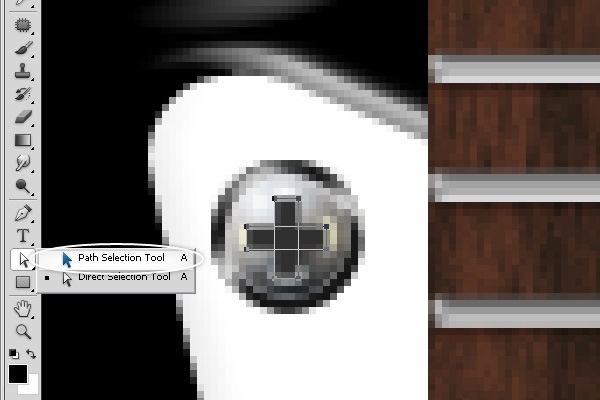 In the Options Bar, click on the Combine button to combine the paths.
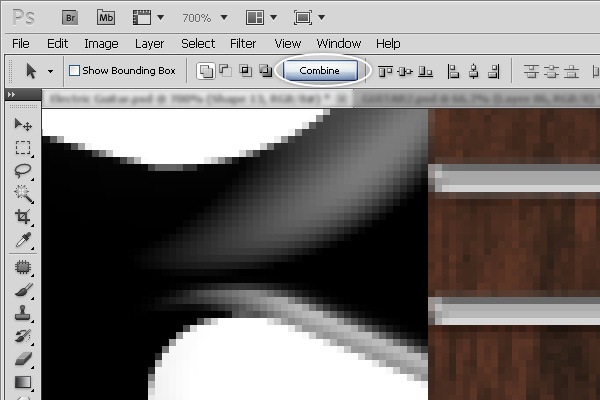
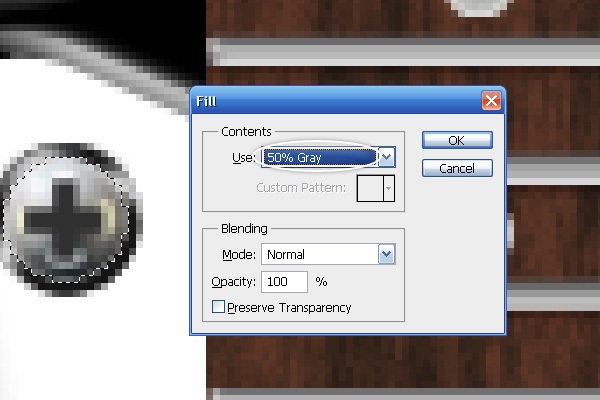
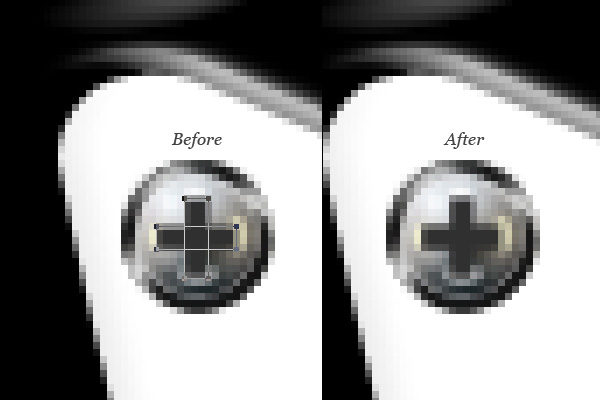 Let’s give the screw some texturing. Place a selection around the inner circle shape by Ctrl-clicking/Cmd-clicking on the layer’s thumbnail in the Layers Panel, create a new layer and then fill the selection with 50% Gray by choosing Edit > Fill.
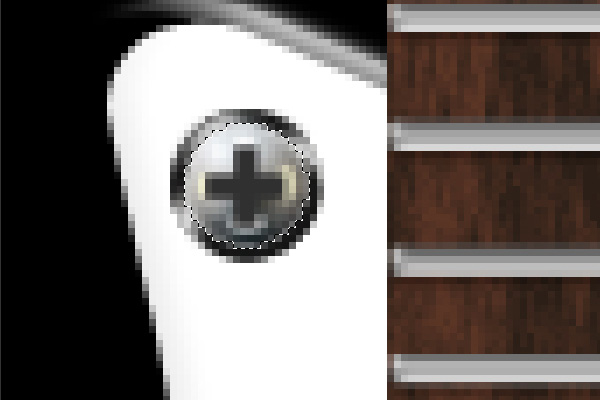
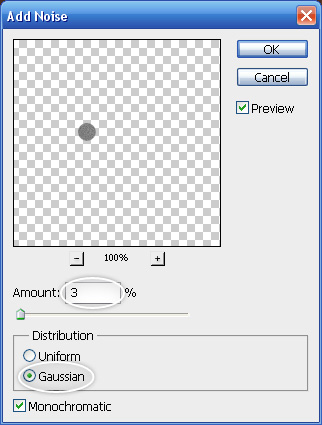
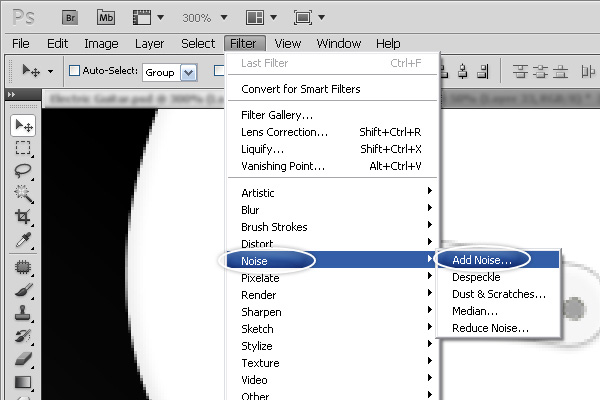
 Go to Filter > Noise > Add Noise.
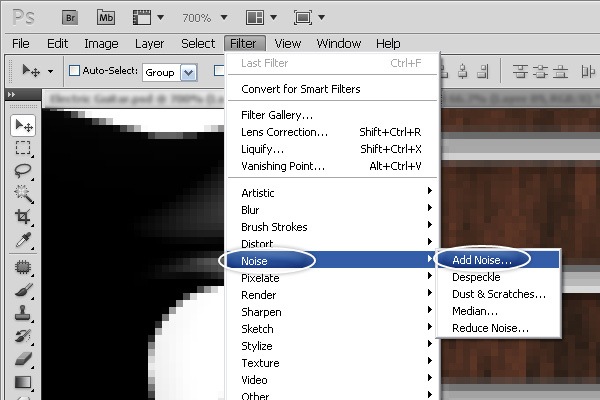
 After applying the Noise filter, change the Blend Mode of the layer to Soft Light and Opacity to 50%.
 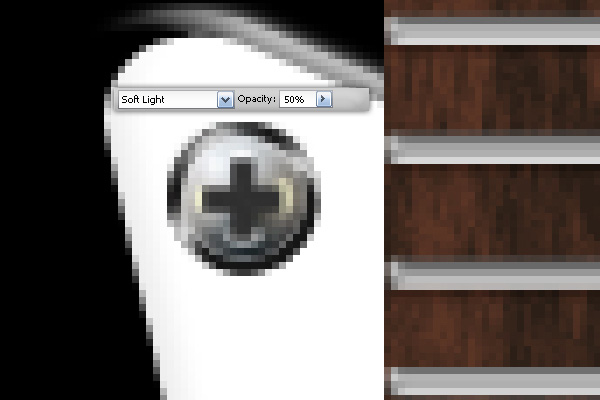 Place all the layers of the screw into a layer group.
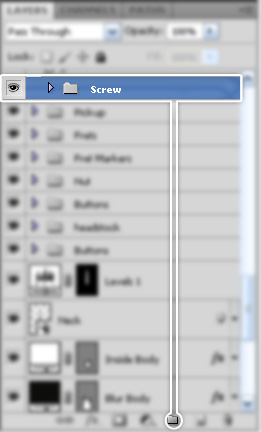 Convert that group for Smart Filters.
 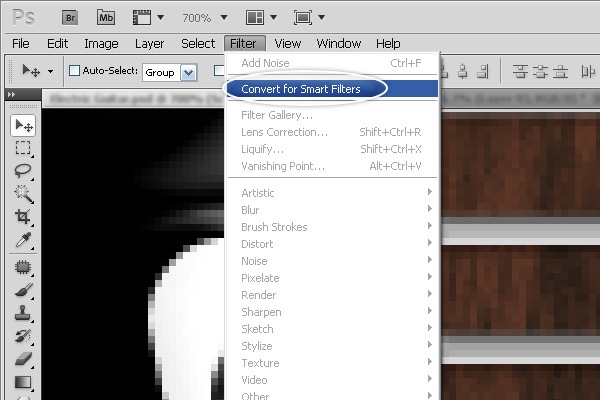 Use Free Transform to resize the screw as needed.
  Hold down Ctrl/Cmd and then, on the canvas, click-and-drag on the screw, which will duplicate the screw.
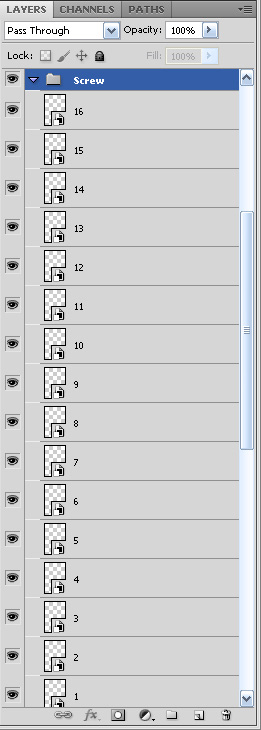
Do this until you have 16 screws. Place them all around the pick guard. 
Step 15: Draw the Pickup Selector Switch
Electric guitars often have a pickup selector switch that allows the guitarist to turn on and off certain pickups.
This is used to alter the sound of the guitar as the guitarist is playing the instrument. To start, select the Line Tool and, in the Options Bar, change the Weight option to 12px. 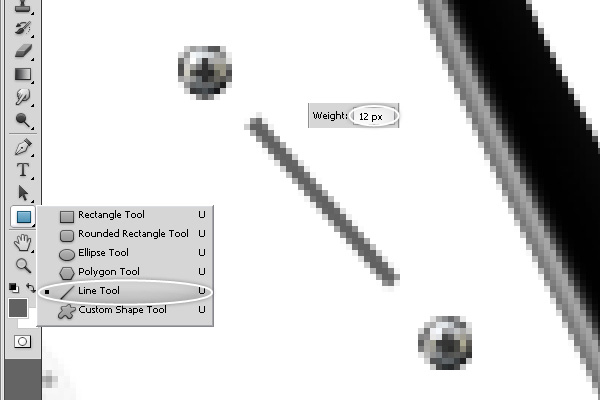 Give the layer a Drop Shadow layer effect.
 Make another line on top of the first one that’s slightly shorter and with a darker Fill color (#2b281f).
 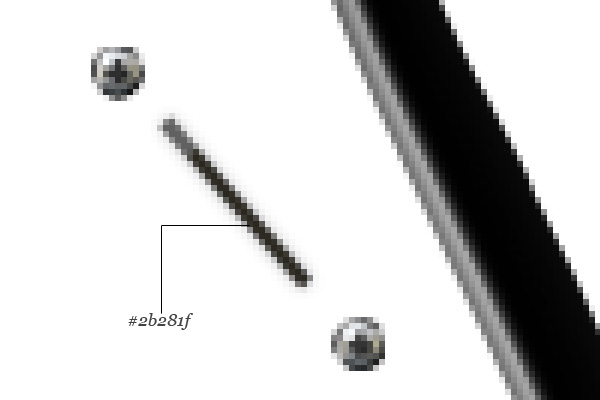 Give the new line a Bevel and Emboss.
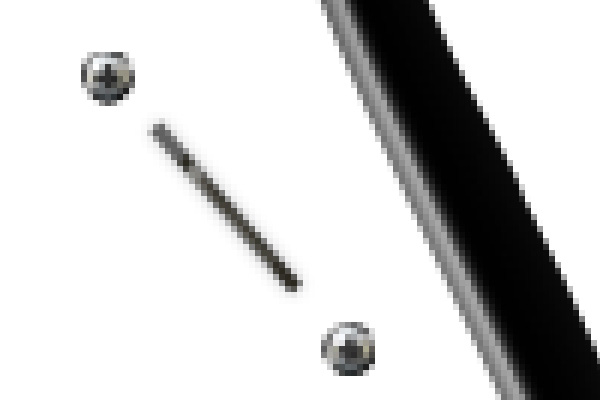
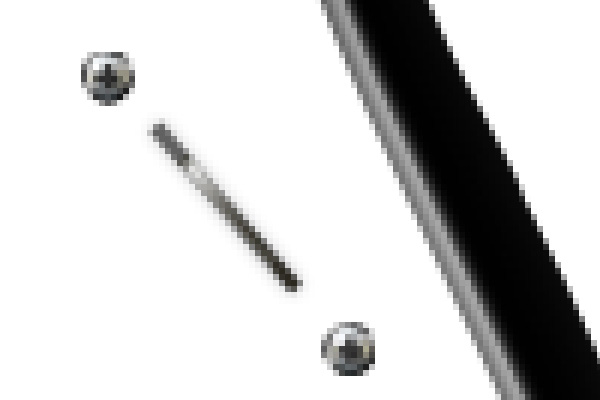
 You can use Gradient Tool (G) to create a highlight.
 Use the Pen Tool (P) to create the switch.
 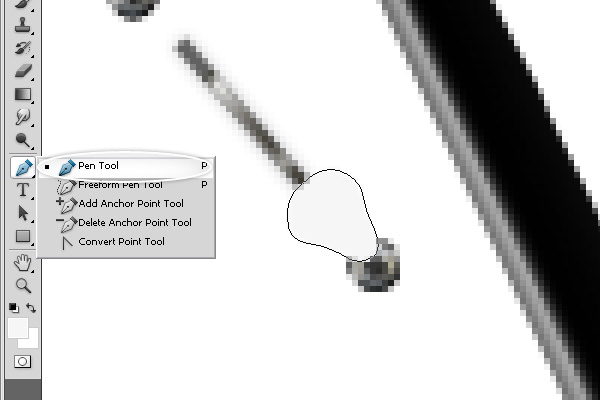 Give the switch layer the following layer effects: Drop Shadow, Inner Shadow and Inner Glow.
Drop Shadow
Inner Shadow
Inner Glow
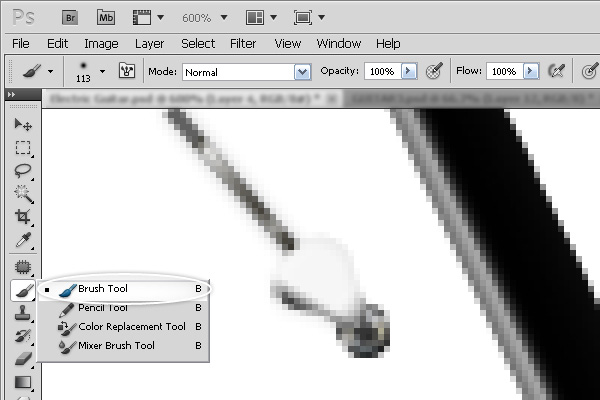
 Use the Brush Tool to add a small shadow on the layer to give the shape some depth.
 Change the Opacity of the layer to 10%.
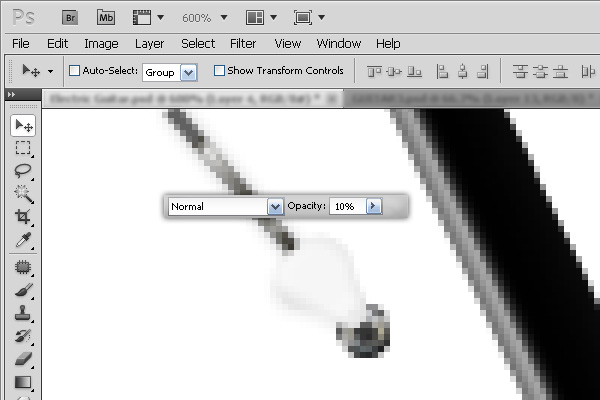
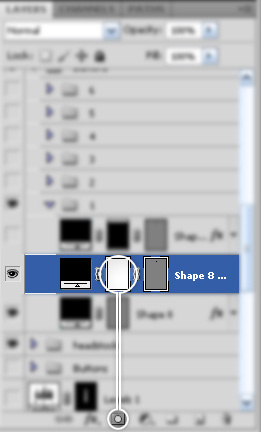
Step 16: Create a Hole at the Bottom of the Guitar
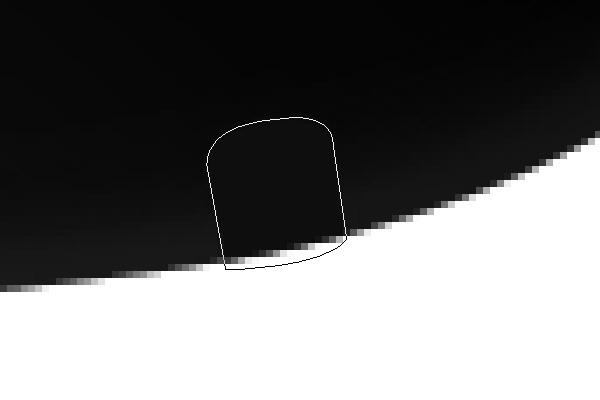
Choose the Pen Tool (P) and draw a small shape at the bottom of the guitar. Make sure the Fill color of the shape is black (#000000).
 Give the shape a Gradient Overlay.
  This is the result of the Gradient Overlay:
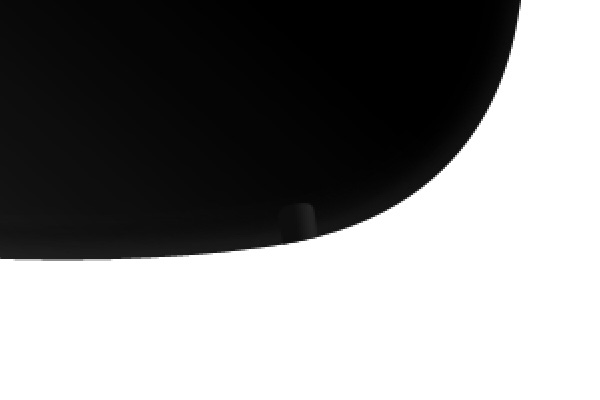
Step 17: Improving the Guitar Body’s Surface
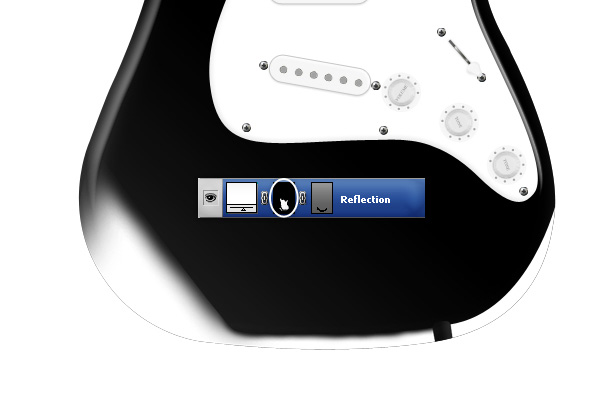
Let’s improve the guitar body’s surface with some highlights and reflections. Select the Pen Tool (P) and draw a shape at the bottom of the guitar body, as shown below.
Have the Fill color be white (#ffffff). 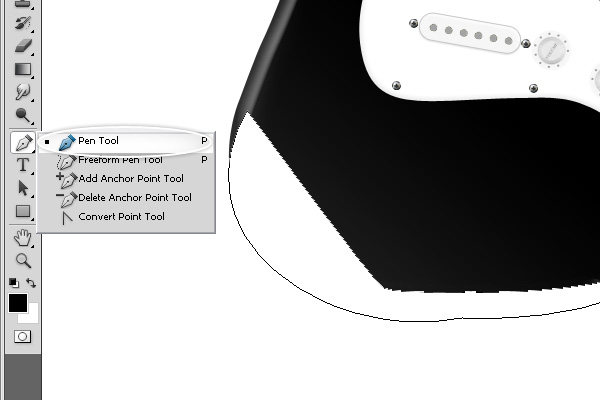
 We’ll use a masking technique for the highlights. First, choose the Brush Tool (B).
Turn on Quick Mask Mode by clicking the button at the foot of the Tools Panel or by pressing Q. When Quick Mask Mode is activated, the button should appear to be red.  Use a smooth brush to paint on areas of the shape that you want to mask out.
The areas that are masked will appear to be red on the canvas. 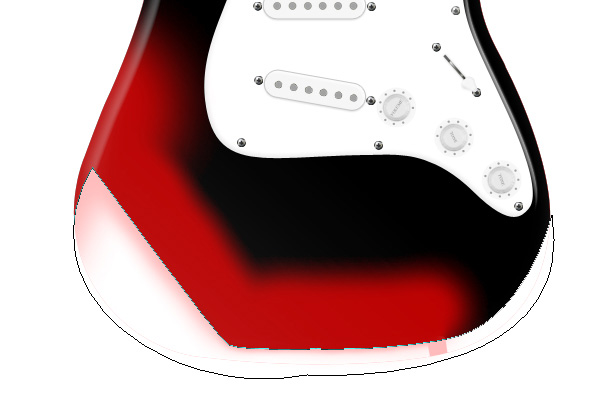 To see the result of your masking, turn off Quick Mask Mode.
 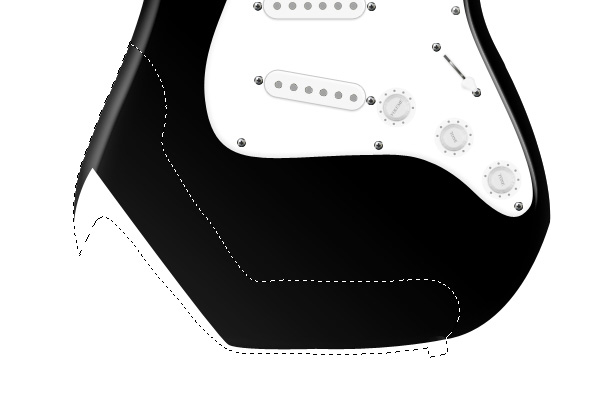 Add a new mask on the layer by creating a selection and then going to Layer > Layer Mask > Reveal Selection.
 Change the layer’s Opacity to 10%.
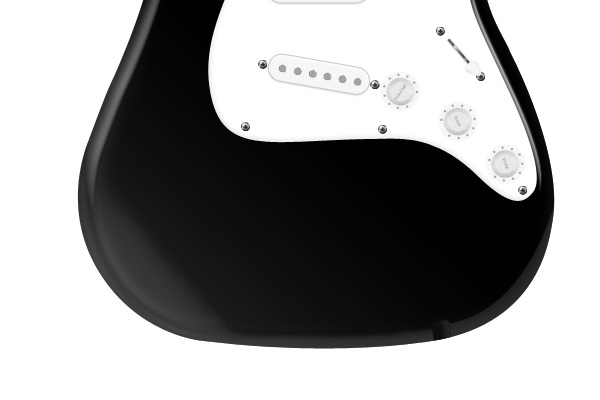
Step 18: Draw The Guitar’s Bridge
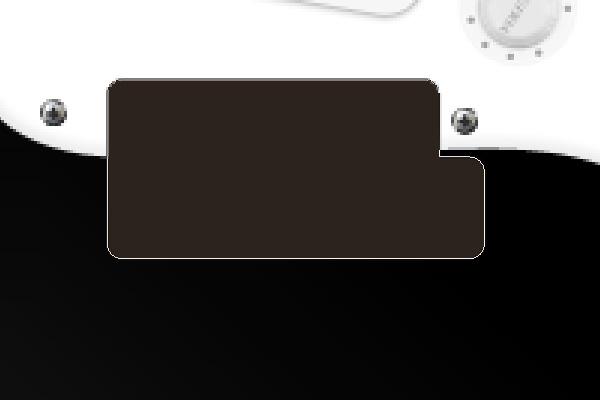
At the bottom of an electric guitar is the bridge, which holds the strings in place on the other end of the guitar (the other end of the strings is attached to the machine heads). To start, choose the Rounded Rectangle Tool (U).
Set the Fill color to a very dark gray color (#2c231c). Draw the bridge’s shape (it should sit on the bottom edge of the pick guard). 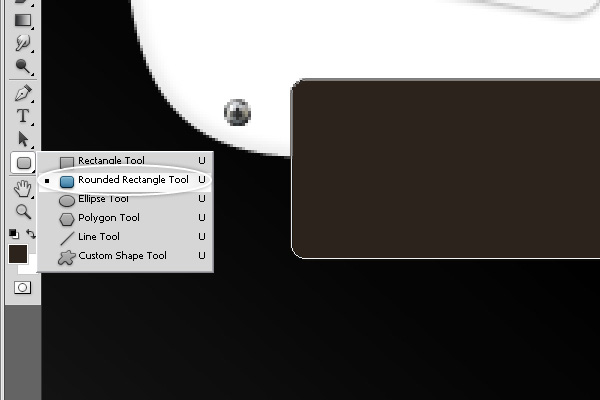
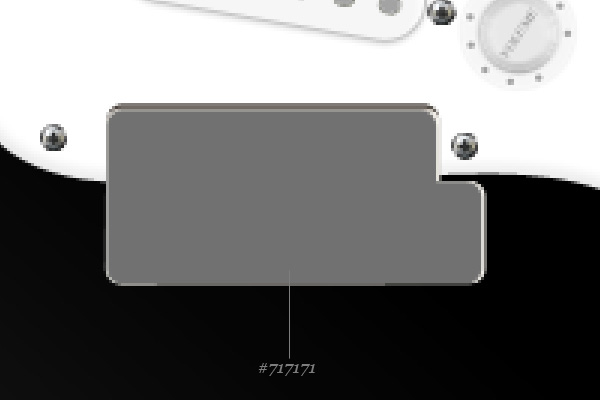
 Make two copies of the bridge shape layer.
Change the color of the first copy to a very light gray (#f4f1ea) and the second one to a darker gray (#717171). This gives our bridge some depth. 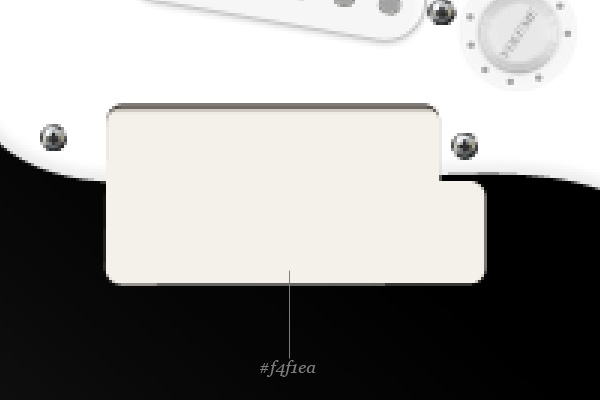
 Give the topmost bridge shape layer the following layer effects: Gradient Overlay, Satin and Bevel and Emboss.
Gradient Overlay
Satin
Bevel and Emboss
 This is the result of the layer effect:
 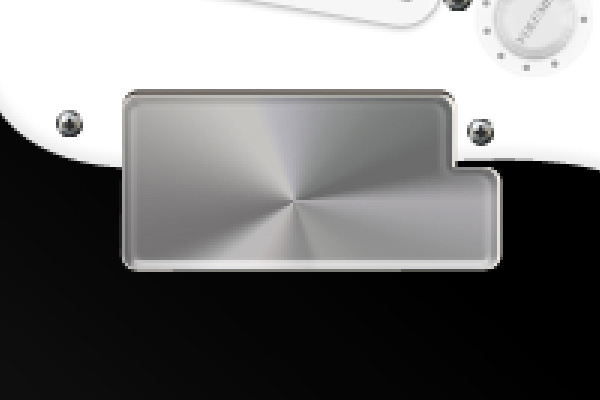 Create a selection around the bridge shape, and then on a new layer, fill the selection by pressing Shift + F5 and choosing 50% Gray.
 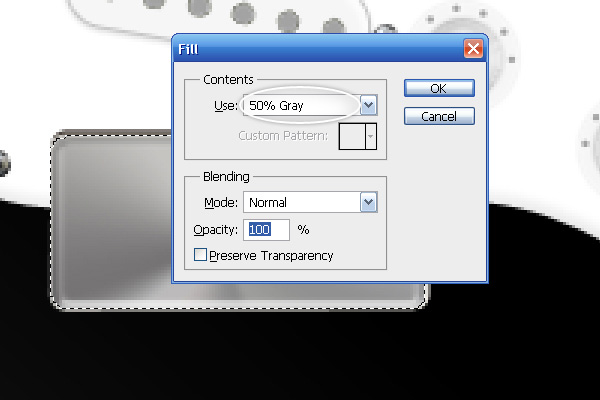 Do not deselect the marquee selection just yet! Give this layer some texturing using Filter > Noise > Add Noise.
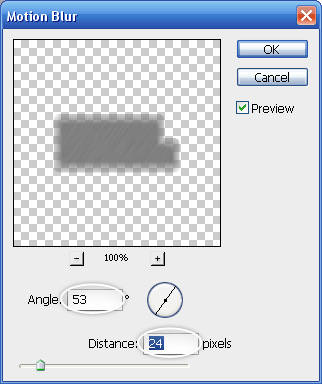
 Make sure you still have your marquee selection active (if you accidentally deselected it, just go to Select > Reselect). Choose Filter > Blur > Motion Blur.
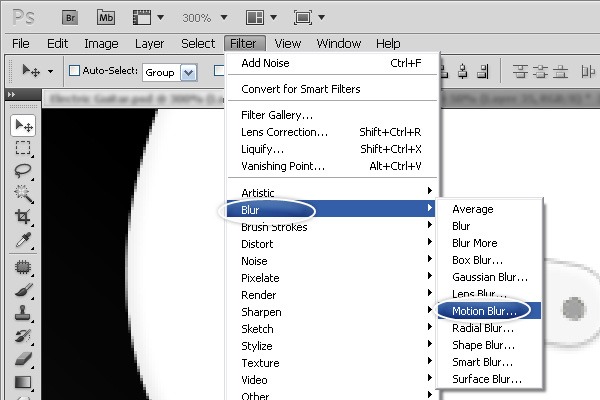
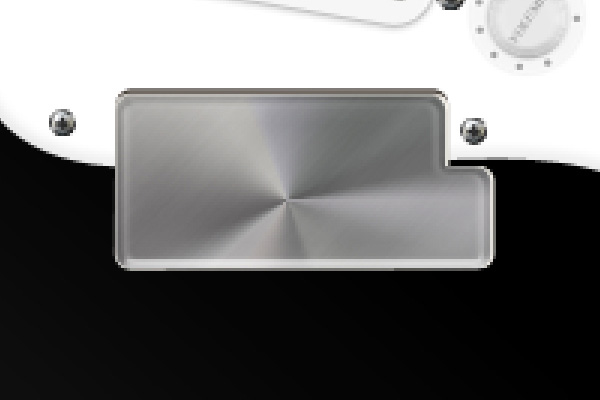
 This is our bridge thus far:
  Change the Blend Mode of the layer to Soft Light.
 Do the same process above to create another layer, but this time reduce the layer’s Opacity to 60%.
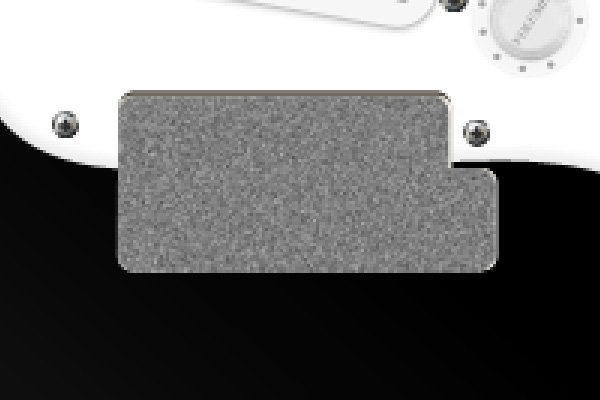
 You can overlay some sort of gritty texture on top of the bridge, as I have done below. Check out the free textures here on Design Instruct.
 To blend the texture in, change the layer’s Blend Mode to Soft Light.
  Next, choose the Ellipse Tool (U) to draw a small circle at the bottom-right of the bridge.
 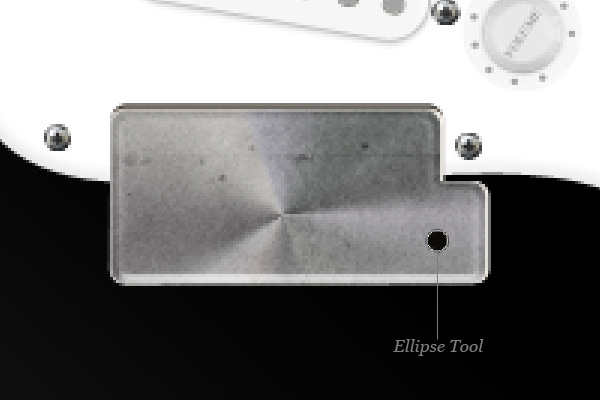 Give this circle a Gradient Overlay, Bevel and Emboss and a Drop Shadow.
Gradient Overlay
Bevel and Emboss
Drop Shadow
 This is the result of the layer style we applied:
 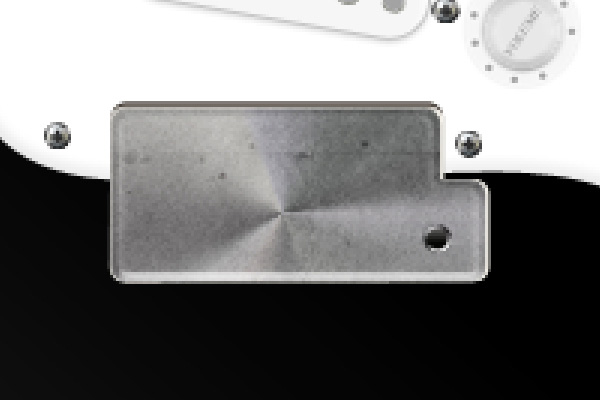 Go back to the screw layer group and duplicate one of the screws 6 times. Then place them on the bridge.
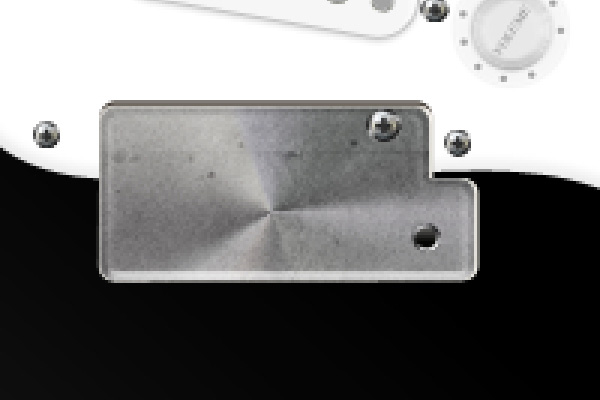
 We will now create 6 saddles on the bridge; these are holes in the bridge that hold the individual strings in place.
Select the Rectangle Tool (U), set the Fill color to a gray color (#4e4e4c) then draw a vertical rectangle shape. 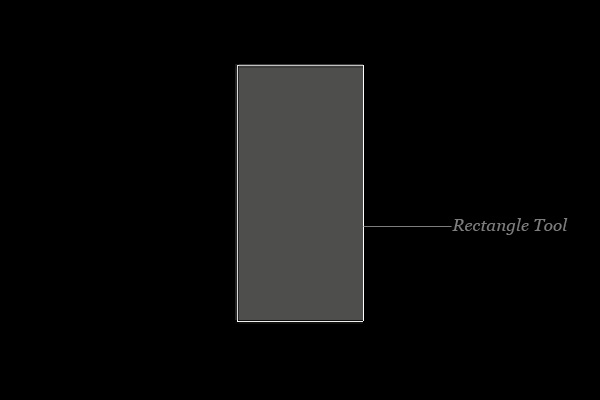 Switch to the Rounded Rectangle Tool (U) and, in the Options Bar, set the path mode to Subtract so that the path you draw creates a hole inside the rectangle shape.
 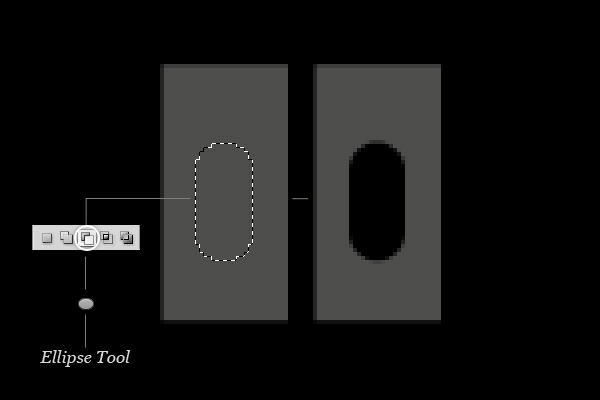 After you make the hole, convert the layer for Smart Filters.
 Then go to Filter > Noise > Add Noise to give the surface of the saddle some scratches.
 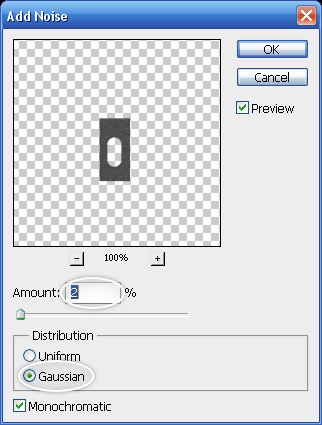 Give the layer a Bevel and Emboss.
 Use the Rounded Rectangle Tool to create the pill-shaped rounded rectangle in white, shown below.
Place a selection around the shape, then invert your selection. Move the selection by about 3 or 4px using your Arrow keys. Go to Layer > Layer Mask > Hide All to mask out the selected area.
 Use the Pen Tool (P) to make the light gray shape at the top of the saddle (shown below).
 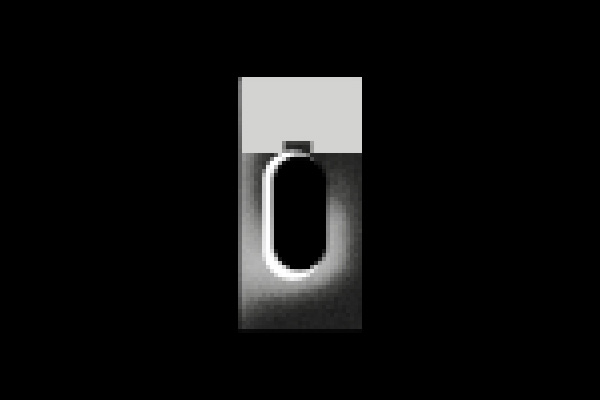 Give the new shape these layer effects: Gradient Overlay, Satin, Bevel and Emboss, Inner Glow and Drop Shadow.
Gradient Overlay
Satin
Bevel and Emboss

Inner Glow
Drop shadow
 Again, go back to the screw layer group and create 2 copies of a screw, then place them on the saddle.
 Give the screws a Bevel and Emboss.
 Use the Rounded Rectangle Tool (U) to draw the shape featured below behind the original shape.
  Place all the layers related to the saddle into layer group.
Duplicate the saddle layer group until you have 6 of them. 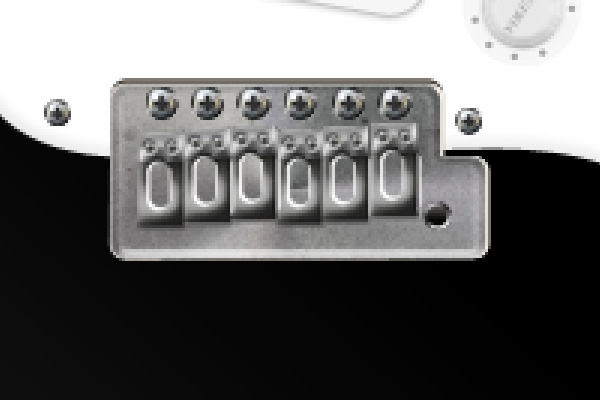 Let’s create a large screw underneath the guitar’s bridge using the Ellipse Tool.
 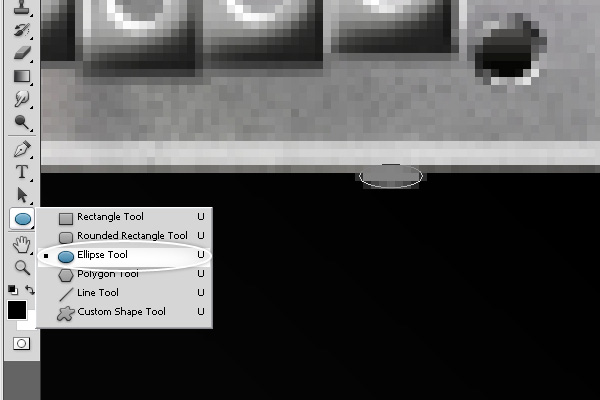 Give the shape an Inner Shadow.

 Use the Rectangle Tool (U) to make the shape below.
 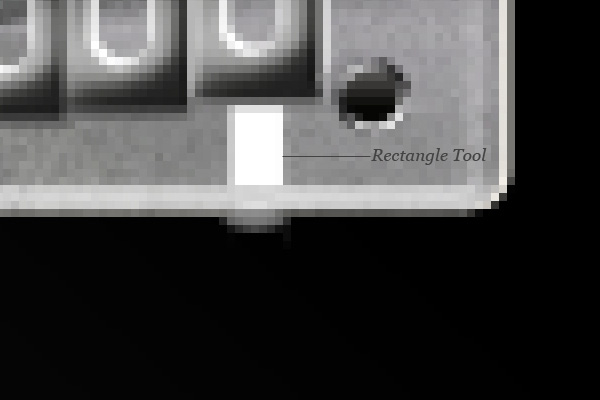 Give the white rectangle shape a Gradient Overlay.
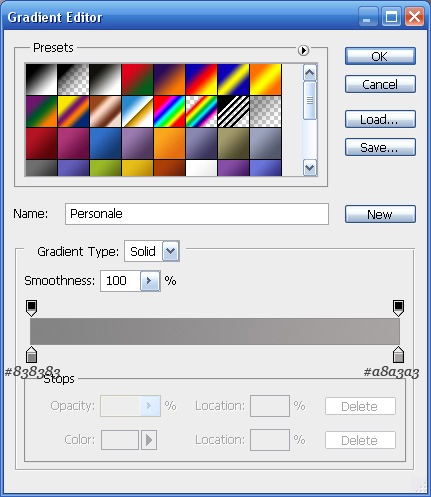
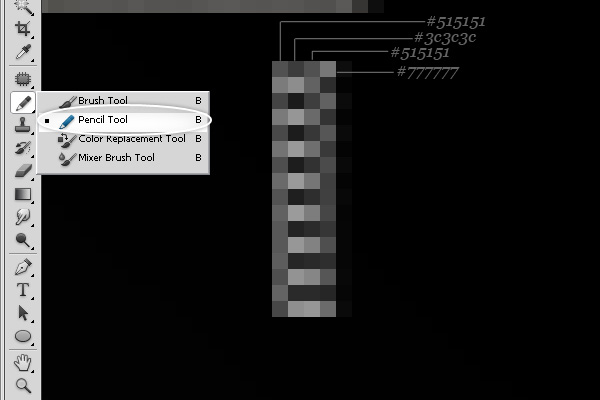
 Create a new layer, switch to the Pencil Tool (B), make the shape below pixel by pixel (use the color references to pick colors).
 Duplicate the layer and move the duplicate beside the original, and shift it down a bit.
 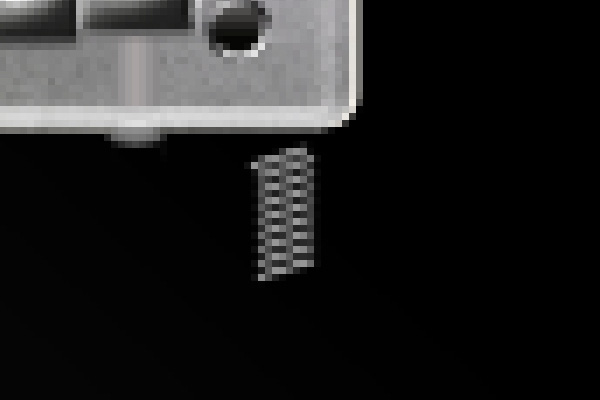 Drag it near the rectangular shape we created, and delete parts of it that sit outside of the shape.
 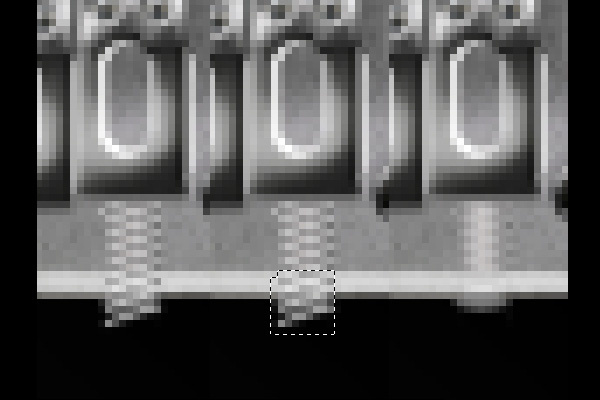 Let’s finish designing the bridge by adding small circles on the saddles, which the guitar strings will thread into.
Use the Ellipse Tool (U) for this. 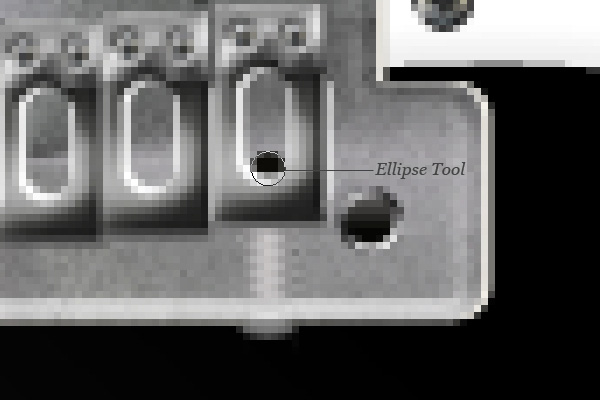 Give the circle shape a Gradient Overlay and Outer Glow.
Gradient Overlay
Outer Glow
 Duplicate the circle until you have 6 of them, then place them on the other saddles.
Step 19: Draw Guitar Strings
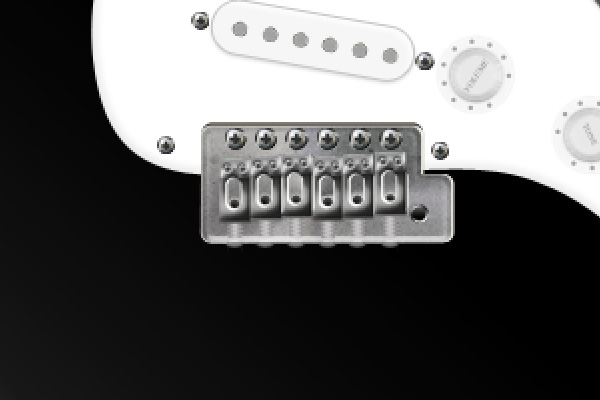
Draw the first string with the Pen Tool (P). Switch to the Brush Tool (B) and set the Master Diameter to 1px in the Options Bar. Right-click on the Pen Tool’s path to reveal a contextual menu where you should choose Stroke Path.
The Pen Tool’s vector path will now be stroked with the brush tip you chose, giving the path the appearance of a guitar string. 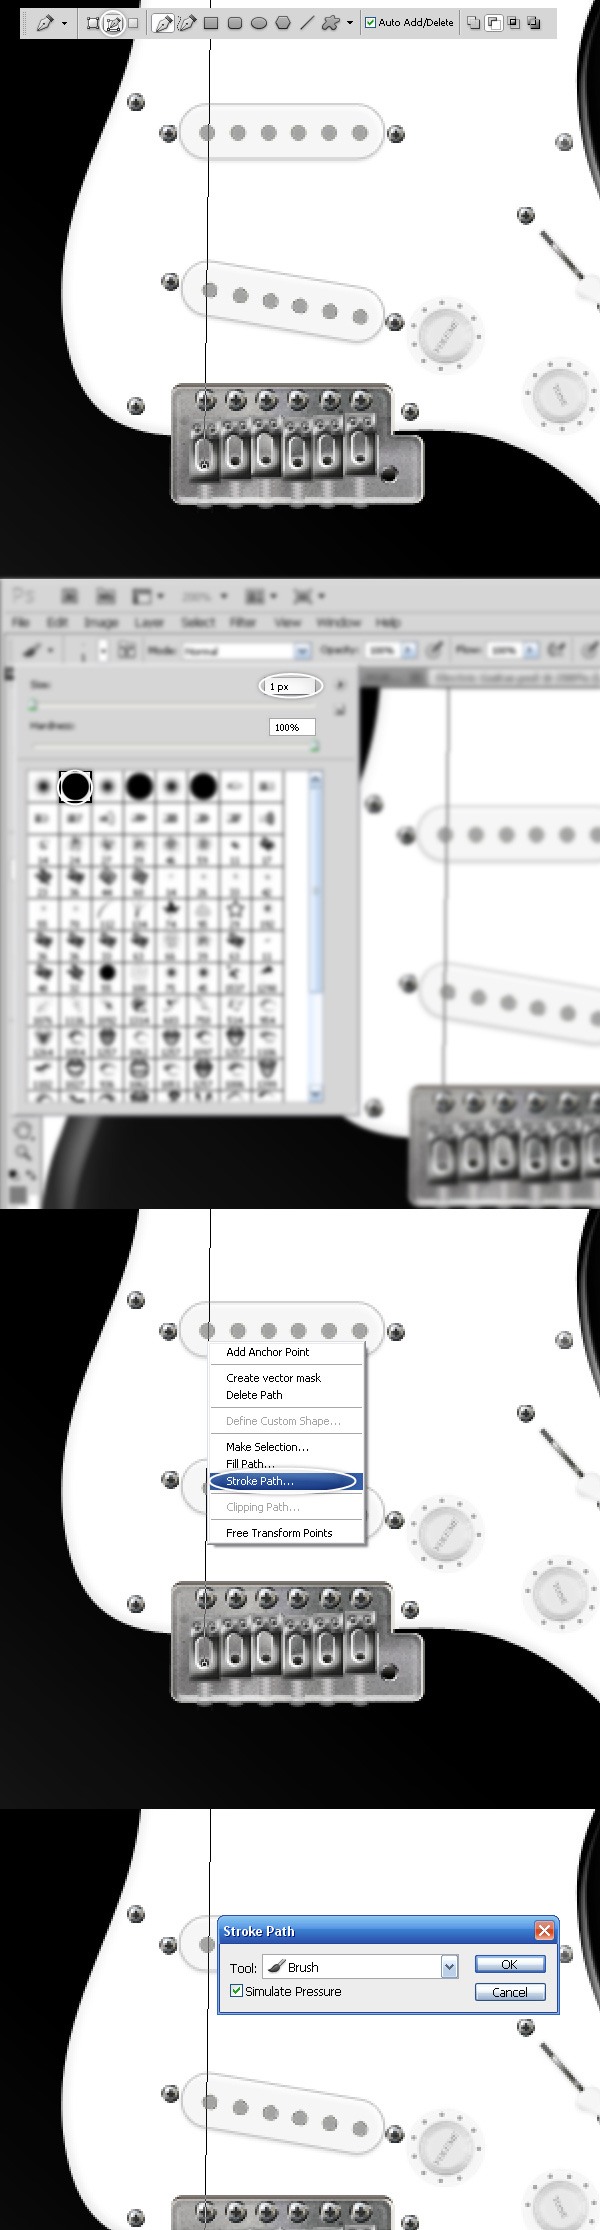
Step 20: Draw the Guitar’s Output Jack
The output jack is where the electric guitar cable is inserted; the other end of the cable is connected to an external guitar amplifier. Typically the output jack is made of metal because it’s a good electrical conductor and it gives the output jack some added strength.
Select the Pen Tool (P) and draw the output jack’s base shape.  Give the shape a Gradient Overlay and a Bevel and Emboss.
Gradient Overlay
Bevel and Emboss
 This is the result of the style we applied above:
  Make a copy of the original shape.
Reduce its size using Free Transform. Use the Delete Anchor Point Tool (found in the Tools Panel by clicking-and-holding down the Pen Tool icon) to remove 2 points. Change the Fill color of the shape to a gray color (#8a8b85).
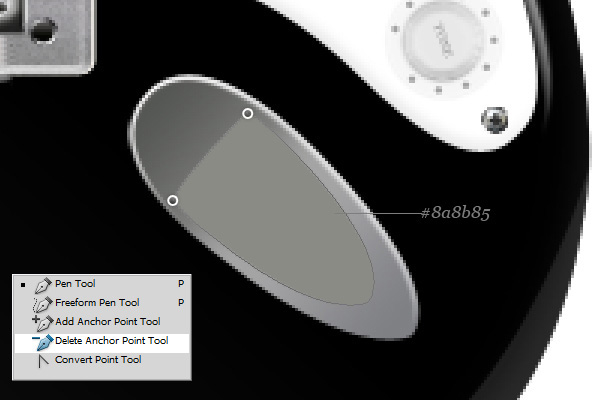 Give the layer a Bevel and Emboss effect.
  Duplicate the shape. Change the Fill color of the duplicate to another gray color (#999999).
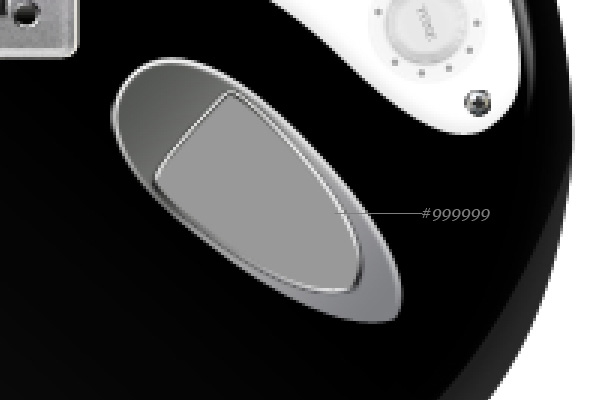 Use these settings to modify the existing Bevel and Emboss layer effect:
  You will have this result:
 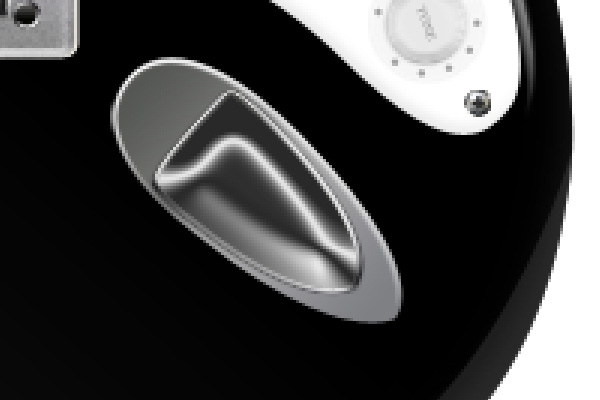 Duplicate the shape once again. Change the Fill color of the copy to #8a8b85.
 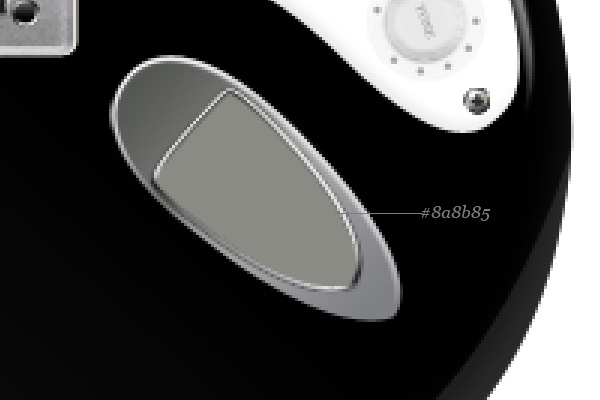 Use these settings to modify the existing Bevel and Emboss layer effect:
  Change the Blend Mode of this layer to Soft Light.
  Use the same technique in a previous step to create a noise layer for some nice surface texturing (don’t forget to change the Blend Mode of this layer to Soft Light).
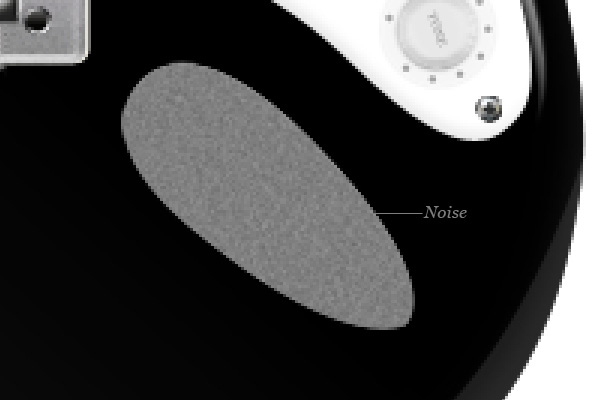
 Let’s draw a hole on the output jack (for the guitar cable to plug into).
Select the Pen Tool (P) or Ellipse Tool (U) and start drawing an ellipse as shown below. Set the ellipse’s Fill color to #b5b6b4. 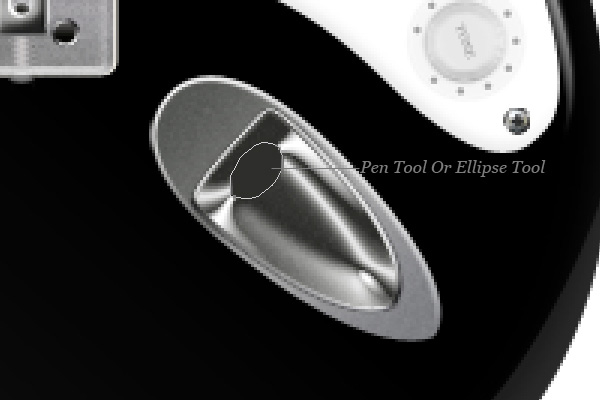 Next, make another smaller ellipse inside the first one.
 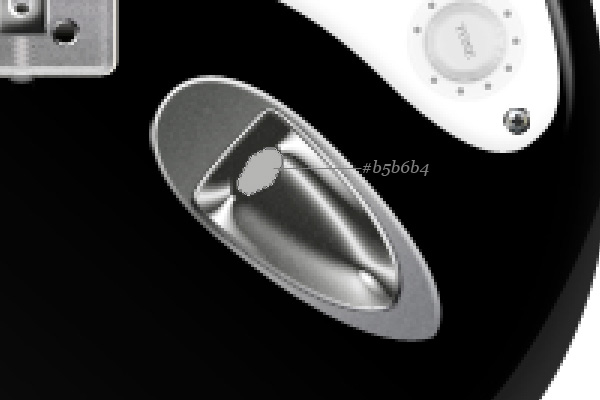 Give the smaller ellipse a Bevel and Emboss layer effect.
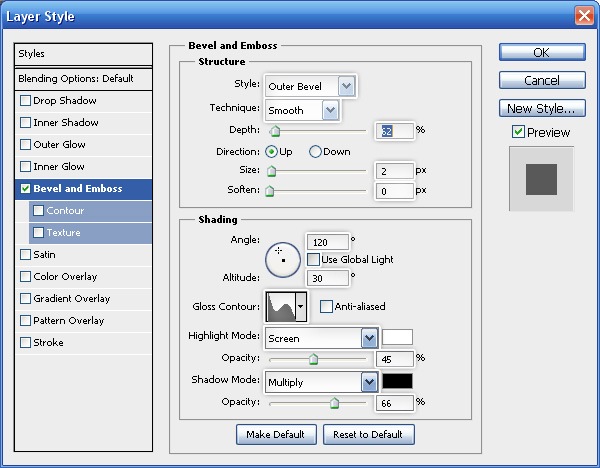
 Repeat the process above until you have 5 ellipses that make it appear that our output jack has a hole.
 Copy a couple of screws from our guitar’s pick guard, resize them as needed, then position them on top of the output jack.
  Give the two screws a Drop Shadow.
  Below, you can see the difference of the screws with and without the Drop Shadow layer effect.
Step 21: Draw Strap Buttons
This is the last step in our very long tutorial! Electric guitarists often play their instrument standing up. A guitar strap is needed in order to hold up the guitar while the musician is playing his instrument.
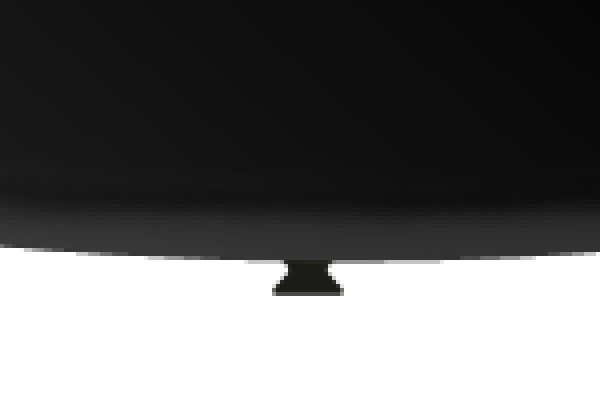
At the bottom and top of the guitar body are screws that function like hooks where each end of the guitar strap can be attached to. These screw-like components are often called strap buttons. Select the Pen Tool (U) and make a shape resembling a side profile of a screw at the top-end of the guitar body.
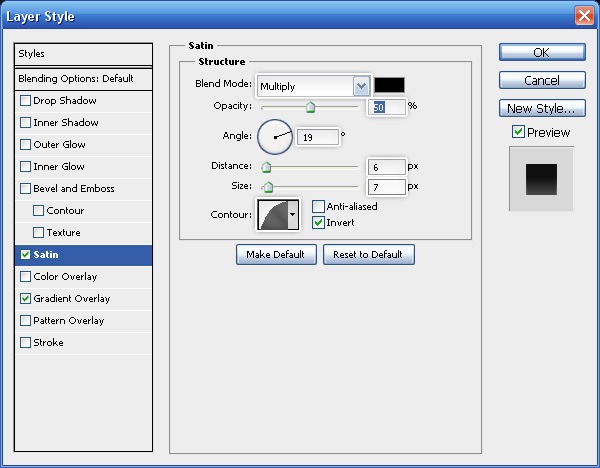
 Give the strap button these layer effects: Gradient Overlay, Satin, Bevel and Emboss and Drop Shadow.
Gradient Overlay
Satin
Bevel and Emboss

Drop Shadow
 Here’s the result of the layer style you applied above:
 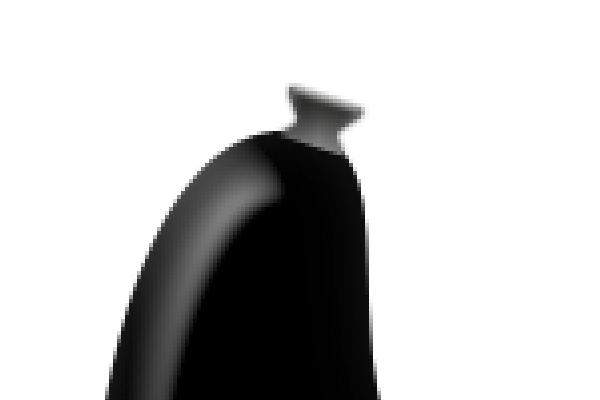 Not realistic enough for you? Let’s add another detail to make it look more realistic.
First, set your Foreground color to black (#000000). Place a selection around the strap button. Create a new layer.
You’ll use the Gradient Tool (G) to make a couple of shadowing effects on the left and right sides of the strap button. Choose the Foreground to Transparent gradient preset (which will be a black to transparent gradient since we set our Foreground color to black earlier). 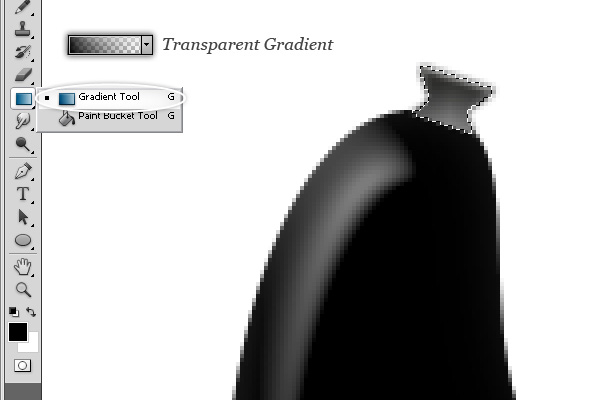 Afterwards, change the layer’s Opacity to 50%.
 Place a selection around the guitar’s body, and on the strap button’s layer, add a new layer mask to hide the bottom part of the strap button, making the portion where the body and the strap button meets appear seamless.
 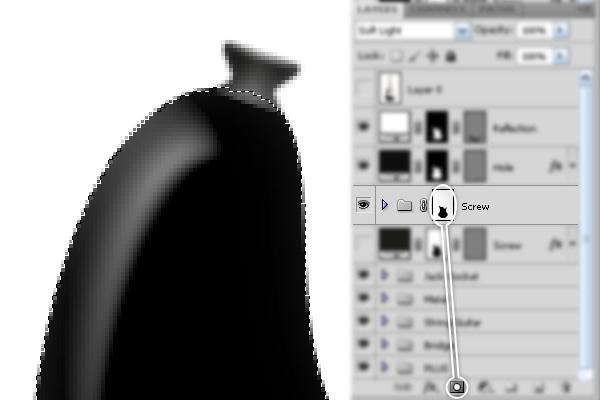 Here’s our strap button thus far:
 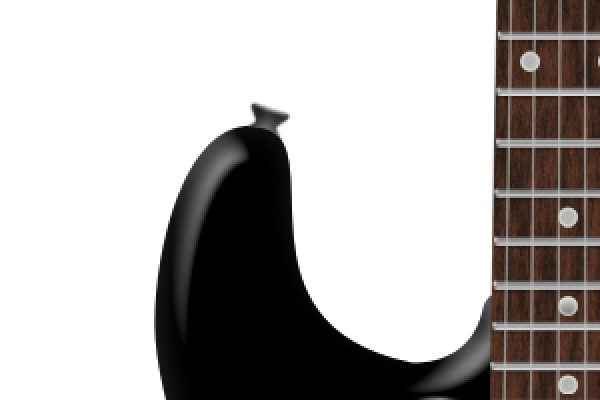 We now need to create the strap button at the bottom of the guitar. Use the Pen Tool (P) again to draw the initial shape.
 Give it these layer effects: Gradient Overlay, Satin, Bevel and Emboss and Drop Shadow.
Gradient Overlay

Satin
Bevel and Emboss

Drop Shadow
 You will have this result after applying the layer style above:
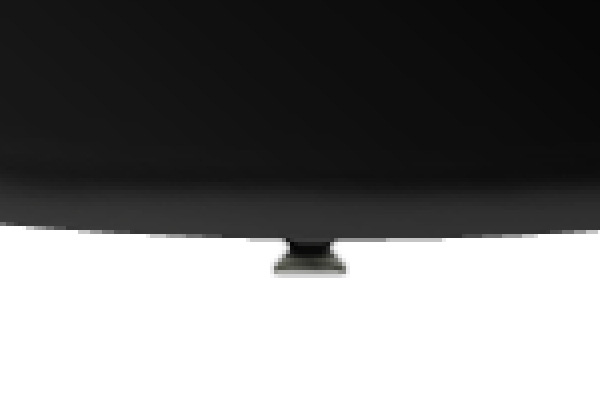
Tutorial Summary
In this thorough, step-by-step tutorial, we showed you how to create a realistic and very detailed electric guitar. We used a lot of drawing techniques that can be applied in creating any real-world objects.
We used layer masks, the Pen Tool, adjustment layers, creative drawing techniques and more in this tutorial.
Download Source Files
- stratocaster_electric_guitar (ZIP, 24.6 MB)
-
 Trevin serves as the VP of Marketing at WebFX. He has worked on over 450 marketing campaigns and has been building websites for over 25 years. His work has been featured by Search Engine Land, USA Today, Fast Company and Inc.
 -

WebFX is a full-service marketing agency with 1,100+ client reviews and a 4.9-star rating on Clutch! Find out how our expert team and revenue-accelerating tech can drive results for you! Learn more
Make estimating web design costs easy
Website design costs can be tricky to nail down. Get an instant estimate for a custom web design with our free website design cost calculator!
Try Our Free Web Design Cost Calculator
Table of Contents
- Preview
- Step 1: Draw the Guitar’s Headstock
- Step 2: Give the Headstock Some Depth
- Step 3: Make Machine Heads
- Step 4: Draw the Tuning Pegs
- Step 5: Draw Additional Chrome on the Headstock
- Step 6: Draw the Nut
- Step 7: Draw the Guitar’s Neck
- Step 8: Draw Frets on the Neck
- Step 9: Add Fret Markers
- Step 10: Draw the Guitar’s Body
- Step 11: Draw the Pick Guard
- Step 12: Draw the Guitar’s Pickups
- Step 13: Draw Tone/Volume Controls
- Step 14: Draw the Pick Guard Screws
- Step 15: Draw the Pickup Selector Switch
- Step 16: Create a Hole at the Bottom of the Guitar
- Step 17: Improving the Guitar Body’s Surface
- Step 18: Draw the Guitar’s Bridge
- Step 19: Draw Guitar Strings
- Step 20: Draw the Guitar’s Output Jack
- Step 21: Draw Strap Buttons
- Tutorial Summary
- Download Source Files
Share this article


Web Design Calculator
Use our free tool to get a free, instant quote in under 60 seconds.
View Web Design CalculatorMake estimating web design costs easy
Website design costs can be tricky to nail down. Get an instant estimate for a custom web design with our free website design cost calculator!
Try Our Free Web Design Cost Calculator


