Publishing System Settings Logout Login Register
Create a Leaking Text Effect In Adobe Photoshop
TutorialCommentsThe AuthorReport Tutorial
Tutorial Avatar
Rating
Add to Favorites
Posted on October 3rd, 2011
2310 views
Adobe Photoshop

Step 1.

To begin with, open a new layer 500 x 200 pixel  on your Photoshop( you can choose any size that you want of course) .

Step 2.

Make a new layer and name it background gradient. Now go to gradient tool and choose three range of colors 1a0d16, 1a0d16, and f28ccc. Use the gradient that you made to create a nice smooth background.

Gradient tool

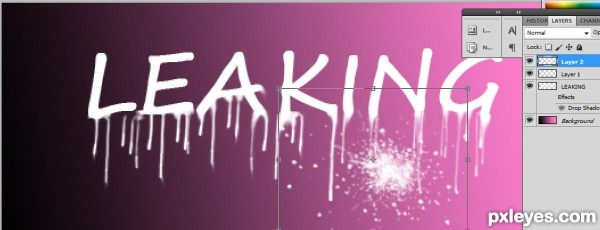
Step 3.

Select the type tool. Write anything you like with a simple text, I choose leaking word itself. When you are working with the type tool Photoshop will make a new layer automatically. Make a new layer on the top of your text layer. Then add some lines with 80% opacity under your leaking text. You can draw that with brushes or wacom tablet. your gonna have something like this. there is no need to be neat now.

step 4.

Take the eraser tool with 70% opacity and try to clean it a bit. After that work with details and shadows, until you are satisfied.


Step 5

We have to connect the words and the leaking lines, so use the smudge tool. with 50 strength and normal mood. Be patient with this tool and try to be gentle with this tool. This will take a little practice.

leaking text effect

Step 6.

Go ahead and take some splash brushes. You can download them free on brushezzy.com or other websites. just pick whatever you think is suitable for your work.

Step 7.

Then go to free transform and by holding Ctrl on the corners of your splash brush, bring it to the perspective.
I just used some other splash brushes and combined them together. Its gonna be something like that.

cool text effect

Step 8.

Use the smudge tool to connect splashes on the floor and the lines. Smudge tool is a great way to connect two shapes with fading. Also, you wont need to blur your images in order to connect them to each other. Try to be very specific and detail with this step. This will make it more natural.

Step 9.

Its almost finish. I'm gonna give it some texture on the corners, by burning tool and brushes. Using burning tool, you can make the contrast more, and that will give a great effect to your image. Remember don't over do it because we want it simple. Hope you liked this tutorial.


Dig this tutorial?
Thank the author by sending him a few P2L credits!

Send
Artmiss

I'm 20 year old girl, an avid graphic designer who wants to create fun stuff.
I upload some tutorials about Adobe Photoshop cs5 for graphic designers. Most of them are easy to learn, yet essential for designers to know,
I also have a small gallery for my
View Full Profile Add as Friend Send PM
Pixel2Life Home Advanced Search Search Tutorial Index Publish Tutorials Community Forums Web Hosting P2L On Facebook P2L On Twitter P2L Feeds Tutorial Index Publish Tutorials Community Forums Web Hosting P2L On Facebook P2L On Twitter P2L Feeds Pixel2life Homepage Submit a Tutorial Publish a Tutorial Join our Forums P2L Marketplace Advertise on P2L P2L Website Hosting Help and FAQ Topsites Link Exchange P2L RSS Feeds P2L Sitemap Contact Us Privacy Statement Legal P2L Facebook Fanpage Follow us on Twitter P2L Studios Portal P2L Website Hosting Back to Top