
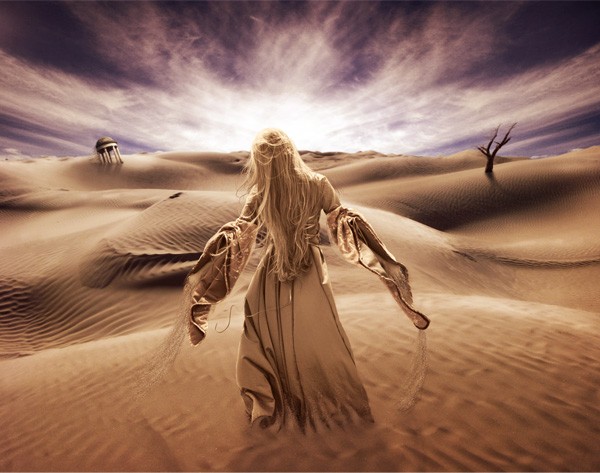
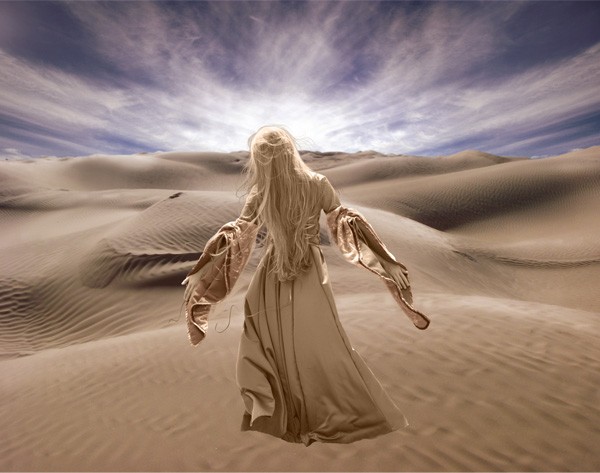
Preview
Click the image below to see it in its full size.
Tutorial Resources
- Stock photo: Desert 3 by B-SquaredStock
- Stock photo: Feeling – cut out stock by Iardacil-stock
- Stock photo: STOCK PHOTO romantic place by MaureenOlder
- Texture: Charcoal by Geek-Stock
- Stock photo: Beach Sky 2 by Gary Cowles
- Stock photo: Sossusvlei death valley Namibia by Jeffrey van Rossum
Step 1: Replacing the Sky
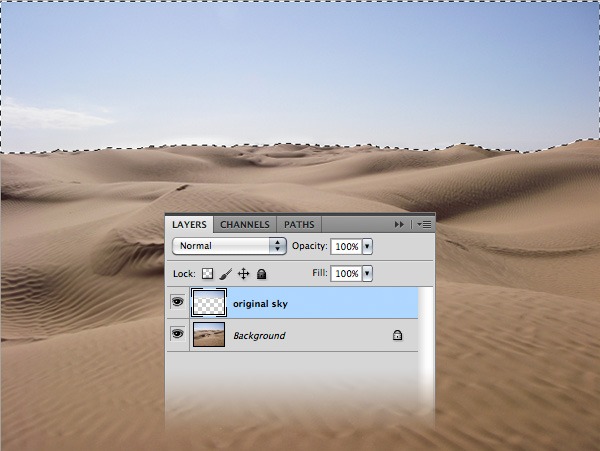
Download the desert photo referenced in the Tutorial Resources above and open it in Photoshop. We’ll start off by replacing the sky. Select the Pen Tool (P) and use it to create a path around the sky.
Right-click within the path that was created with the Pen Tool, choose Make Selection from the contextual menu that appears, and click OK (or you can use the shortcut Ctrl/Cmd + Enter/Return).
This will transform your path into a selection.
Now hit Ctrl/Cmd + J to copy the selected area to a new layer. Name this layer “original sky”.
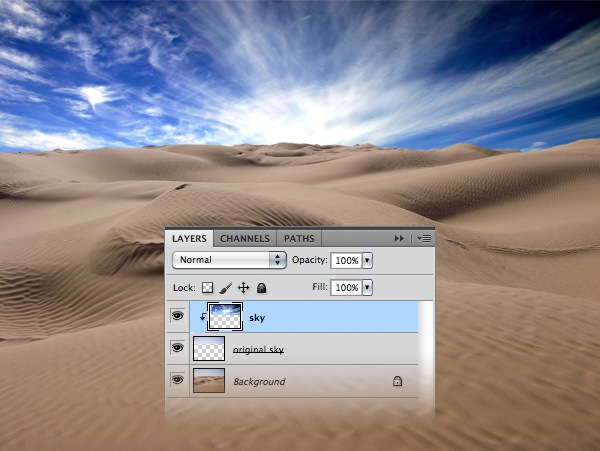
Download the sky image and open it in Photoshop.
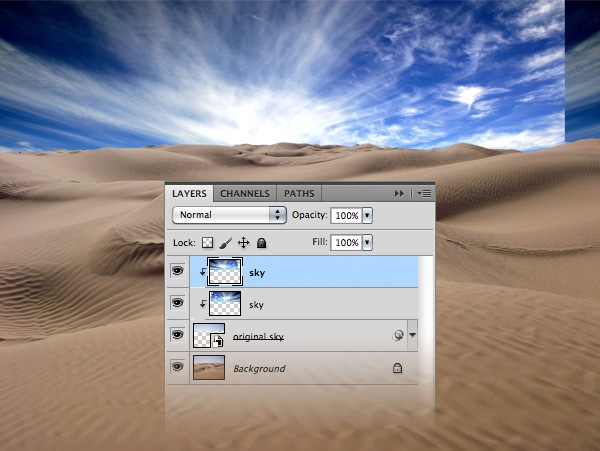
Use the Move Tool (V) to move it into your first Photoshop document. Name this layer “sky”, right-click on it and choose Create Clipping Mask from the menu that appears. This will make the sky image visible only over the area of the “original sky” layer.
Go to Edit > Free Transform (Ctrl/Cmd + T), hold down Shift to maintain the proportions and then scale down this layer.
I like how the sky looks on the right hand side, but the left hand side is not suitable for the image we want to create.
The shape of those clouds distracts the attention from other more important elements that we will add later on in the scene. So, I will show you how to make the left hand side of the sky look like the right hand side.
Use the Move Tool (V) to move the sky layer about 50px to the right. Duplicate this layer (Ctrl/Cmd + J), right-click on the new layer and select Create Clipping Mask.
Go to Edit > Transform > Flip Horizontal. Then use the Move Tool to move this layer to the left.
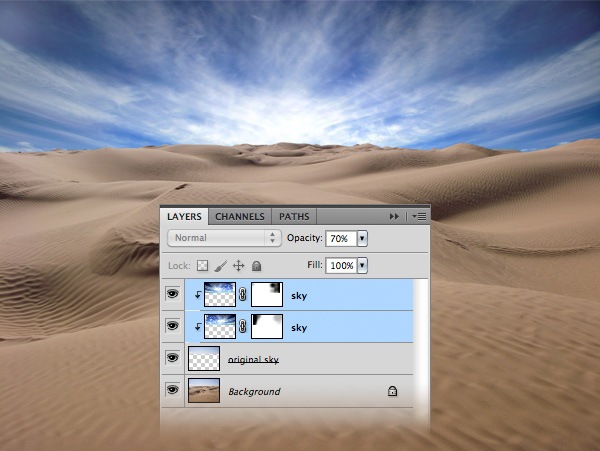
Now we need to blend the two layers together. To do this, we will use masks and a soft brush.
Select the top sky layer and add a mask to it (Layer > Layer Mask > Reveal All or use the Add layer mask button from the bottom of the Layers Panel).
Switch to the Brush Tool (B), select a soft, black brush for it and then use the tool to mask the right hand side of this layer.
Set the Opacity of this layer to 70%.
Select the second sky layer, add a mask to it and use a soft, black brush to erase the hard edge from the left hand side.
The result is a more beautiful, even sky that suits the entire image.
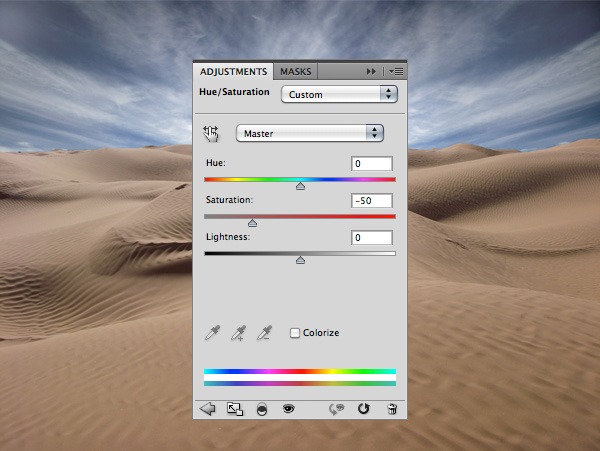
Now we will change the color of the sky. Go to Layer > New Adjustment Layer > Hue/Saturation, check the Use Previous Layer to Create Clipping Mask option and set the Saturation to -50.
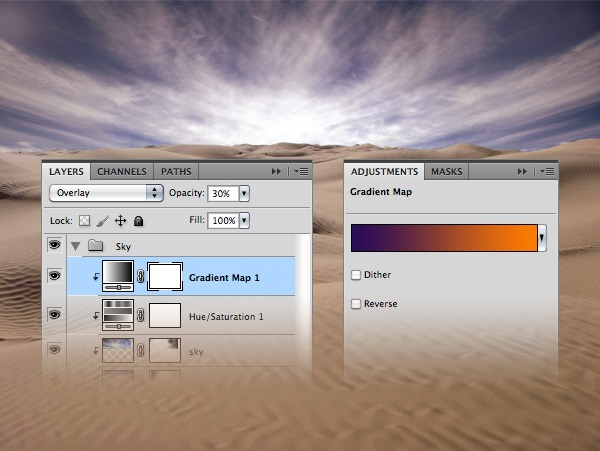
Now go to Layer > New Adjustment Layer > Gradient Map, check the Use Previous Layer to Create Clipping Mask option again and then use the settings from the following image. The gradient that I used is a standard Photoshop gradient from violet (#290a59) to orange (#ff7c00).
Afterwards, set the Blend Mode of the Gradient Map adjustment layer to Overlay with Opacity at 30%.
Hold down the Ctrl/Cmd key, select all the layers related to the sky and hit (Ctrl/Cmd + G) to group them.
Name this group “Sky”.
Step 2: Adjusting the Landscape
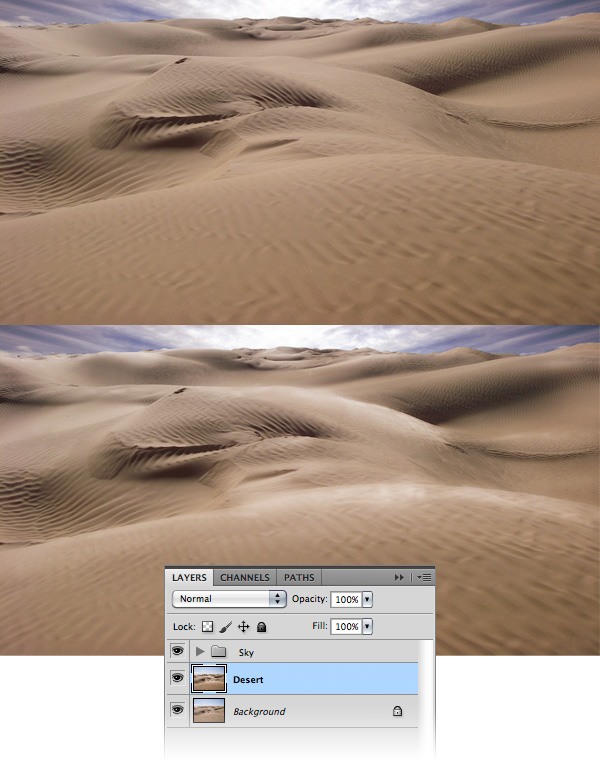
Now we will focus on the desert. We are going to increase its contrast by using the Dodge Tool and the Burn Tool.
But before that, duplicate your Background layer and name the new layer “Desert”. Work only on the duplicated layer and keep the original one as backup (toggle off the visibility of the original layer).
Select the Dodge Tool (O) and set the Range to Midtones and Exposure options to 15%. Then right-click on your image and select a soft brush with its Master Diameter size at around 100px.
Use this tool to make the top of the dunes brighter.
Then select the Burn Tool (O) and use it to make the bottom of the dunes darker. Take a look at the following image for reference.
Tip: to switch quickly from the Dodge Tool to the Burn Tool (or vice versa), hold down the Alt/Option key.
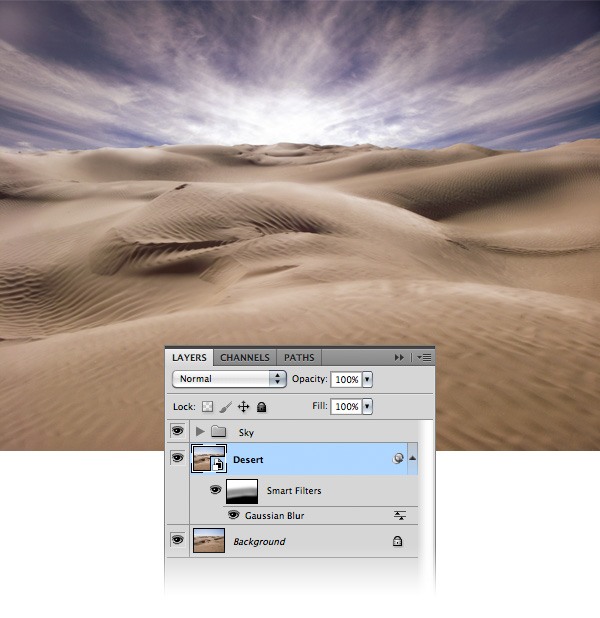
Now we will add a Gaussian Blur filter in the background area of the desert to create a focus effect. Right-click on the “Desert” layer and select Convert to Smart Object.
Then go to Filter > Blur > Gaussian Blur and set the Radius to 1px.
Click on the Smart Filters mask of this layer to make it active. Then select a soft, black brush (B) wit the size around 400px and paint with it over the foreground dune to eliminate the blur. Then set the Opacity option of the brush to 50% and use it to mask the blur effect from the middle area of the desert.
We’ll leave the background blur as it is.
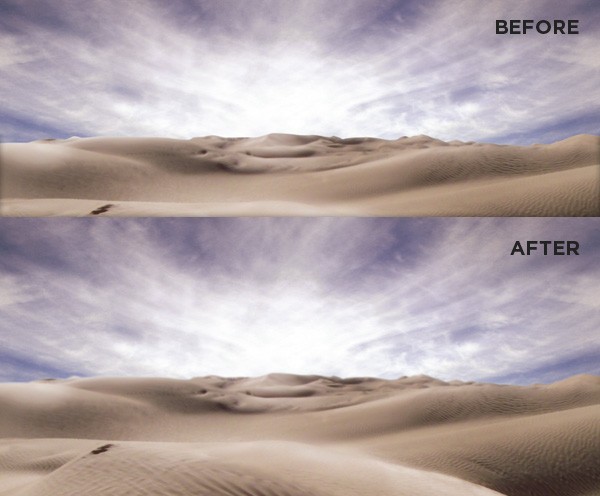
Now there is a small issue with the horizon line because it’s too sharp. To correct it, simply select the “original sky” layer and apply a 1px Gaussian Blur filter to it.
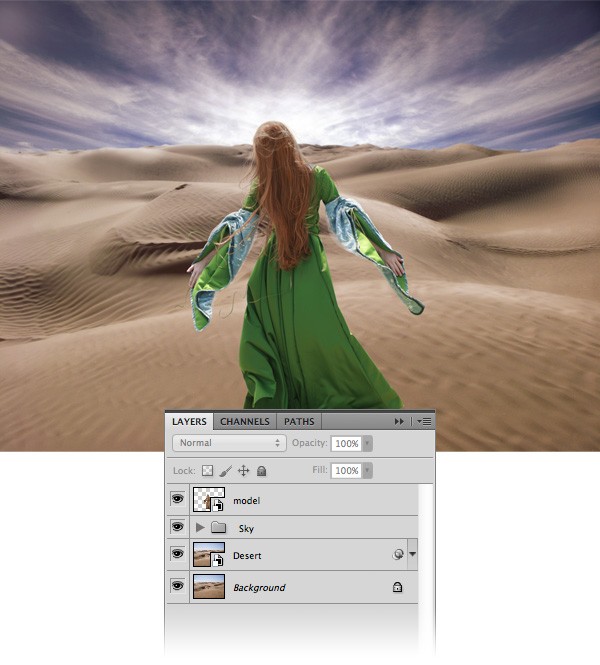
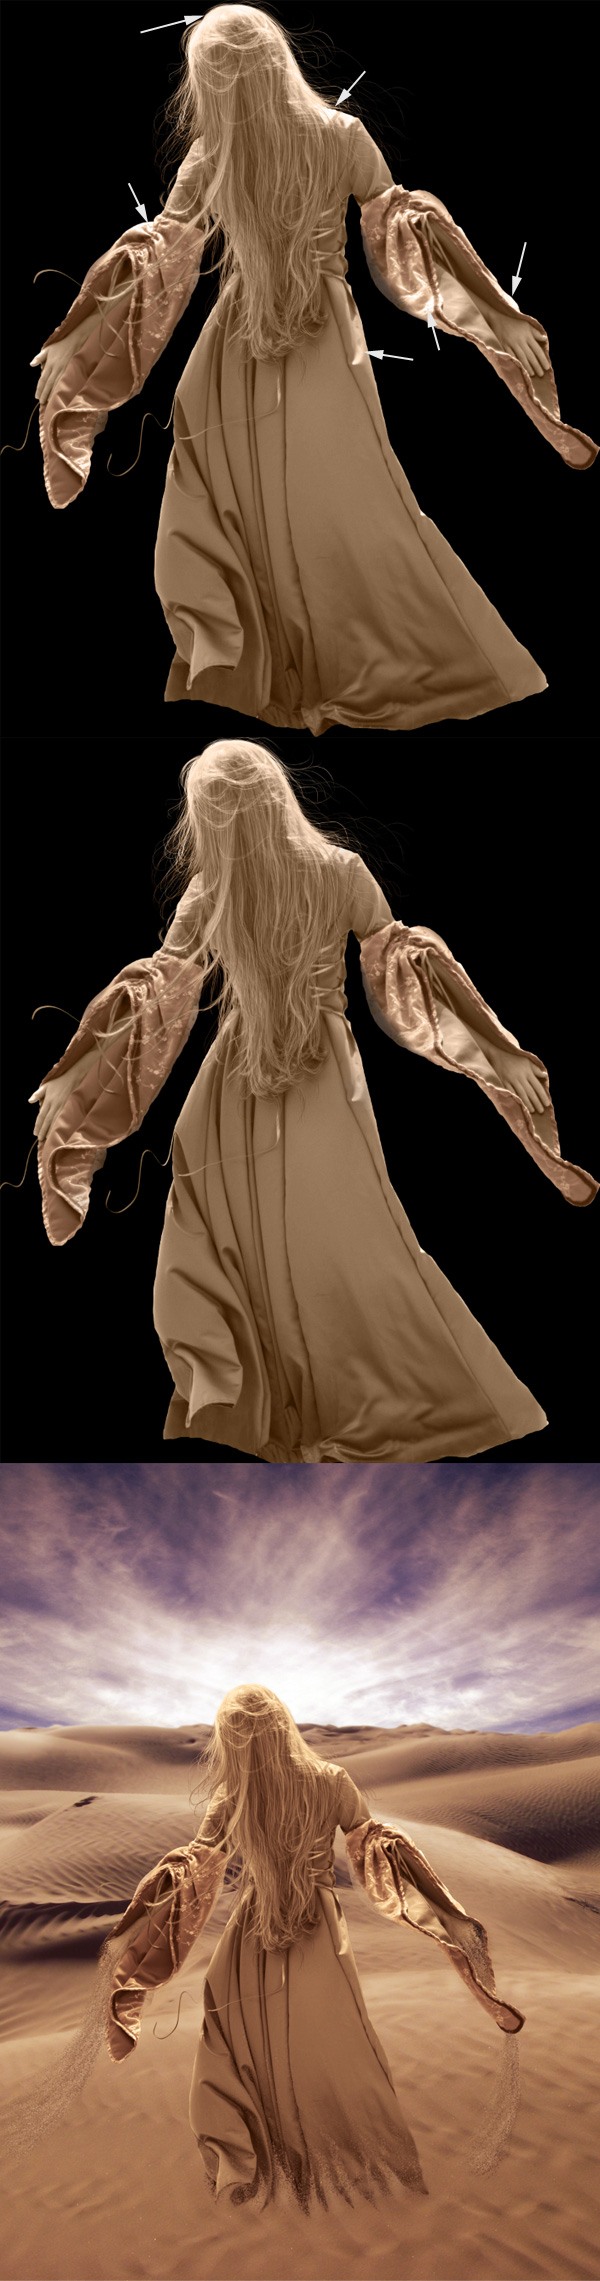
Step 3: Adding the Model
Download this photo and open it in Photoshop. Select the Move Tool (V) and move the model into your photo manipulation scene.
Name this layer “model”, right-click on it and select Convert to Smart Object.
Go to Edit > Free Transform (Ctrl/Cmd + T), hold down the Shift key and scale down this layer. We want the model to be on the foreground dune facing the brightest area of the sky.
Note: the reason I used a smart object is so that I can scale down the layer in the photo manipulation scene and be able to modify the source image at full scale and focus on the details.
Now we will change the color of the model’s dress.
In the Layers Panel, Double-click on the thumbnail of the smart object. The source image will be opened in a new document.
Hold down the Ctrl/Cmd key and click on the thumbnail of the model’s layer to load a selection around her.
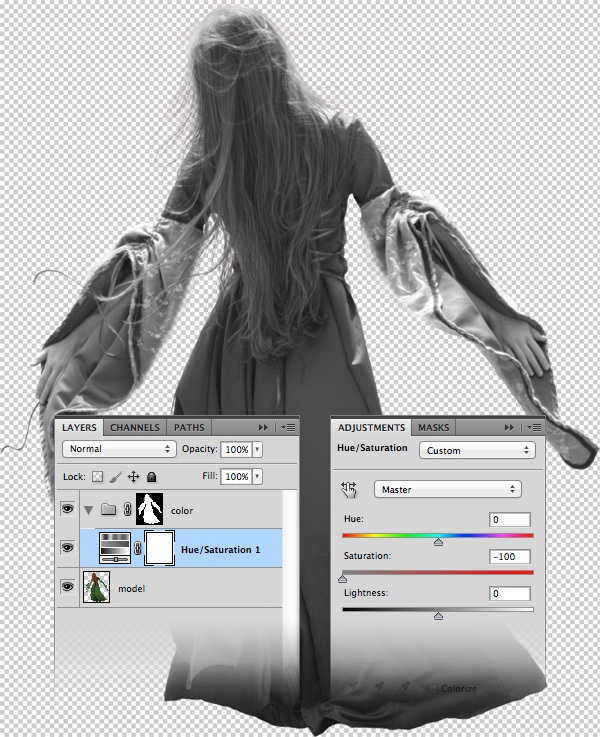
Then create a new group and name it “color”. A mask with the shape of your selection will be automatically added to the group. Now every layer we add inside this group will affect only the model.
Go to Layer > New Adjustment Layer > Hue/Saturation and set the Saturation to -100.
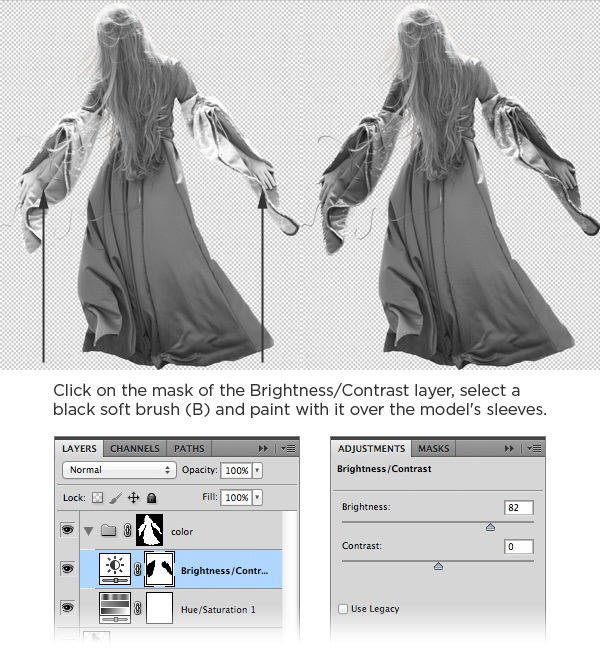
Go to Layer > New Adjustment Layer > Brightness/Contrast and set the Brightness to 82. The sleeves are too bright at the moment. To correct this, click on the mask of the Brightness/Contrast layer, select a soft, black brush (B) and paint with it over the sleeves.
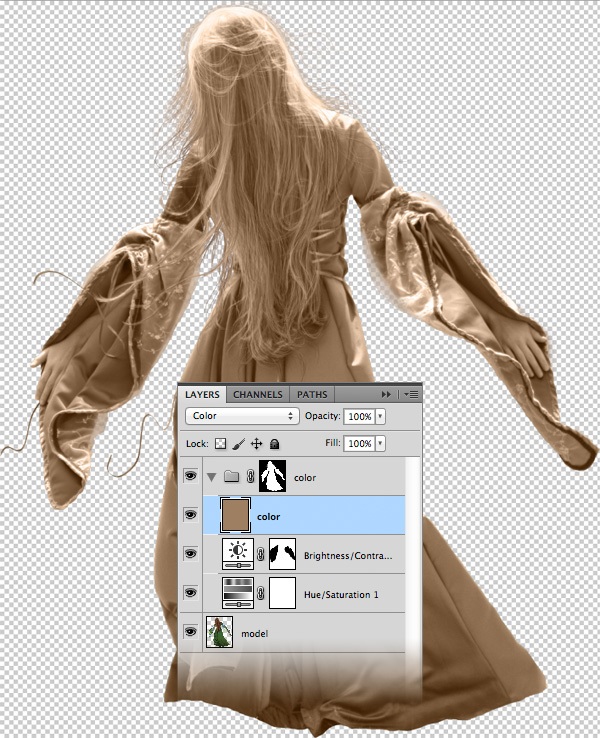
Create a new layer (Ctrl/Cmd + Shift + N) and name it “color”. Then select the Paint Bucket Tool (G) and fill the layer with the color #9e7f62. This is a color that I selected from the desert photo. Set the Blend Mode of this layer to Color.
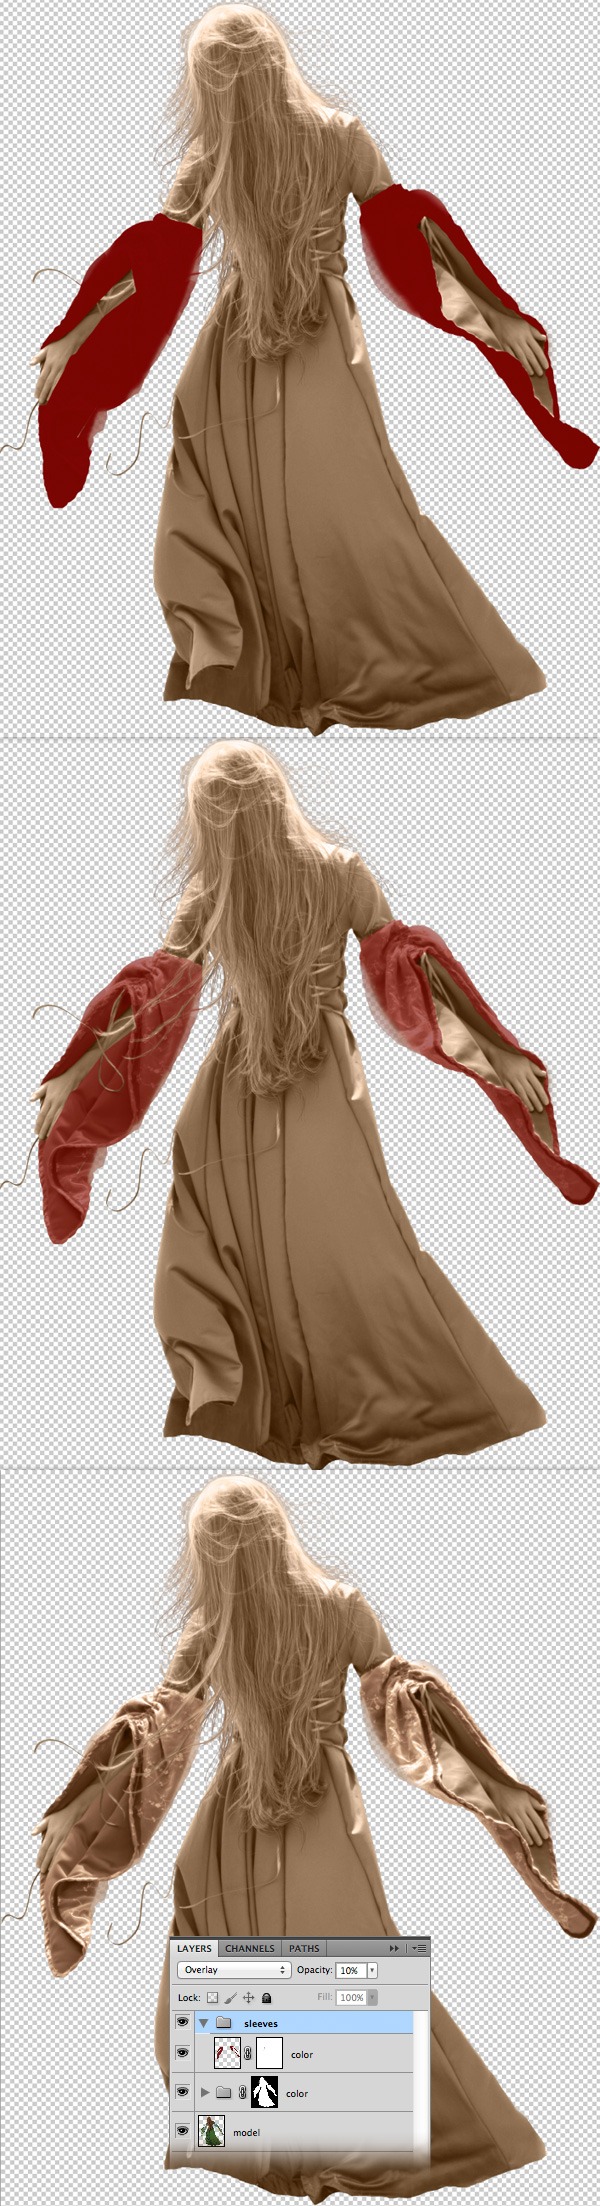
We don’t want the entire dress to have the exact same color, so we will make the sleeves a bit more red. Create a new group outside of the “color” group and name it “sleeves”.
Hold down the Ctrl/Cmd key and click on the thumbnail of the “model” layer to load a selection of it.
Create a new layer inside the “sleeves” group. Set the foreground color to #790100, select a hard brush (B) and paint with it over the sleeves.
Then hit Ctrl/Cmd + D to deselect.
Temporarily lower the Opacity of the layer to 50% and add a mask to it. Then select a small, black brush (B) and paint with it over the areas where the color covers the model’s hair or hands. Then set the Opacity back to 100%.
Take a look at the following image for reference.
Set the Blend Mode of the “sleeves” group to Overlay and with Opacity at 10%.
Save this document and close it. The smart object from your photo manipulation scene will be automatically updated.
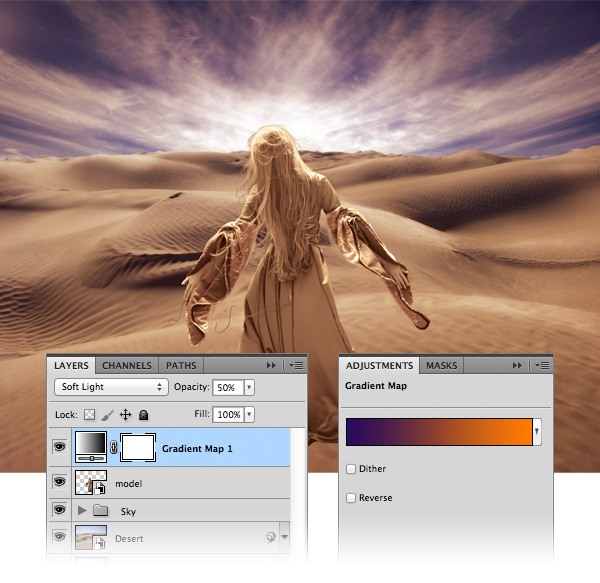
Step 4: Applying a Gradient Map
It’s time to add a simple color adjustment to the image that will make a big difference. Go to Layer > New Adjustment Layer > Gradient Map and use the violet to orange gradient.
It’s a standard gradient in Photoshop, but if you don’t have it, the colors are #290a59 and #ff7c00. Set the Blend Mode of this layer to Soft Light with Opacity at 50%.
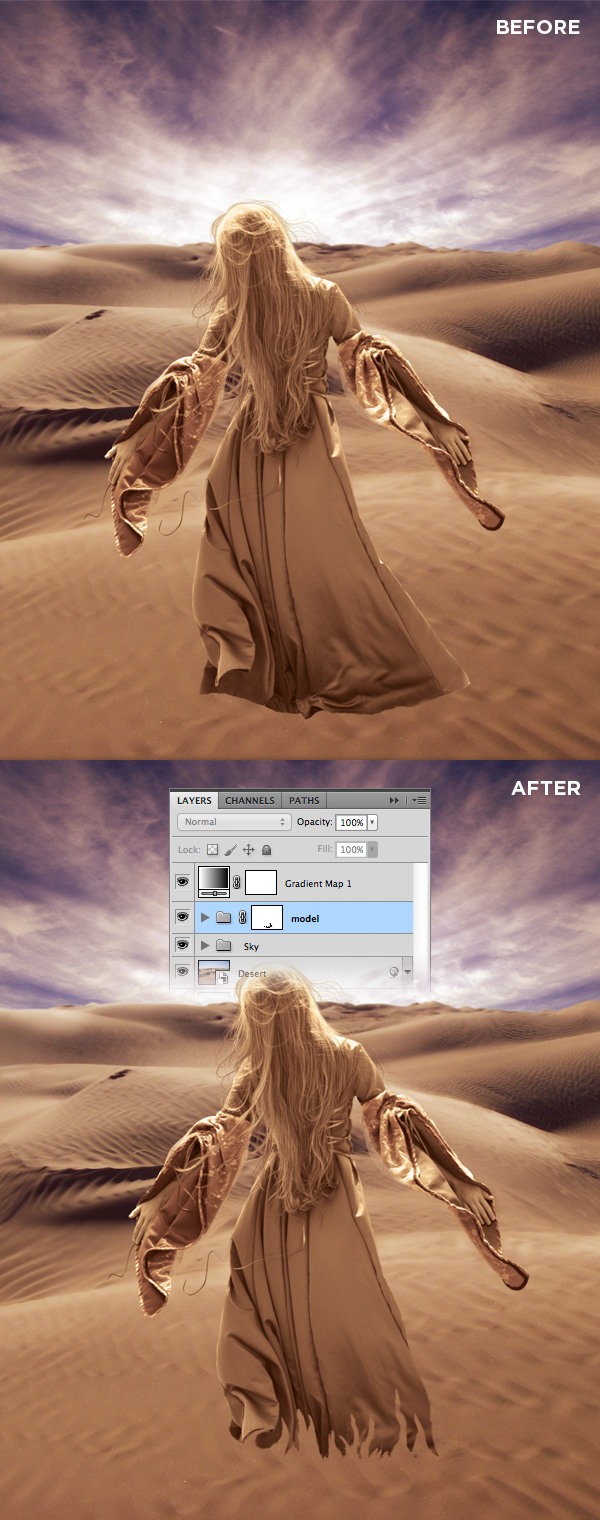
Step 5: Covering the Bottom of the Dress with Sand
Now we will use a mask to create an effect of sand rising from the ground and covering the dress.
Click on the “model” layer to make it active. Hit Ctrl/Cmd + G to put this layer inside a group and name it “model” as well.
With the group active, add a mask to it by going to Layer > Layer Mask > Reveal All (or by using the Add layer mask button from the Layers Panel).
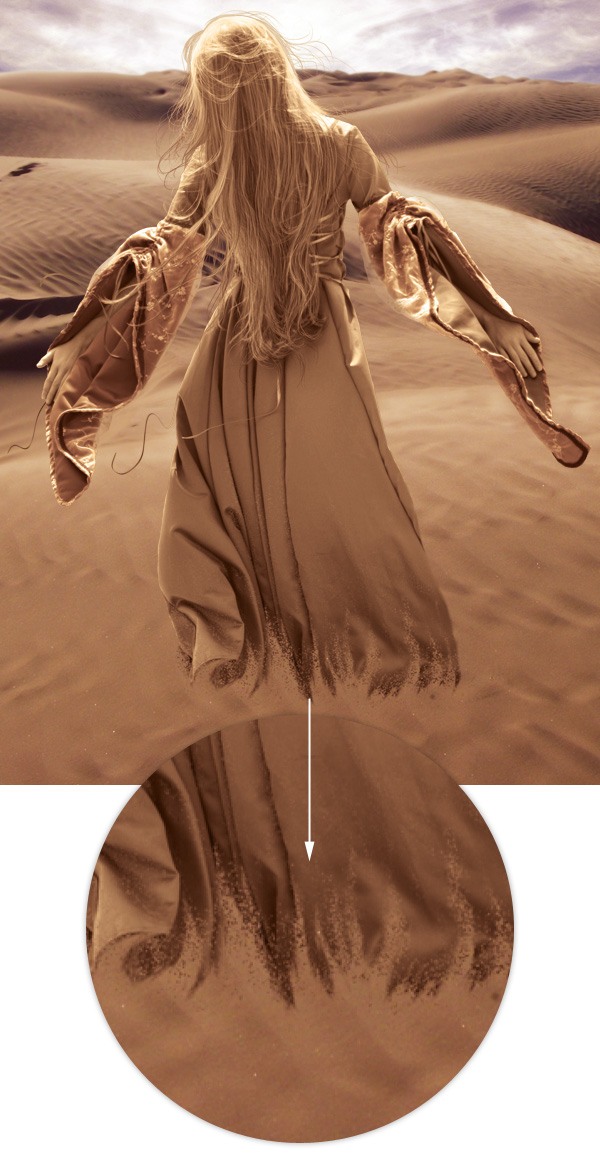
Set the foreground color to black, select a hard brush and paint with it over the dress, as you see in the following image.
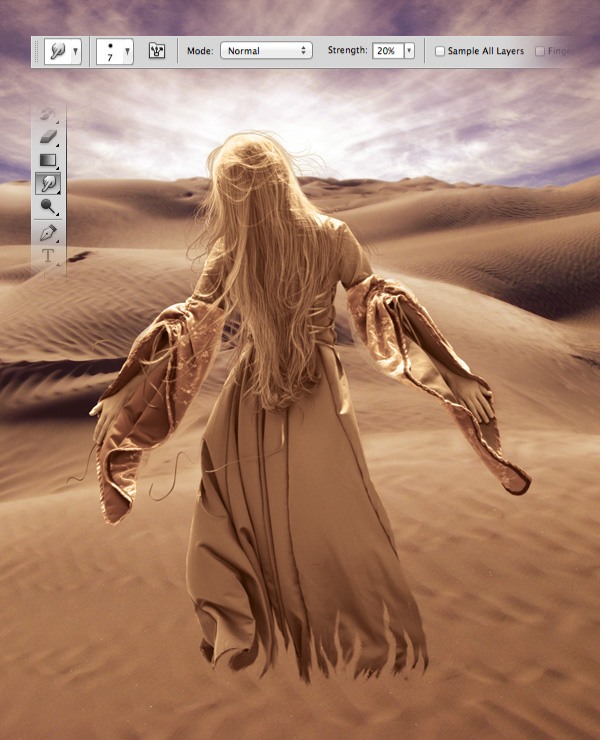
Select the Smudge Tool, right-click on your image and select a hard brush with the size 7px. From the Options Bar that’s typically located at the top of the Photoshop workspace, set the Mode to Normal and the Strength to 20%.
Click on the mask of your “model” group to make it active and draw over the sand paths from the bottom to the top.
Step 6: Adding Particles of Sand
Now we will create a custom brush to add particles of sand onto the dress. This will make the effect we want to achieve more realistic.
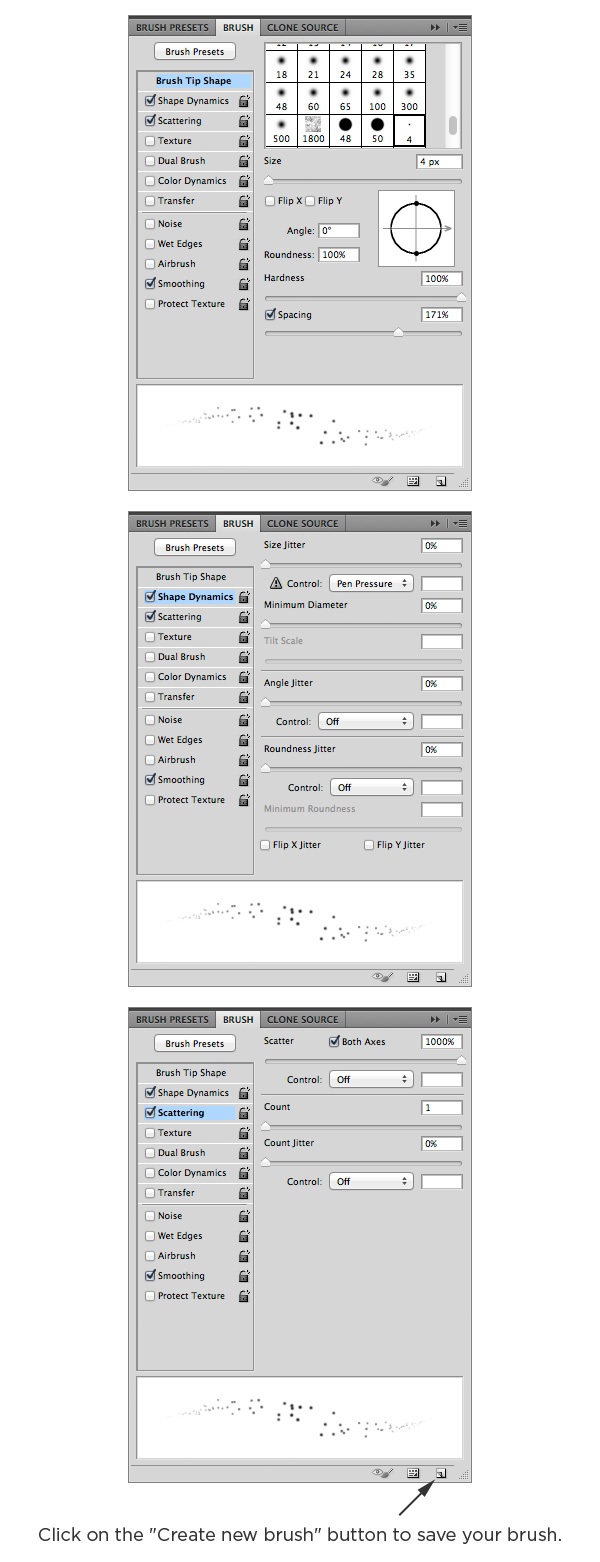
Select the Brush Tool (B) and select a hard circle brush with the size at 4px.
Open the Brush Panel (Window > Brush or hit the F5 key) and use the settings from the following image.
Click on the Create new brush button from the bottom of the the panel to save your brush.
Make sure that the mask of your “model” group is active. Set the foreground color to black. Select the brush that you created and paint with it around the paths of sand.
You can play around with the size of your brush to make smaller or larger particles of sand.
Change the color to white and paint with the brush over the sand. This will reveal areas of the dress, which are darker than the sand, and will add a more realistic touch.
Step 7: Separating the Hands
It’s time to get to a bit more advanced but fun stuff.
We will work on turning the hands of the model into sand. These are the steps that we will follow:
- We need to separate the hands from the original layer and put each one into its own layer
- We will reconstruct the area of the sleeves that was covered by the hands
- We will use the particles brush we created to erase parts of the hands
- We will use the same brush to paint some sand falling onto the ground
Now that we have established what we want to do, let’s see how we are going to achieve it.
Select the Pen Tool (P) and create a path around each hand. Hit Ctrl/Cmd + Enter/Return to convert the path into a selection.
Click on the “model” layer to make it active. Then hide the hands from the layer by going to Layer > Layer Mask > Hide Selection.

Now we need to put each hand into its own layer.
Hold down Ctrl/Cmd and then click on the mask of the “model” layer. Doing so should select the white area of the mask (the entire layer except for the hands). We want a selection of the hands, so what we have to do is invert the selection by going to Select > Inverse.
Click on the “model” layer to make it active. Then hit Ctrl/Cmd + J to copy the selected area to a new layer.
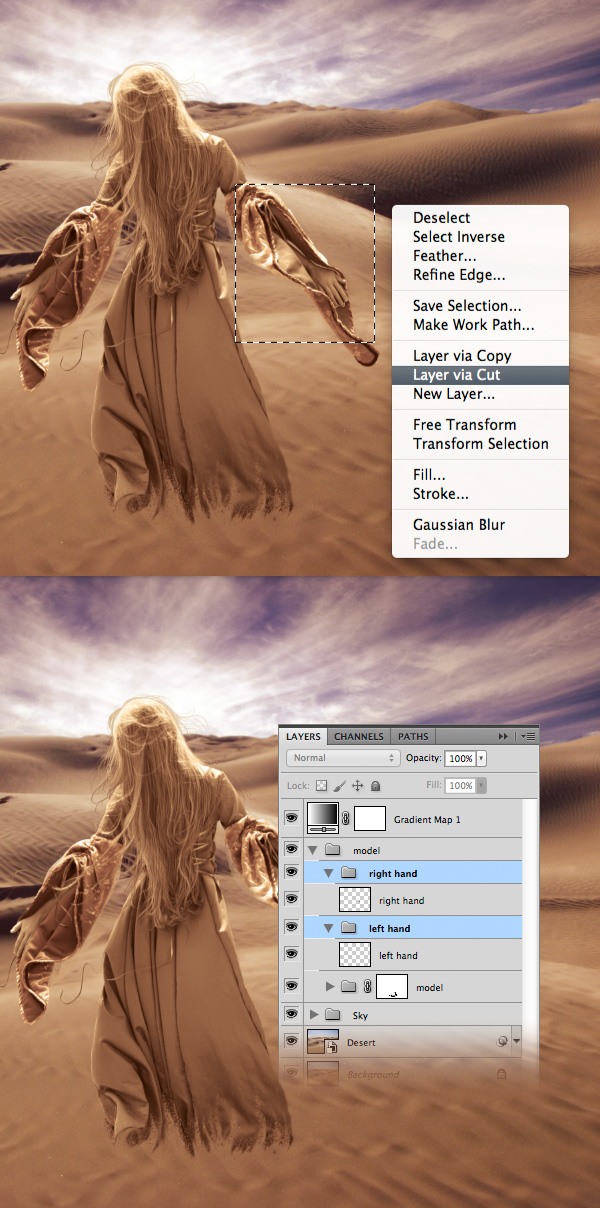
We want each hand to have its own layer. To do that, simply use the Rectangular Marquee Tool (M) to create a selection over one hand.
Then right-click on your image and choose Layer via Cut from the menu that appears. This will separate the selected hand and put it inside its own layer. Name these layers “right hand” and “left hand” and put each one inside a group (Ctrl/Cmd + G).
Step 8: Reconstructing the Sleeves
Later we will mask the model’s hands to look like they are turning into sand.
But before that, we need to reconstruct the sleeves that were covered by the hands.
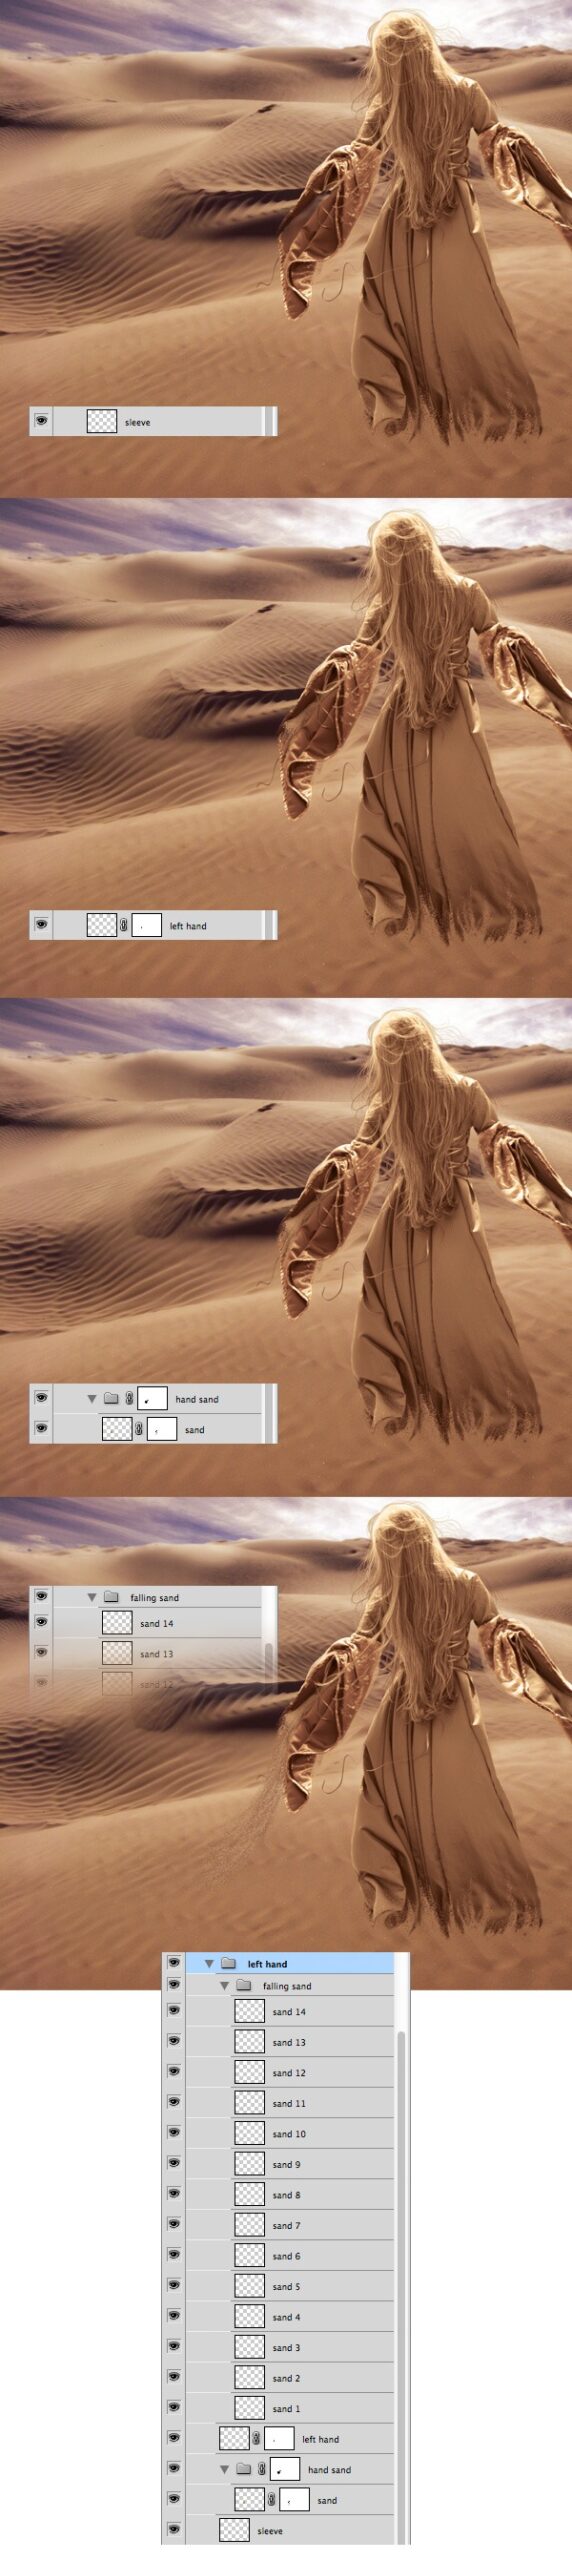
First, make the hands layers invisible by clicking on their eye icon in the Layers Panel. Then create a new layer (Ctrl/Cmd + Shift + N) inside the “right hand” group. Name this layer “sleeve”.
Hold down the Ctrl/Cmd key and click on the thumbnail of the “right hand” layer to create a selection around the hand (1).
Then use a soft brush to fill this selection with colors from the actual sleeve (2). To select a color from the image use the Eyedropper Tool (I).
Hit Ctrl/Cmd + D to deselect and use a smaller brush to fill any empty margins that were left around the hand (3).
Tip: when you have the Brush Tool active you can quickly select a color by holding down the Alt/Option key and clicking on the desired color from your image.
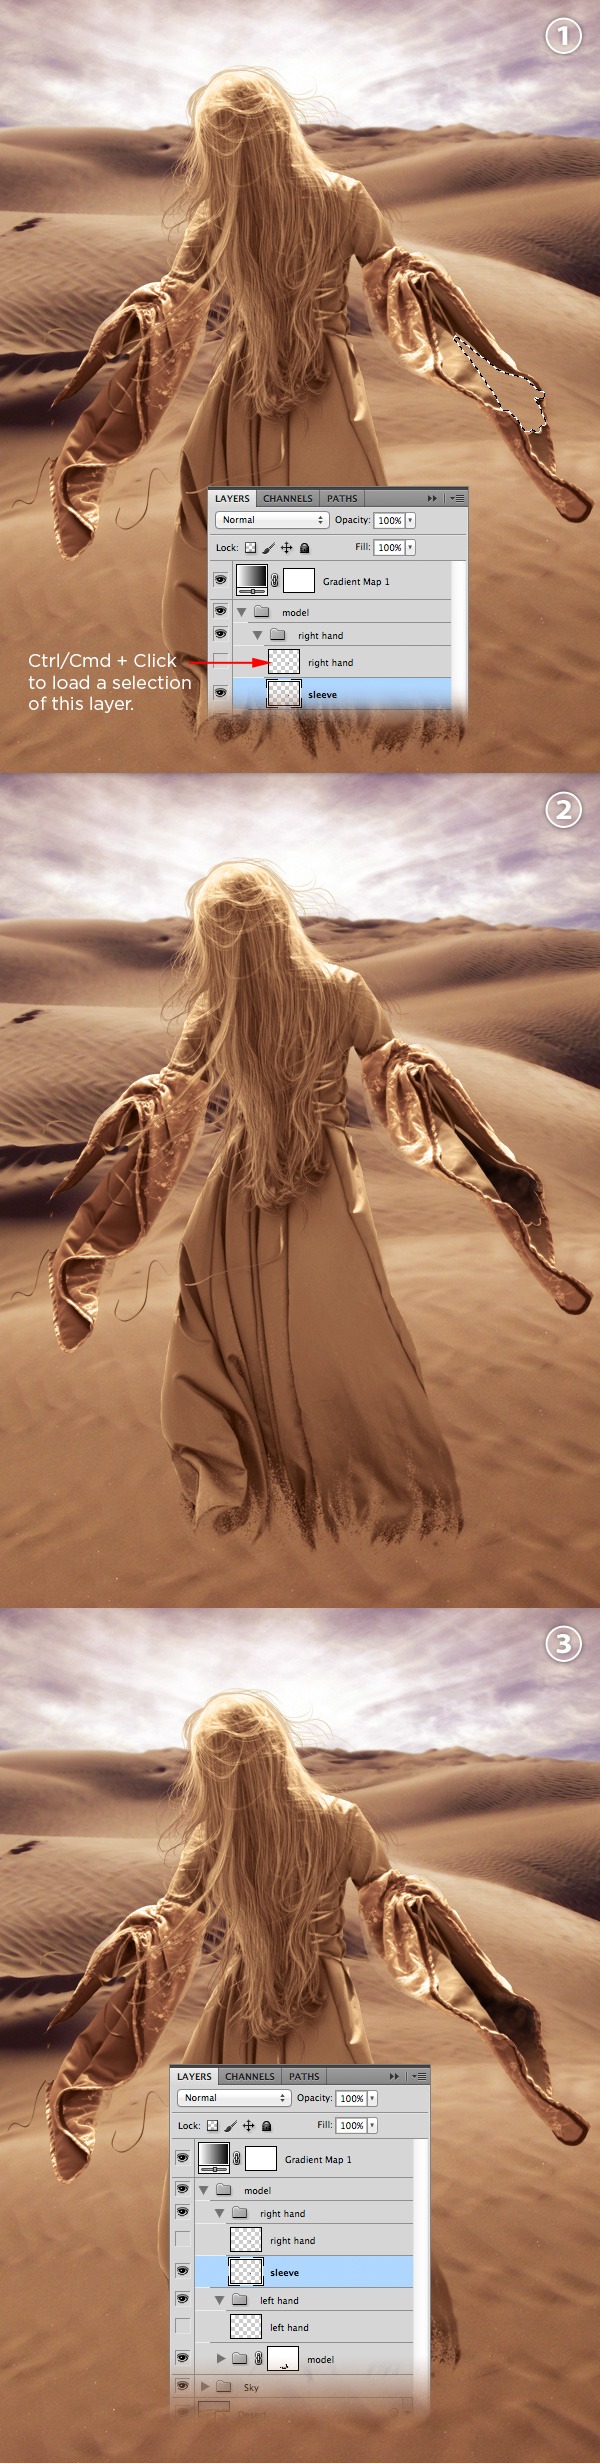
This reconstruction does not have to be perfect because it will be mostly covered by the hand of the model and the sand.
Step 9: Masking the Hand
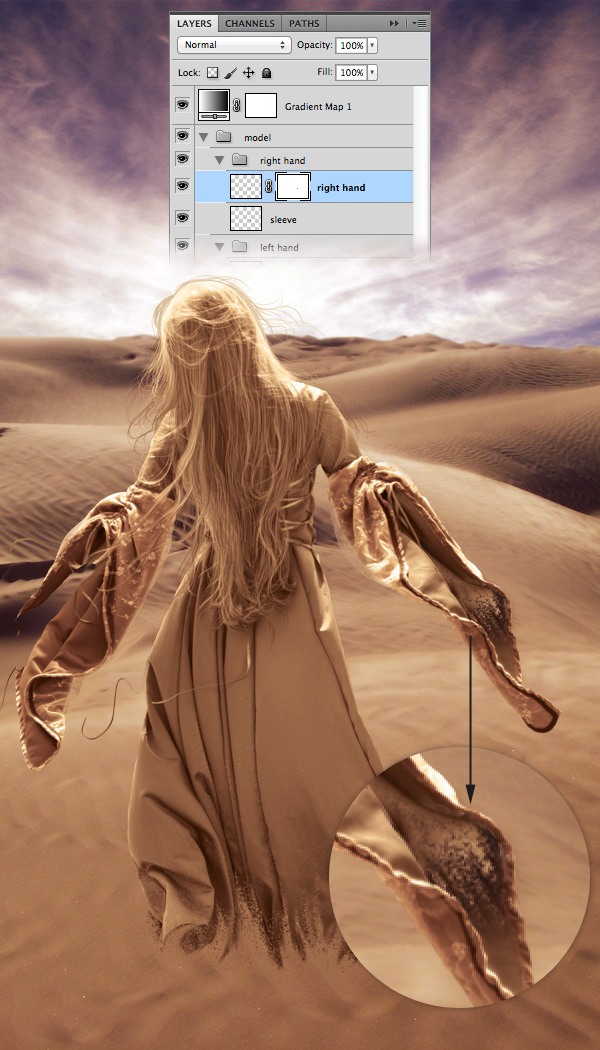
Click on the eye icon of the “right hand” layer to make it visible again. Add a mask to this layer (Layer > Layer Mask > Reveal All).
Set the foreground color to black.
Select the particles brush that you created earlier and use it to mask areas of the hand, as you see in the following image.
Step 10: Adding Some Sand onto the Hand
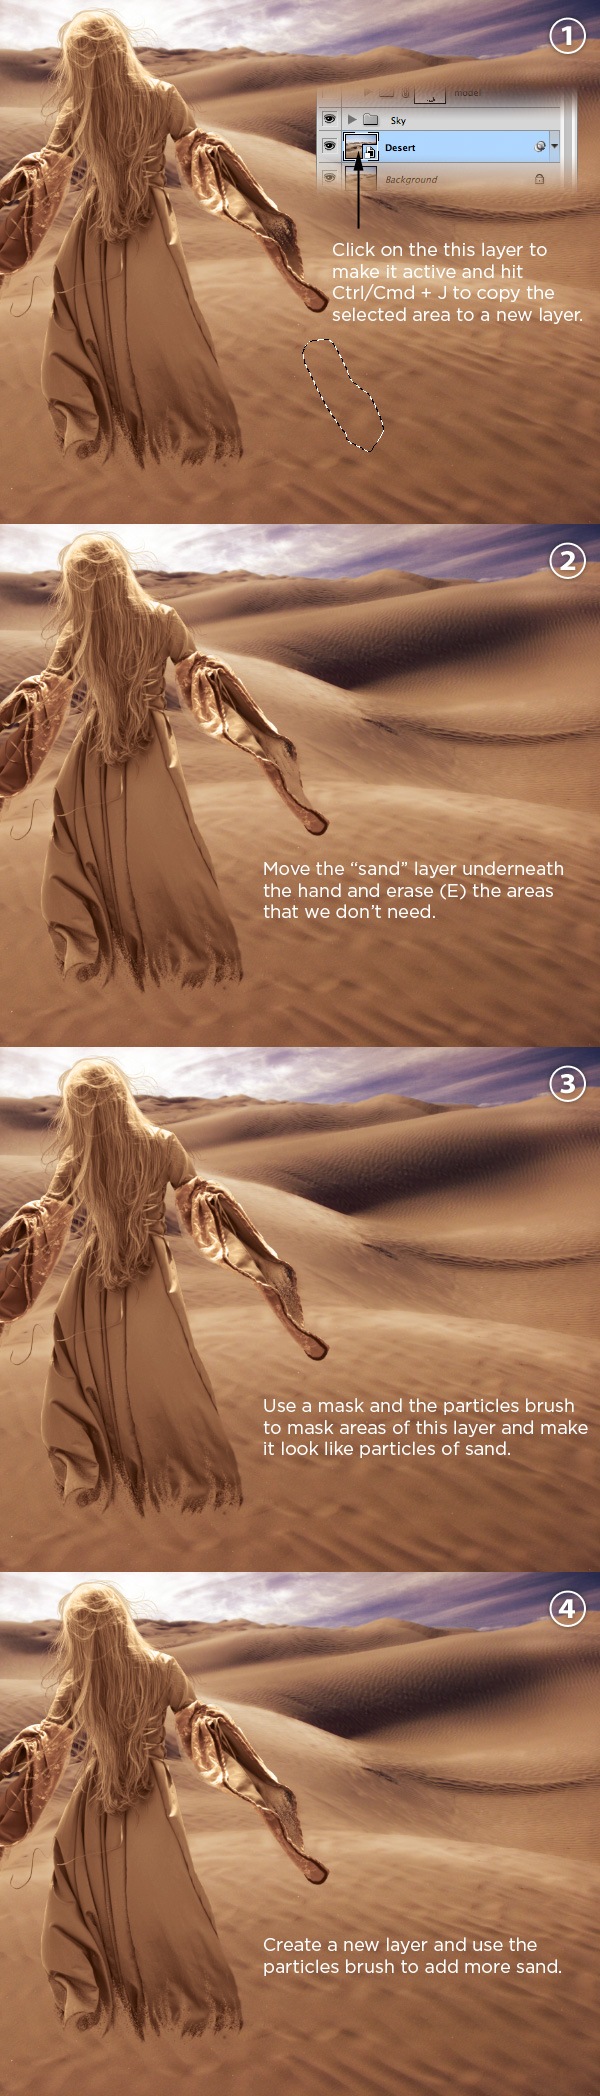
Select the Lasso Tool (L) and use it to select an area from the desert. Click on the “Desert” layer to make it active and hit Ctrl/Cmd + J to copy the selected area to a new layer (1).
Name this layer “sand” and move it underneath the “right hand” layer.
Hit Ctrl/Cmd + G to put this layer inside a group and name it “hand sand”. Use the Move Tool (V) to move the “sand” layer underneath the hand and erase (E) the areas of this layer that we don’t need. Leave only a path of sand from the fingers to the bottom of the sleeve (2).
Add a mask to the “sand” layer (Layer > Layer Mask > Reveal All).
Set the foreground color to black and use the particles brush (B) to mask areas of this layer and make it look like sand particles (3).
Then you can create a new layer inside this group and use the same brush to add more sand. Use the Eyedropper Tool (I) to select an appropriate color (4).
Step 11: Creating the Falling Sand
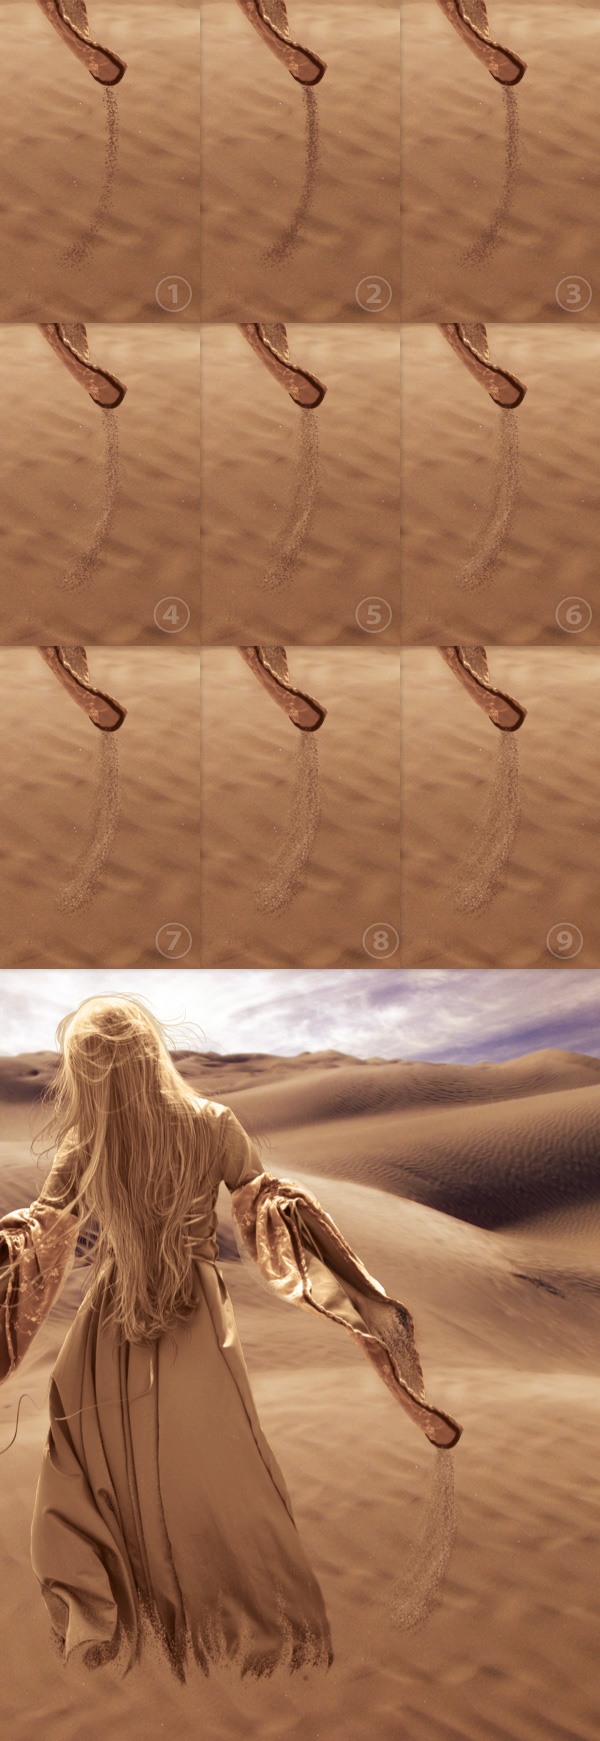
Create a new group and name it “falling sand”. Then use the particles brush (B) to create sand falling from the sleeve onto the ground.
Hold the Alt/Option key to pick up colors from the desert. Use a combination of dark and bright sand colors to create a realistic effect. Also, you can change the size of your brush to create smaller or bigger particles.
I added a new layer for each color that I used.
Below you can see step by step how I created the falling sand.
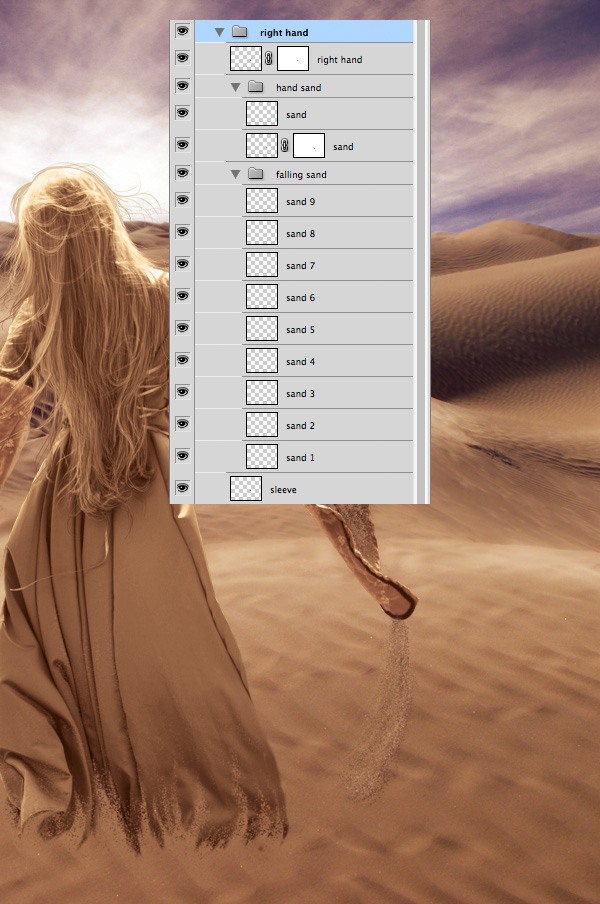
In the following image you can see how I organized the layers from the “right hand” group.
Step 12: Adding Sand to the Left Hand
Repeat the technique that you used for the right hand to create sand on the left one. Here is a brief summary of the process:
- Make the “left hand” layer invisible and work on reconstructing the sleeve
- Mask some areas of the hand layer using the particles brush and the black color
- Copy a small part of the desert sand, move it above the hand and mask this layer using the particles brush
- Create falling sand using colors from the sand on the ground.
Take a look at the following image for reference.
Step 13: Adding Shadows and Highlights to the Ground Sand
Create a new group, name it “shadows & highlights” and put it above the “model” group. Create a new layer inside this group (Ctrl/Cmd + Shift + N).
Select a hard brush with the size around 10px and use black and white colors to add shadows and highlights to the sand from the bottom of the dress. Use black around the paths of sand and white in the middle. Take a look at the following image for reference.
Name this layer “shadows & highlights”, right-click on it and select Convert to Smart Object.
Then go to Filter > Blur > Gaussian Blur and set the Radius to 16px. Set the Blend Mode of this layer to Soft Light and Opacity to 70%.
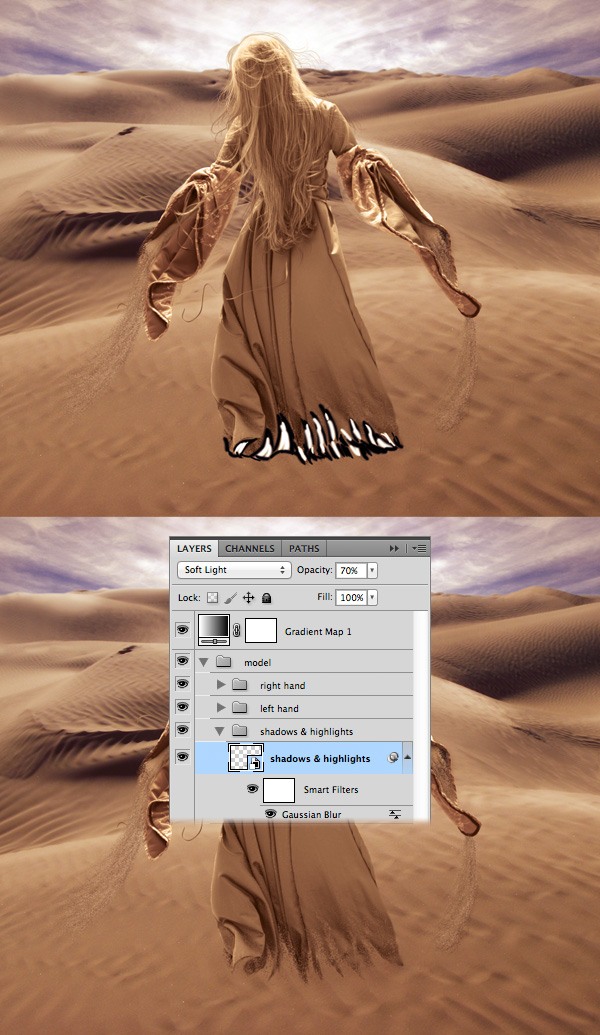
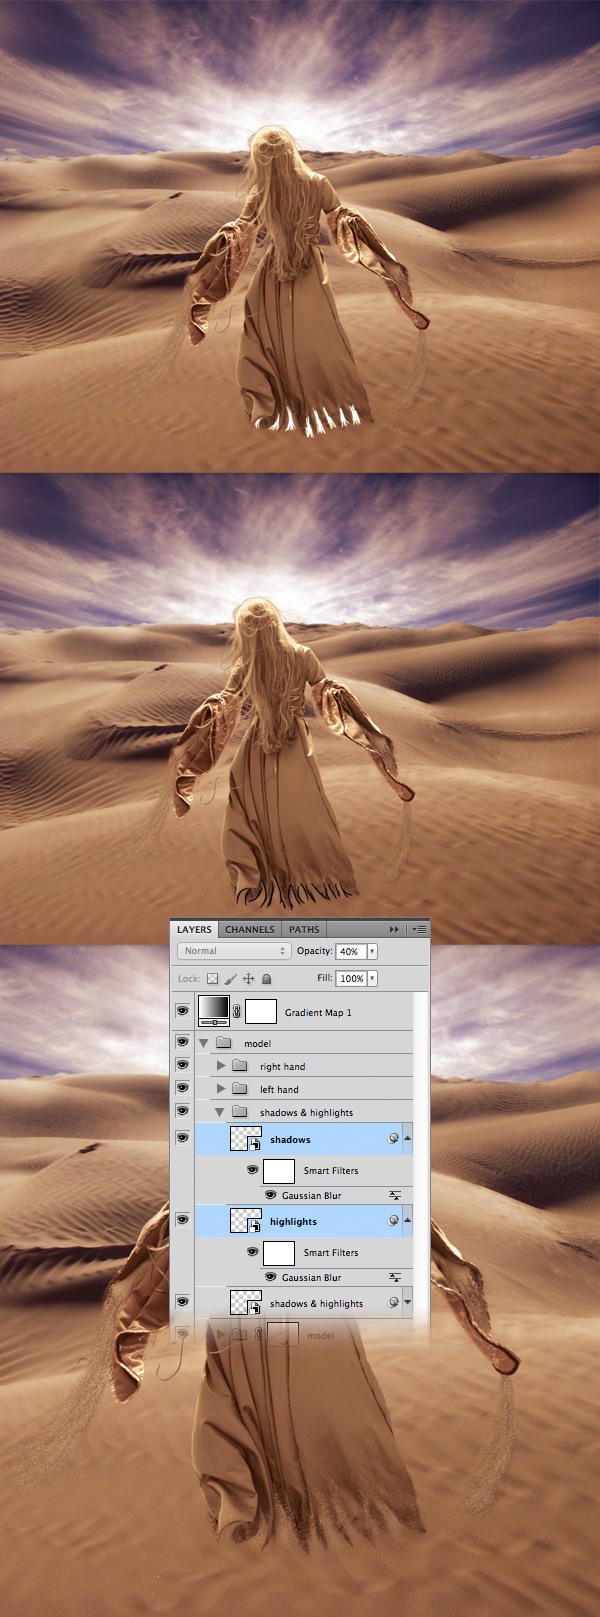
You can emphasize the shadows and highlights a little bit more by creating a new layer for each one and by using a smaller-sized brush. Convert each of these layers into smart objects and add a 5px Gaussian Blur to each one.
Then set their layers’ Blend Mode to Soft Light and Opacity at 40%.
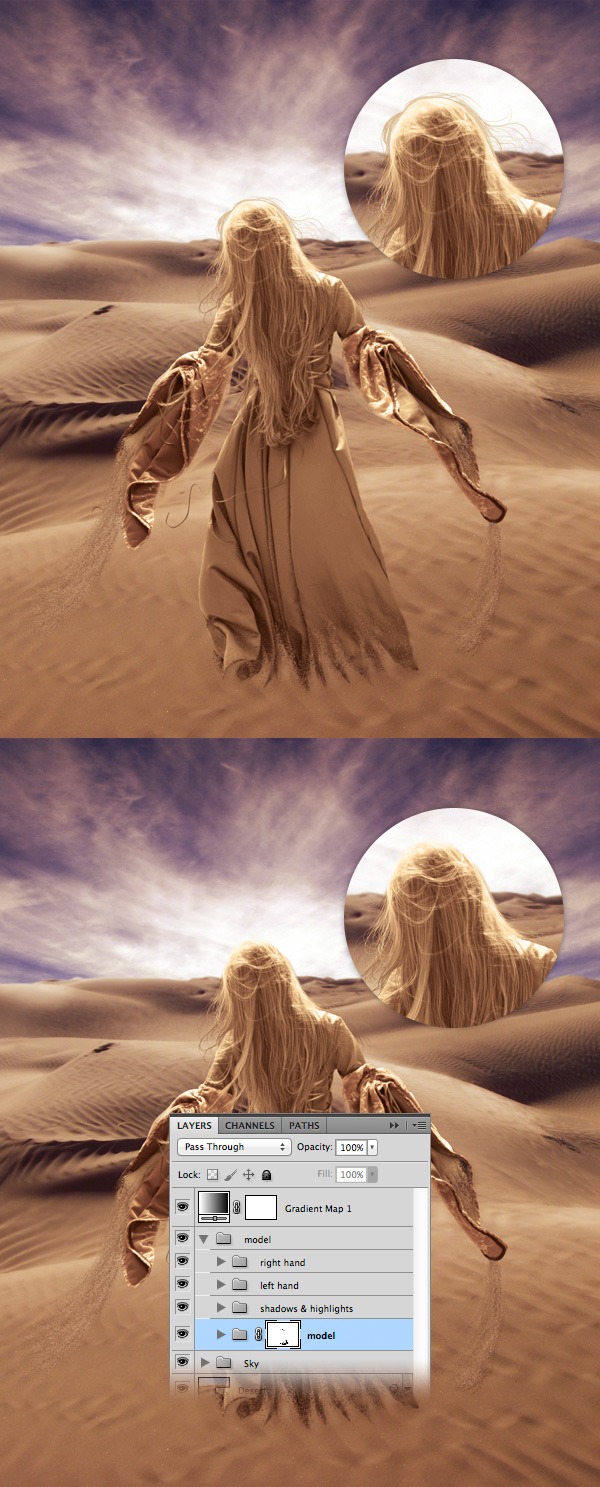
Step 14: Performing Some Adjustments to the Model
The model’s hairs which go over the sky layer look a bit unrealistic in this particular scene, so we will remove them. Click on the mask of the “model” group to make it active, select a soft, black brush and erase those hairs.
Some areas of the model’s dress are too bright for this scene. To correct this issue, we will use the Burn Tool (O).
Double-click on the thumbnail of the “model” smart object to open the source image in a new document.
Select the Burn Tool (O), set the Mode to Highlights and the Exposure to 15% in the Options Bar. Then use this tool to lower the brightness of the highlights shown in the image below.
Tip: You can add a temporary layer underneath the “model” layer and fill it with black in order to distinguish the highlights better.
Delete the layer filled with black, save this document and close it.
Step 15: Adding Shadows to the Model
Create a new group underneath the “model” group and name it “shadows”.
We’ll start with the sand shadows.
Hold down the Ctrl/Cmd key and select the “right hand” and “left hand” groups. Right-click on one of these groups and choose Duplicate Layers from the menu and then click OK.
With the duplicated groups selected, go to Layer > Merge Layers (Ctrl/Cmd + E). This will merge the two groups into a single layer.
Name this layer “sand shadow”, double-click on it to open the Layer Style window and add a black Color Overlay layer effect. Move this layer inside the “shadows” group, right-click on it and select Convert to Smart Object.
Go to Edit > Transform > Flip Vertical.
Then use the Move Tool (V) to move this layer down. Add a 1px Gaussian Blur to this layer and set its Opacity to 10%.
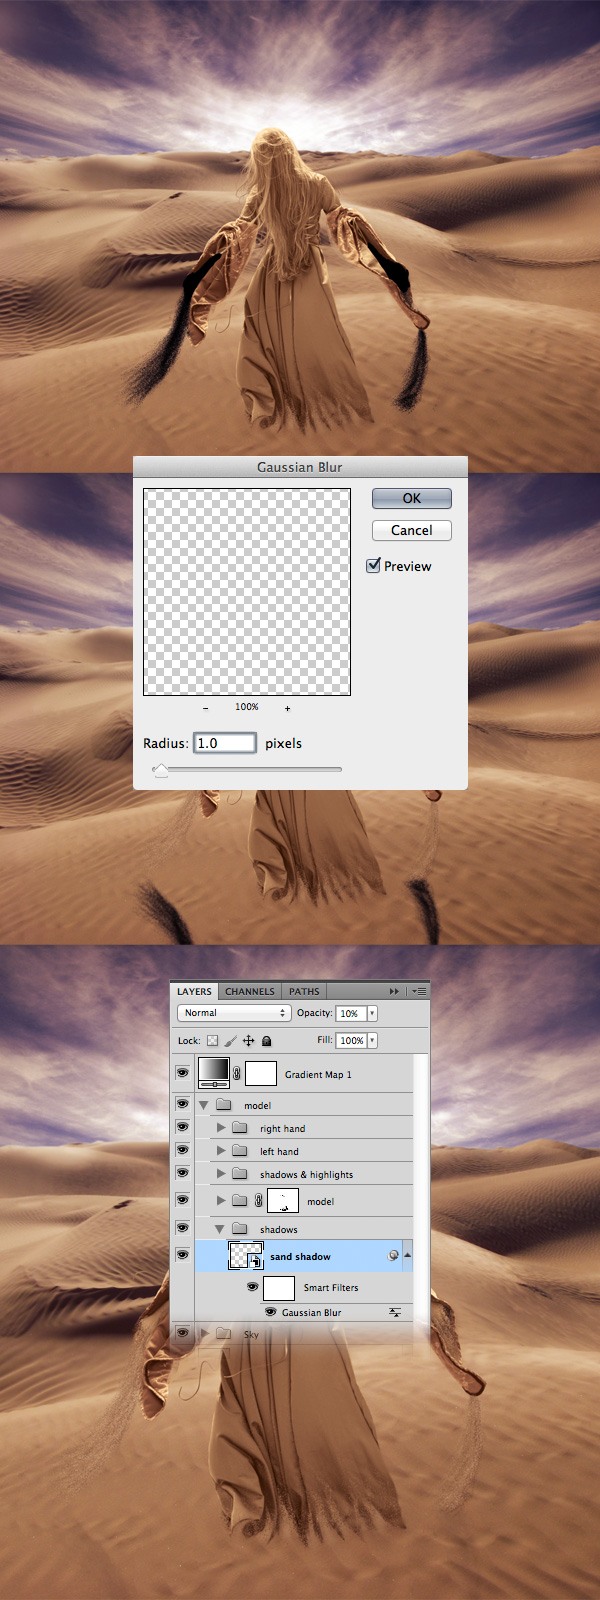
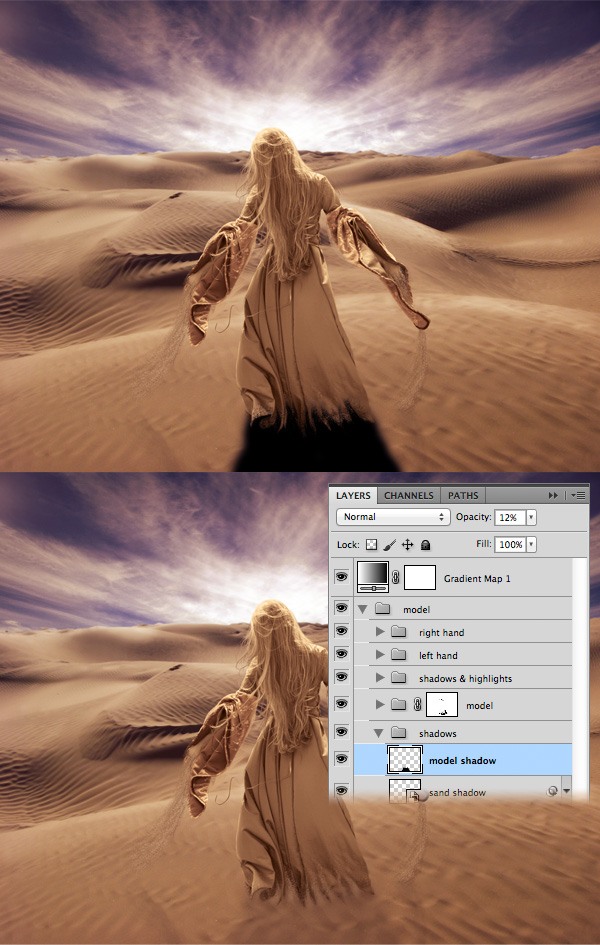
Create a new layer inside the “shadows” group and name it “model shadow”. Set your foreground color to black.
Then select a big, soft brush (B) and paint a shadow as you see in the image below. Set the Opacity of this layer to 12%.
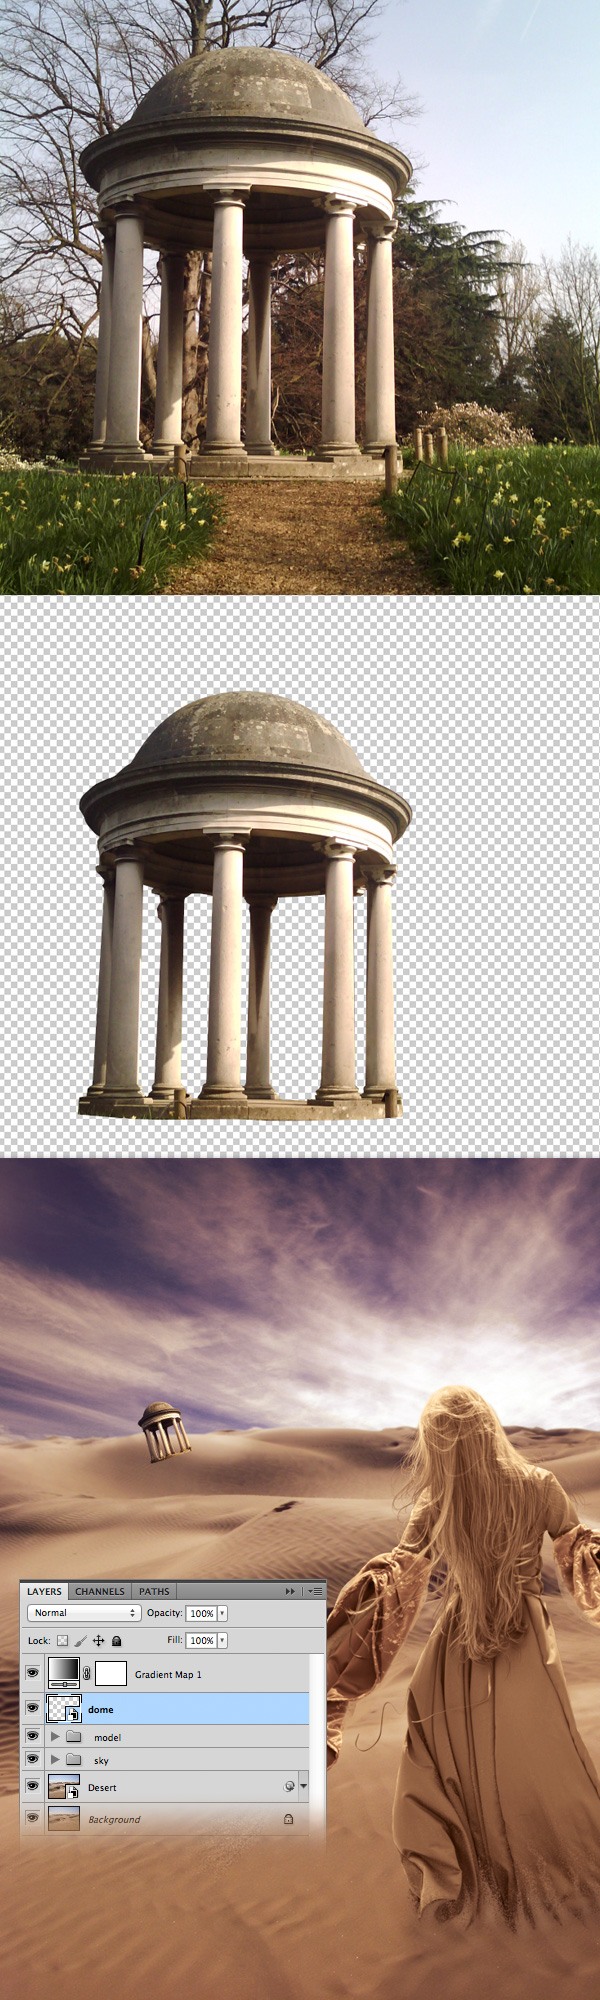
Step 16: Adding the Dome
Download this dome photo and open it in Photoshop.
Use the Pen Tool (P) to separate the dome from the background, as you see in the image below.
Move the dome into your photo manipulation scene using the Move Tool (V). Name this layer “dome”, right-click on it and choose Convert to Smart Object.
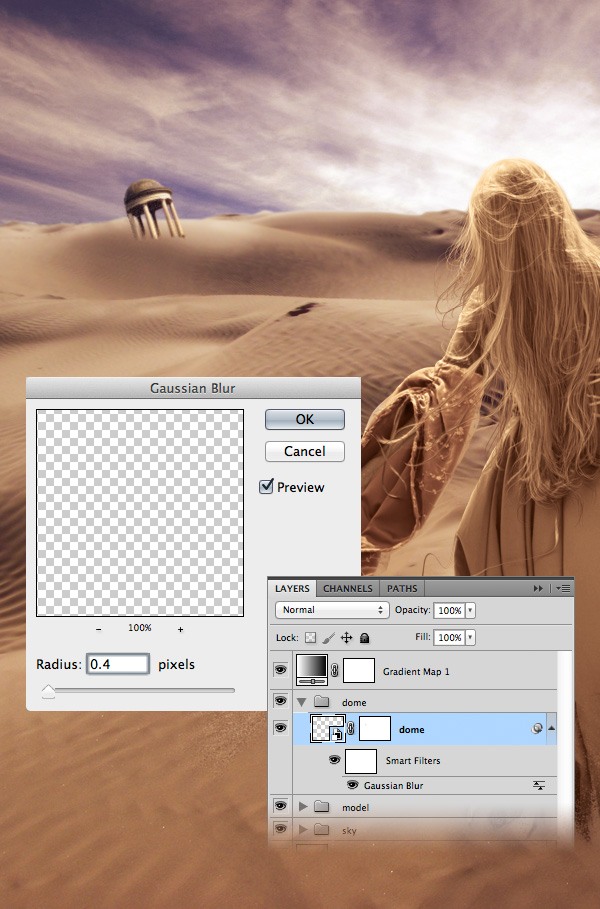
Go to Edit > Free Transform (Ctrl/Cmd + T), hold down Shift to maintain the proportions and then scale down and rotate the dome. Move this layer onto a dune from the background.
Take a look at the following image for reference.
Because the dome is in the background, we need to make it a bit blurry so our depth of field is as accurate as possible. Go to Filter > Blur > Gaussian Blur and set the Radius to 0.4px.
Add a mask to this layer (Layer > Layer Mask > Reveal All).
Set the foreground color to black. Then select a soft brush (B) and paint with it over the bottom area of the columns to make the dome look like it’s buried in the desert. Select the particles brush and set its size to 2px and the Opacity to 50%.
Make sure that the mask is still active and paint with this brush over the dome.
Put this layer inside a group (Ctrl/Cmd + G) and name it “dome”.
The left hand area of the dome is a bit too bright at the moment. We need to make it darker because the light comes from the right hand side.
Create a new layer and name it “shadows”.
Right-click on it and select Create Clipping Mask from the menu that appears. Select a soft, black brush (B) and paint with it over the left hand area of the dome. Then set the Opacity of this layer to 30%.

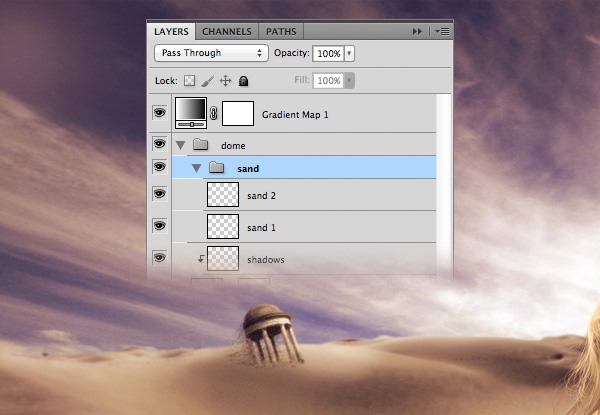
Step 17: Adding Sand to the Dome
Create a new group and name it “sand”.
Then use the particles brush (B) to create sand as you did for the model’s dress and hands. Pick up your colors from the ground sand near the dome. Then add a subtle Gaussian Blur filter (0.2 – 0.3px) to your sand layers.
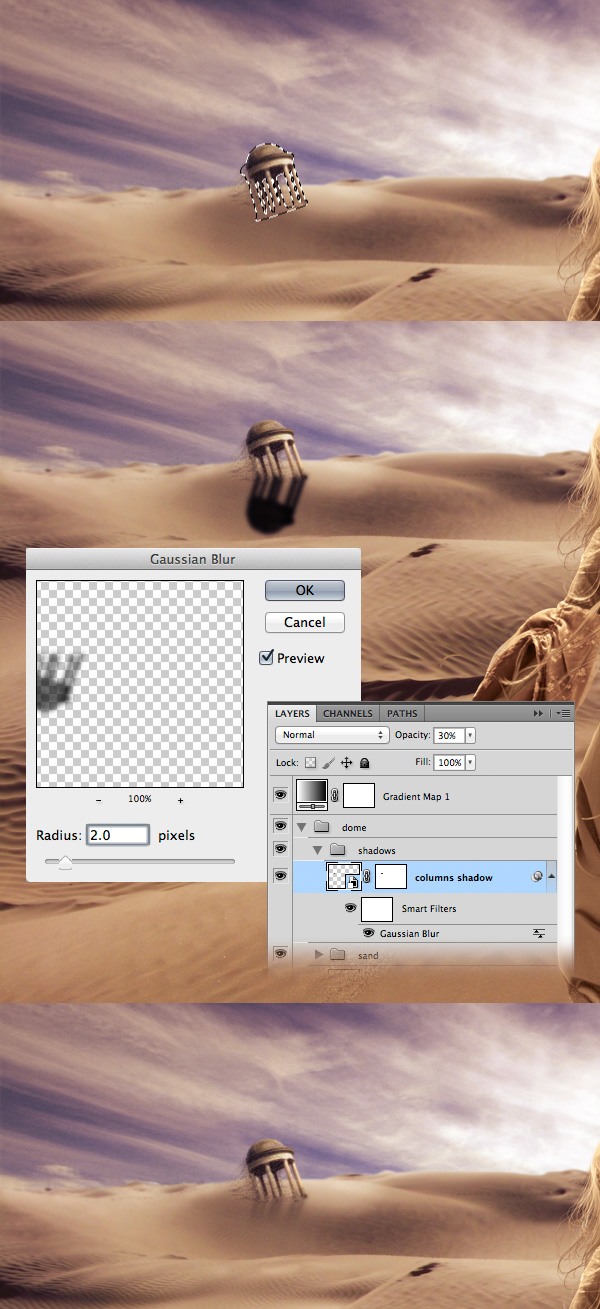
Step 18: Adding Shadows to the Dome
Create a new group and name it “shadows”.
Hold down the Ctrl/Cmd key and click on the thumbnail of the “dome” layer to select it. Create a new layer inside the “shadows” group and fill the selection with black using the Paint Bucket Tool (G). Hit Ctrl/Cmd + D to deselect.
Right-click on this layer and choose Convert to Smart Object from the menu that appears.
Then go to Edit > Transform > Flip Vertical. Use the Move Tool (V) to move the shadow at the bottom of the dome. Go to Filter > Blur > Gaussian Blur and set the Radius to 2px.
Add a mask to this layer (Layer > Layer Mask > Reveal All).
Select a soft, black brush and mask the bottom area of the shadow. Name this layer “columns shadow” and set its Opacity to 30%.
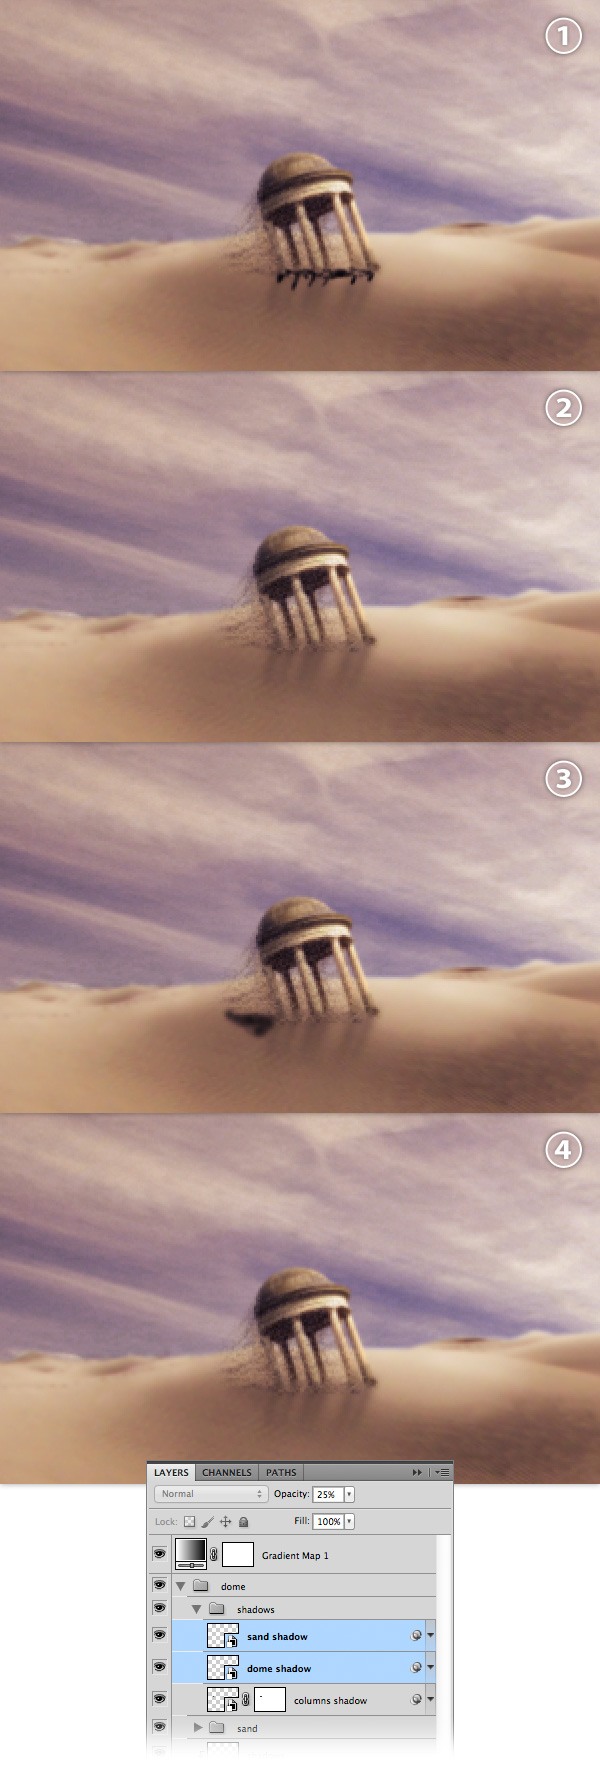
Create a new layer and use a black brush (B) to paint a shadow at the bottom of the columns (1). Name this layer “dome shadow”, right-click on it and choose Convert to Smart Object from the menu that appears.
Go to Filter > Blur > Gaussian Blur and set the Radius to 2.8px.
Set the Opacity of this layer to 30% (2).
Create a new layer and use a soft, black brush (B) to create a shadow for the sand (3). Name this layer “sand shadow”, right-click on it and choose Convert to Smart Object.
Then go to Filter > Blur > Gaussian Blur and set the Radius to 2px. Set the Opacity of this layer to 25% (4).
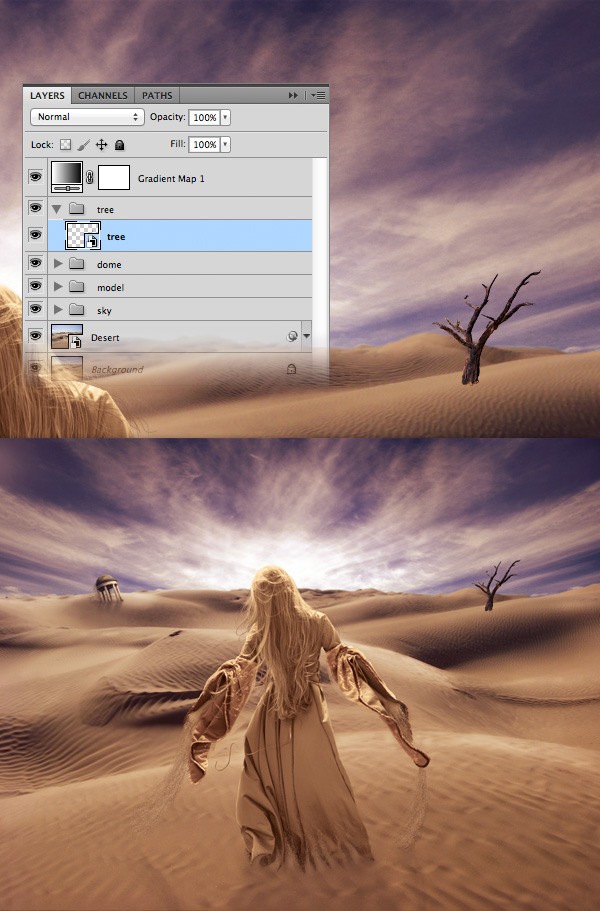
Step 19: Adding the Tree
Download this tree image and open it in Photoshop.
Use the Quick Selection Tool (W) to select the tree. Then hit Ctrl/Cmd + C to copy your selected area, go back to your photo manipulation scene and hit Ctrl/Cmd + V to paste it.
Name this layer “tree”, right-click on it and choose Convert to Smart Object from the menu that appears. Then go to Edit > Free Transform (Ctrl/Cmd + T), hold down Shift and scale down this layer.
Use the Move Tool (V) to move the tree onto the background dune from the right hand side of the image.
Put this layer inside a group (Ctrl/Cmd + G) and name it “tree”.
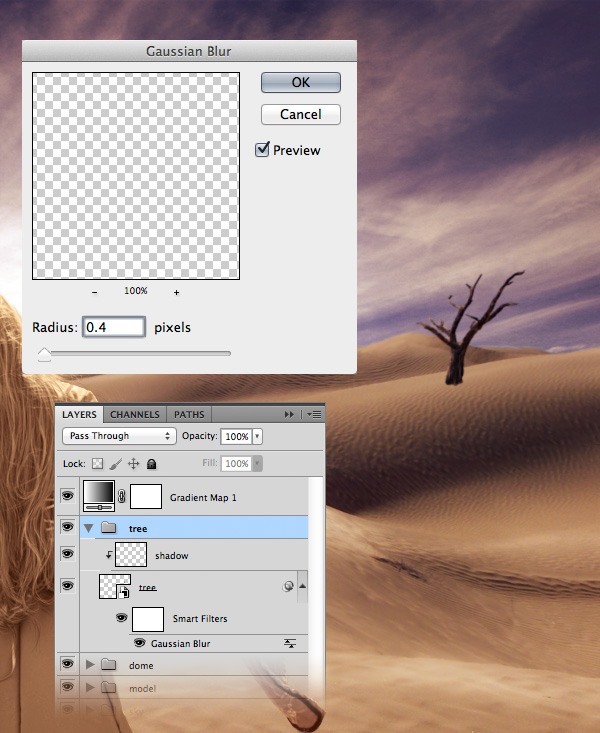
Step 20: Adding Shadows onto the Tree
Create a new layer and name it “shadow”. Right-click on it and choose Create Clipping Mask from the menu that appears. Set the foreground color to black, select a small, soft brush and paint with it it over the tree’s branches.
Set the Opacity of this layer to 70%.
Click on the “tree” layer to make it active and add a 0.4 Gaussian Blur to it.
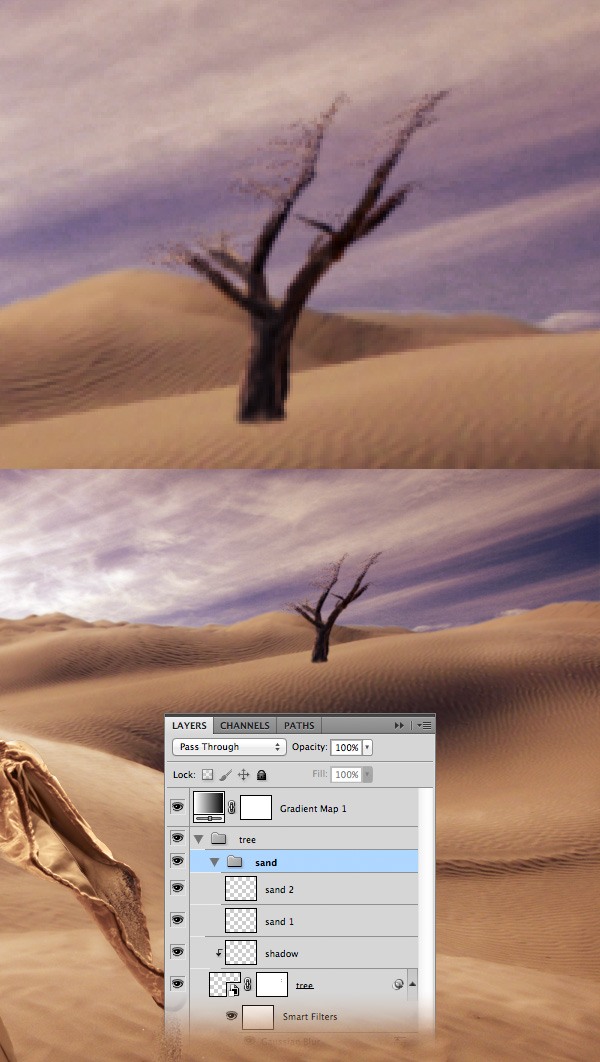
Step 21: Creating the Sand for the Tree
Add a mask to the “tree” layer (Layer > Layer Mask > Reveal All). Select the particles brush (B) and use it to mask some of the branches.
Create a new group and name it “sand”. Then use the particles brush to paint some sand that flies away from the branches.
Take a look at the following image for reference.
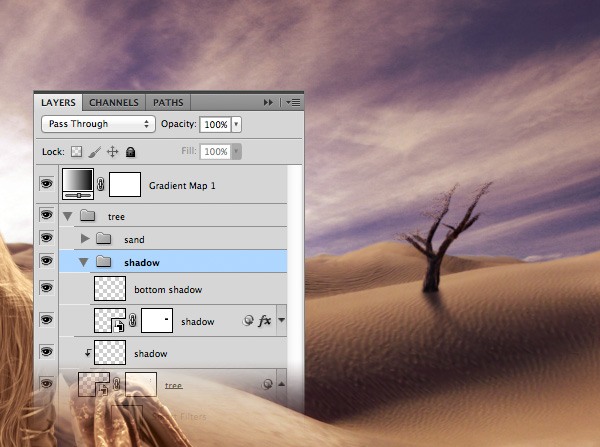
Step 22: Adding a Shadow to the Tree
Hold down Ctrl/Cmd and click on the thumbnail of the “tree” layer to select it. Create a new layer and fill the selection with white.
Hit Ctrl/Cmd + D to deselect.
Right-click on this layer and choose Convert to Smart Object from the menu that appears. Name this layer “shadow”, put it inside a group (Ctrl/Cmd + G) and name it “shadow” as well. Go to Edit > Transform > Flip Vertical.
Use the Move Tool (V) to move this layer at the bottom of the tree. Add a 2.5px Gaussian Blur filter to the shadow. Add a mask to this layer (Layer > Layer Mask > Reveal All) and use a soft, black brush (B) to erase the bottom area.
Then set the Opacity of this layer to 35%.
Create a new layer inside the “shadow” group, select a soft, black brush and paint with it over the previous shadow at the base of the tree to make that area darker. Name this layer “bottom shadow” and set its Opacity to 50%.
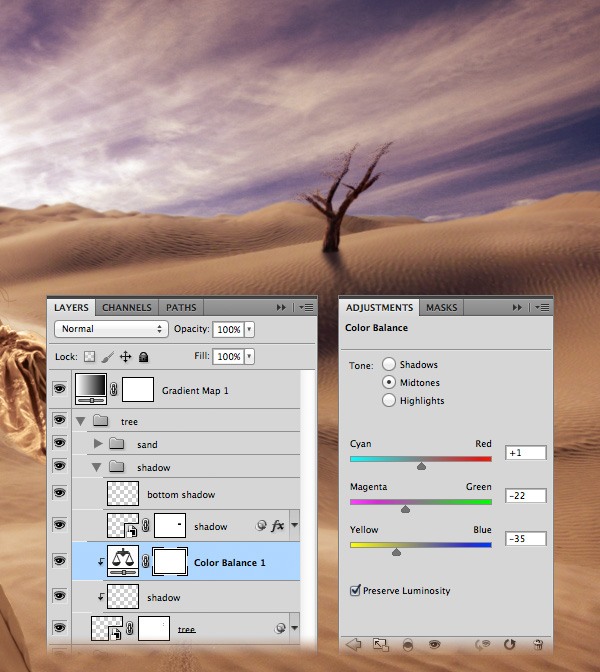
Click on the “shadow” layer above the “tree” layer to make it active. Then go to Layer > New Adjustment Layer > Color Balance, check the Use Previous Layer to Create Clipping Mask option and use the settings from the following image.
Step 23: Perform Final Color Adjustments
Click on the “Gradient Map” layer from the top of your Layers Panel to make it active.
Then put this layer inside a group and name it “color adjustments”.
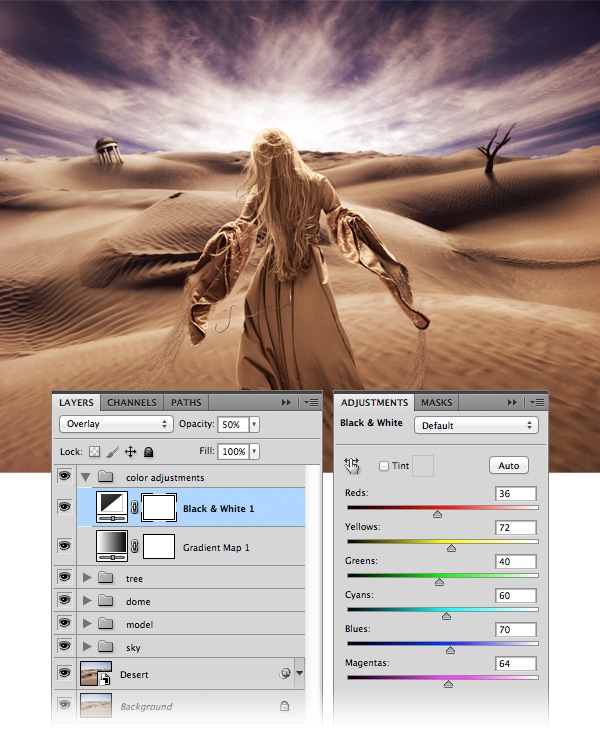
Go to Layer > New Adjustment Layer > Black & White and use the settings from the following image. Set the Blend Mode of this layer to Overlay and Opacity at 50%.
Step 24: Add a Texture to the Scene
Download this texture, open it in Photoshop and then move it into your document. Use Free Transform (Ctrl/Cmd + T) to scale down and rotate this image.
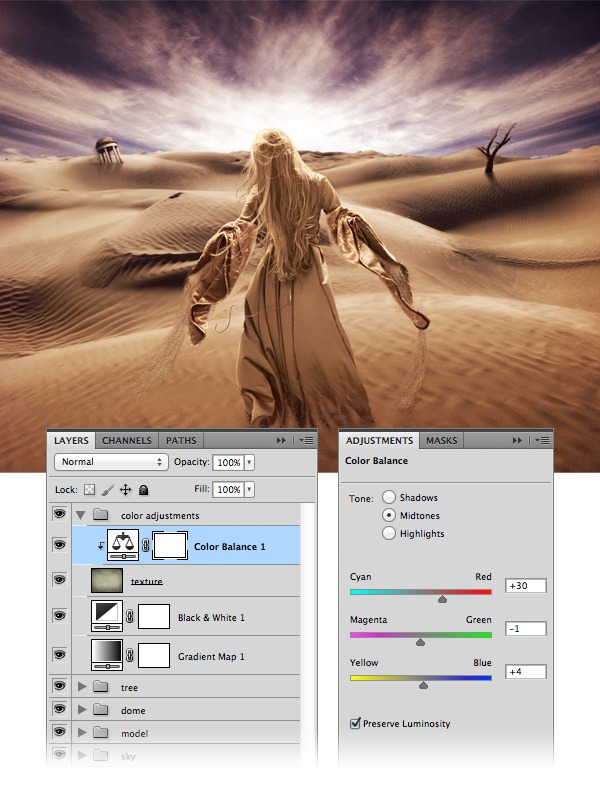
Name this layer “texture” and set its Blend Mode to Soft Light and the Opacity at 50%.
Then go to Layer > New Adjustment Layer > Color Balance, check the Use Previous Layer to Create Clipping Mask option and use the settings from the following image.
Tutorial Summary
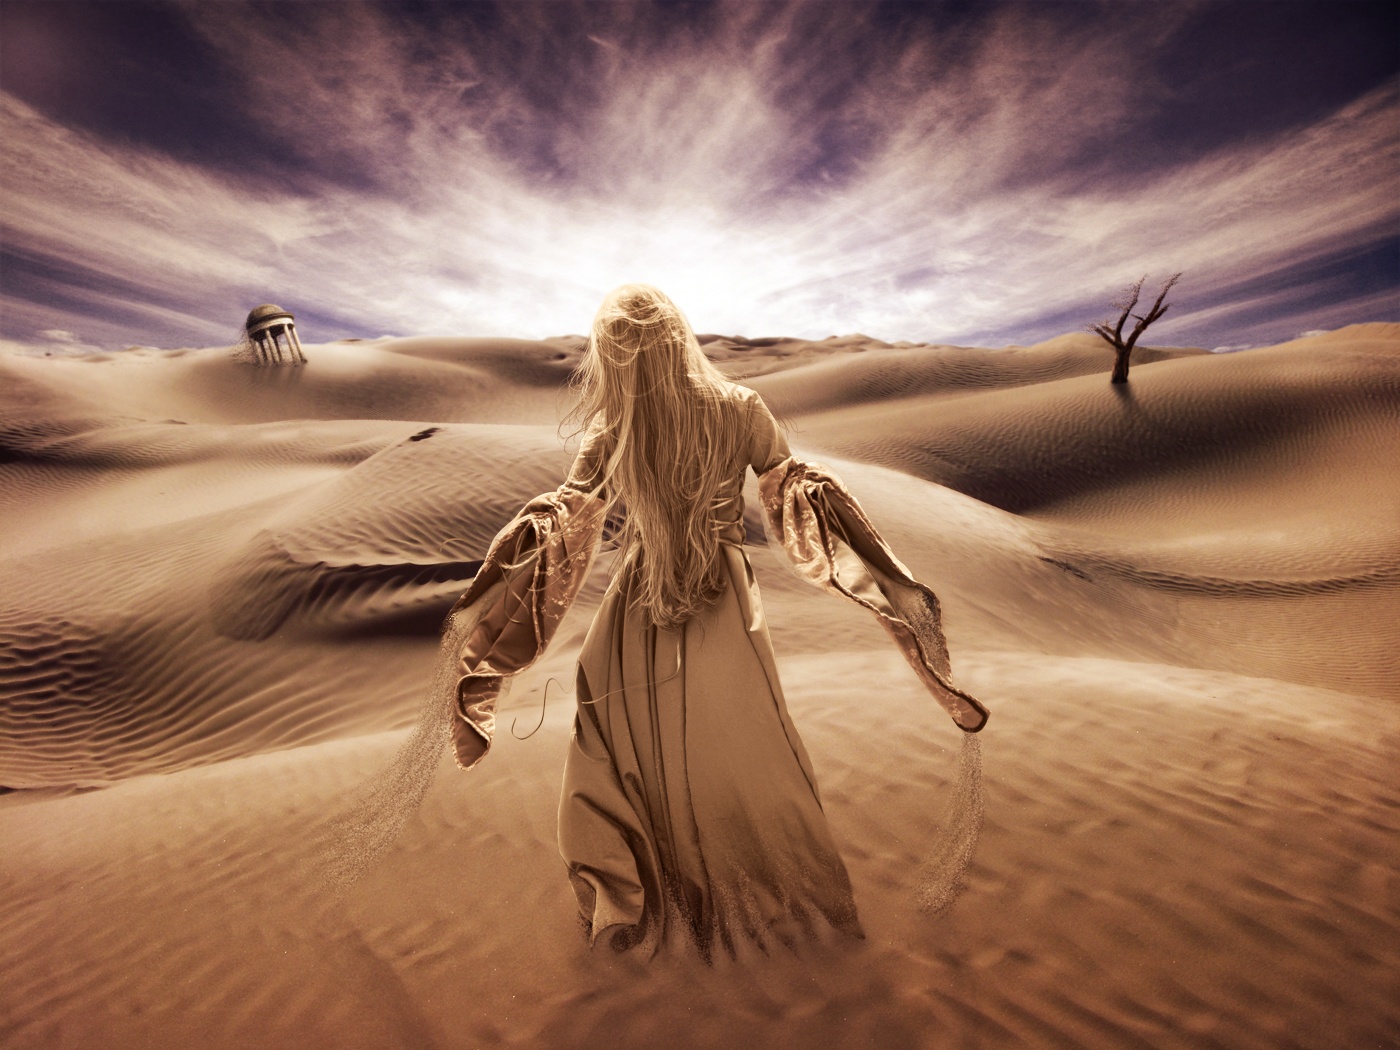
We have finished creating our surreal desert scene. Below you can see the final result of this tutorial. I hope you enjoyed it and found it useful.
I look forward to your opinions and questions in the comment section below.
Download Source Files
- surreal_desert_scene (ZIP, 77.2 MB)
-
 Trevin serves as the VP of Marketing at WebFX. He has worked on over 450 marketing campaigns and has been building websites for over 25 years. His work has been featured by Search Engine Land, USA Today, Fast Company and Inc.
 -

WebFX is a full-service marketing agency with 1,100+ client reviews and a 4.9-star rating on Clutch! Find out how our expert team and revenue-accelerating tech can drive results for you! Learn more
Make estimating web design costs easy
Website design costs can be tricky to nail down. Get an instant estimate for a custom web design with our free website design cost calculator!
Try Our Free Web Design Cost Calculator
Table of Contents
- Preview
- Tutorial Resources
- Step 1: Replacing the Sky
- Step 2: Adjusting the Landscape
- Step 3: Adding the Model
- Step 4: Applying a Gradient Map
- Step 5: Covering the Bottom of the Dress with Sand
- Step 6: Adding Particles of Sand
- Step 7: Separating the Hands
- Step 8: Reconstructing the Sleeves
- Step 9: Masking the Hand
- Step 10: Adding Some Sand Onto the Hand
- Step 11: Creating the Falling Sand
- Step 12: Adding Sand to the Left Hand
- Step 13: Adding Shadows and Highlights to the Ground Sand
- Step 14: Performing Some Adjustments to the Model
- Step 15: Adding Shadows to the Model
- Step 16: Adding the Dome
- Step 17: Adding Sand to the Dome
- Step 18: Adding Shadows to the Dome
- Step 19: Adding the Tree
- Step 20: Adding Shadows Onto the Tree
- Step 21: Creating the Sand for the Tree
- Step 22: Adding a Shadow to the Tree
- Step 23: Perform Final Color Adjustments
- Step 24: Add a Texture to the Scene
- Tutorial Summary
- Download Source Files
Share this article


Web Design Calculator
Use our free tool to get a free, instant quote in under 60 seconds.
View Web Design CalculatorMake estimating web design costs easy
Website design costs can be tricky to nail down. Get an instant estimate for a custom web design with our free website design cost calculator!
Try Our Free Web Design Cost Calculator


