
Step 1
On a new layer, create a rectangle and apply a gradient fill of your choice to it.

Step 2
Create a new layer. On this layer, create another rectangle and fill it with a black & white gradient.

Step 3
Go to Object - Envelope Distort - Make with Wrap and choose Arc as a style. I used bend 35%.


Step 4
Rotate the figure in any way you like, change its blend mode to Screen (Transparency palette), and its Opacity to ~30%.

Step 5
On a new layer, create another rectangle and fill it with either a black & white gradient, or choose any other color instead of white. I chose a light yellow.

Step 7
Go to Object - Envelope Distort - Make with Wrap and, again, choose Arc as it's style, with bend -35% this time. Change the object's Blend mode and Opacity, as shown on the picture (Screen 40%). Rotate the object any way you like.


Step 8
If you are not happy about the gradient, you can always edit it. You can see how to do that on the image below. When you are done with the gradient color, don't forget to switch back to Edit the Object mode.

Step 9
Copy the object (Cntr+C or Command+C) and Paste it onto a new layer. Change the gradient color to black & white.

Step 10
Now we need to create an opacity mask for this object.
Draw a circle and apply a radial black & white gradient to it. Please note that you need to use 'Registration color' instead of simple black in the gradient.

Step 11
Select both the object we pasted on the layer first and the circle, and choose Make Opacity Mask from the Transparency panel menu.

Now the band will look like this:

You can always change the opacity mask's gradient or move it around by clicking on the mask icon in the Transparency panel. Don't forget to unlink the mask from its object, otherwise you will be moving both at the same time.
When you are happy with the result, just click on the object icon in the Transparency panel to be able to work with the object itself.

Step 12
Copy the band (along with its mask) and past to a new layer. Rotate it in any way you like.

Step 13
Repeat step 12.

Step 14
Go to the Layer 3 (the first band we created). We will add some shining to it. Firstly, copy the band and paste it onto the new layer. Now, change the band's blending mode to normal, and make sure that 'registration' black color is used in the gradient.

Step 15
Draw an ellips and fill it with black (registration) & white radial gradient, then change its Blending mode to Screen and its Opacity to ~30%, and place the ellips under the band.


Step 16
Select both - the elips and the band - and click Make Opacity Mask

Step 17
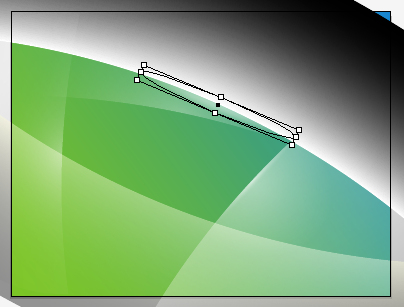
On a new layer, create an elips and fill it with b&w gradient (remember to use registration black).

Step 18
Then apply the same Opacity mask we used in Steps 14-16.

Note:
When you do any transformations to the elips (and, in general, to any object that has an Opacity mask), remember to unlink the object from its mask, otherwise you will end up transforming/moving both.

Here is what we get after Step 18:

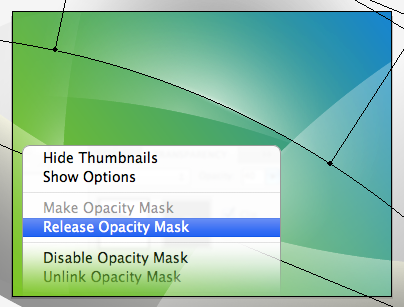
Step 19
Now we can create the same shining edges on some other bands. For doing this select another band (Layer 7) and copy & paste it onto a new layer. Because we applied an opacity mask to this band, we now need to release it to be able to use it as a new opacity mask.
Step 20
Repeat Steps 15-18 for this band and for the band on Layer 6.

Step 21
Now, we need to tidy up our art board. Select all of the objects on all of the layers, except for the background layer, and group them (Cntrl+G / Command+G). Delete any empty layers.

Step 22
Create a rectangle (above the grouped objects) with no fill and no stroke. Select all and Make a Clipping Mask (Cntrl+7 / Command+7). Congratulations! We are done.
Here it is - our nicely done abstract background ;)
