


Time needed: Approx. 15-25 minutes.
Experience: Intermediate - Advanced.
We're going to open up a new document:
You don't have to use these settings, just use anything you like, any size. After we've made our new image, we're going to start with the tutorial.
Step 1
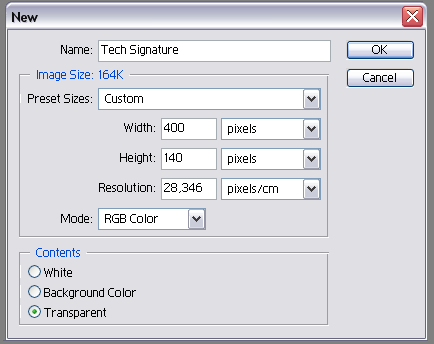
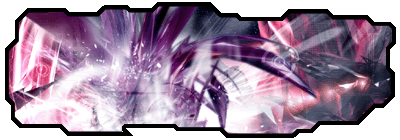
Fill the background layer with a solid black. Name this layer 'Border' or something similar. This we're going to use for our border. Once you've filled it up, grab the polygonal lasso tool. Now simply make a selection like the one I have made below:
Now press CTRL+SHIFT+I to inverse the selection. Press the delete tool. You should have something like below:

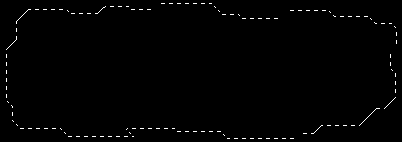
Select the layer again with CTRL+CLICK on the layer. Now go to Select->Modify->Contract. I always use something around 2-6 for my signatures. 4 is good, that's what I use mostly. Press ok and then hit the delete key once more. You should have something like below:
Step 2
Find yourself a nice background image you can use. We've got some located in our downloads section so you should be able to find one you like. You need to register to view the downloads section though. Paste it below the border layer. Name this layer background. Now select your border layer again:

Select your Magic Wand Tool or just simply press 'W'. While still having the border layer selected click somewhere in the middle of the image to get something like below:
Now select your background image layer and then hit CTRL+SHIFT+I to inverse the selection. Now press delete and you should have something like below:
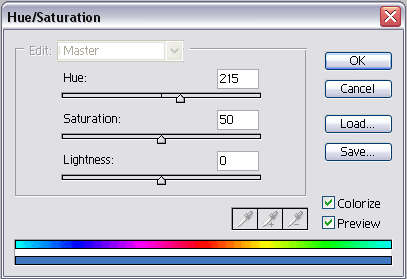
Press CTRL+U to colorize your background image. You can choose anything you like. I'm going to use the following:
Now apply a nice style to your border image. You can download some styles in our download section.
Step 3
We're going to add some Tech brushes to our image. Make a new layer above your background layer. NAme it Tech Style. Now get your favorite tech brushes and apply them to the layer. Use white as your foreground color. Change the opacity a bit to let's say 50%-70% and you should and up having something like below:
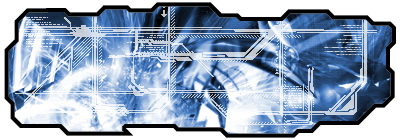
Now we're going to repeat the 'Magic Want Tool' from step 2. Press 'W', select your border layer and click somewhere in the middle of the image. Press CTRL+SHIFT+I and then select your tech style layer. Hit the delete key. This is to prevent having your image look sloppy on other backgrounds then white.
Step 4
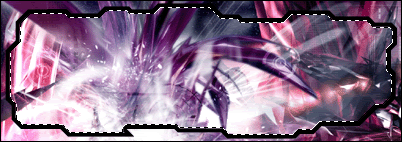
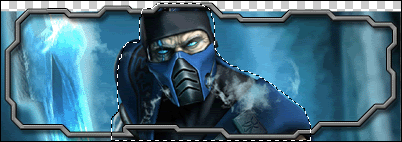
We're going to add a nice image to our signature. Get one you like and paste it above or below the tech style layer, just what you like more. Now select your lasso tool and make a selection just around your image. We're going to blend it into the background. When you've selected your image, you should have something like this:
Now press CTRL+ALT+D and enter a value between 10-30. Press ok. Now click on 'add layer mask' in the layers pallette:

Change the layer's blend mode to 'luminosity':

Move the image to some place you like it best. Now we're going to repeat the 'Magic Wand Tool' step one more time. Select your border layer and click somewhere in the middle of the image. Press CTRL+SHIFT+I and then select your image layer. Hit the delete key. You should end up with having something like below:
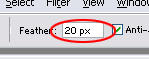
Now we can blend it in more with using the feather technique. Select your elleptical marquee tool and set the feather to somewhat between 10-30. Now just make a small selection on the image and move the selection to the outer sides of the image you want to blend in more:
Hit delete one or two times and repeat this step untill your satisfied.
Step 5
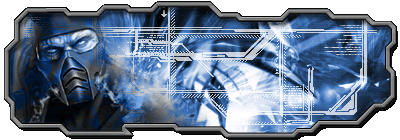
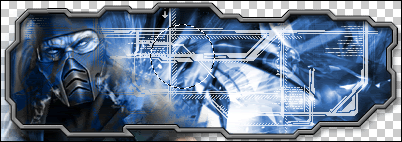
We're going to add some text here. Select the text tool and type something you want, your name for example. Add a nice style to the text and you're done! You should end up with something like this*:

*Optional. You can merge all the layers except the border layer. Press the little eye next to the border image to make it invisible. Now press CTRL+SHIFT+E to merge the visible images. Go to blending options and add some bevel to it. It should look like below:

If you found this tutorial usefull or if you have any comments or questions, post them below. If you've followed this tutorial and ended up with something nice then show it to us aswell!
©Copyright Disturbed


