


Hi all,
I'm sort of a newb at Illustrator. I have sort of a weird question to ask. I want to create some basic shapes(sort of my own fonts), but when I use the pen tool they don't come out clean and professional looking. I've tried the simplify object route, but that doesn't look good either. I was wondering what the best technique to achieve this is. I've also tried drawing it, scanning it, and tracing it in illustrator, but that doesn't work either. How do people do it?

Creating Basic Shapes in Illustrator
Started by
sinjix_media
, May 23 2007 10:44 AM
22 replies to this topic
#2

Dance
-

- Members
-

- 871 posts
P2L Jedi
- Gender:Male
- Location:UpNorth
Posted 23 May 2007 - 01:16 PM
post a sample picture of a shape you are unhappy with so we could take a look, a printscreen with the shapes handles showing would be ideal.
#3
Scythar
-

- Members
-
- 1,888 posts
Honored X Staff
- Gender:Male
- Location:Antwerp (Belgium)
Posted 24 May 2007 - 03:31 AM
same here, cos there's nothing cleaner and meaner then the pen tool 
bdw: loved the movie (Sig, Dance)
bdw: loved the movie (Sig, Dance)
#4
sinjix_media
-
- Members
-
- 12 posts
Young Padawan
Posted 24 May 2007 - 03:41 AM
I don't have any screen-shots or anything to show you. I guess I was speaking in general rather than talking about ONE thing I'm working on. I will give you an example logo that you can look at and let me know how they achieve those shapes hypothetically if they used illustrator to create it.
http://ic3.deviantar...y_DaniNeves.jpg
http://ic1.deviantar...by_bitcrumb.jpg
I understand that some of it may be font/text manipulation, but how would one achieve this by using illustrator's pen tool or other. What if I needed to create something that wasn't text, but had similar shapes?
I want to learn how to create PRECISE shapes. If someone would be so kind as to point me in the right direction or teach me how to achieve it, it'd be greatly appreciated.
#5
Dance
-
- Members
-
- 871 posts
P2L Jedi
- Gender:Male
- Location:UpNorth
Posted 24 May 2007 - 07:38 AM
Im not a illustrator expert, i use PS to create most of my shapes and then export tha paths into illustrator as needed. The thing you can do to get those clean circles and curves is to actualy go ahead and use the shape tool whitch generate premade primetive shapes for you. Then go ahead and edit those with the pen. Aka a clean O would be a circle and then another circle subtracted from it. Use the rulers and set out guides for the handles, if you are making a shape that requires that you have parallel lines symetrically running, copy parts from one line and use that as its own parallel. Combine primitive shapes and use the pen to edit them only where nessessary. Be methodical you can edit the line as much as you want, dont rush it. Look at the things people create and see how much of it could actually be broken into primitives and how much of it realy need to be custom made with the pen.
#6
Scythar
-
- Members
-
- 1,888 posts
Honored X Staff
- Gender:Male
- Location:Antwerp (Belgium)
Posted 24 May 2007 - 10:21 AM
i'lll try to make little tut:
mostly there vasic shapes, and use of the socalled "pathfinder tool".
Ill get back to you.
mostly there vasic shapes, and use of the socalled "pathfinder tool".
Ill get back to you.
#7
Dance
-
- Members
-
- 871 posts
P2L Jedi
- Gender:Male
- Location:UpNorth
Posted 24 May 2007 - 10:47 AM
Woooh, custom tuts! 
#8
sinjix_media
-
- Members
-
- 12 posts
Young Padawan
Posted 24 May 2007 - 06:48 PM
Oh my god!i'lll try to make little tut:
mostly there vasic shapes, and use of the socalled "pathfinder tool".
Ill get back to you.
You have no idea how much I'm looking forward to this.
This will have to be THE MOST viewed tutorial on Pixel2Life
#9
Scythar
-
- Members
-
- 1,888 posts
Honored X Staff
- Gender:Male
- Location:Antwerp (Belgium)
Posted 25 May 2007 - 02:26 PM
k,
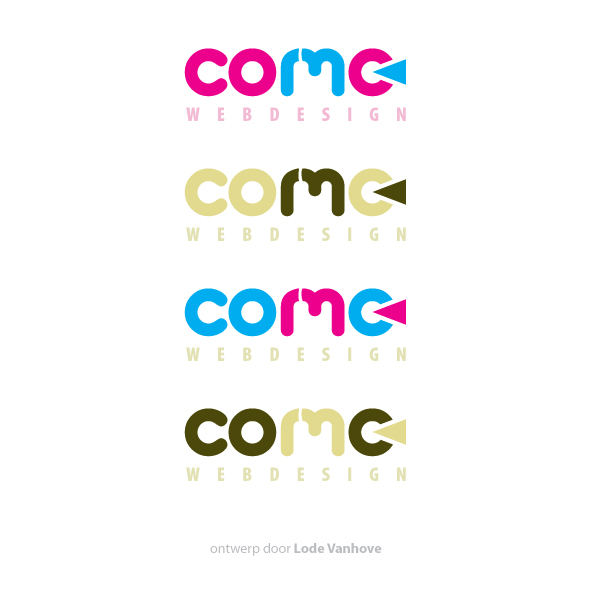
here comes nothing,
i used the first logo as a reference for this one.
...
here comes nothing,
i used the first logo as a reference for this one.
...
#10
Scythar
-
- Members
-
- 1,888 posts
Honored X Staff
- Gender:Male
- Location:Antwerp (Belgium)
Posted 25 May 2007 - 02:34 PM
1. Create 2 circles on top of each other (mine are 29 and 16)
 2Circles.jpg 20.37KB
50 downloads
2Circles.jpg 20.37KB
50 downloads
2. Select them both and search the pathfinder tool, it will be easier in Illustrator CS2, then in CS3 to find it
Pathfinder_tool_1.jpg 38.94KB
43 downloads
2Circles.jpg 20.37KB
50 downloads2. Select them both and search the pathfinder tool, it will be easier in Illustrator CS2, then in CS3 to find it
Pathfinder_tool_1.jpg 38.94KB
43 downloads
#11
Scythar
-
- Members
-
- 1,888 posts
Honored X Staff
- Gender:Male
- Location:Antwerp (Belgium)
Posted 25 May 2007 - 02:42 PM
When you did that you got a donut shape.
Now, copy the donut by ctrl+clicking and holding the shift too, placing the copy to the right and at a distance so the left outside snaps to the right inside point.
CopyDonut.jpg 45.38KB
56 downloads
Now, copy the donut by ctrl+clicking and holding the shift too, placing the copy to the right and at a distance so the left outside snaps to the right inside point.
CopyDonut.jpg 45.38KB
56 downloads
#12
Scythar
-
- Members
-
- 1,888 posts
Honored X Staff
- Gender:Male
- Location:Antwerp (Belgium)
Posted 25 May 2007 - 02:46 PM
Now, select the bottom 2 points of the right donut with the direct selection tool (the open arrow) and press delete.
SelectBottom2.jpg 34.32KB
60 downloads
SelectBottom2.jpg 34.32KB
60 downloads
#13
Scythar
-
- Members
-
- 1,888 posts
Honored X Staff
- Gender:Male
- Location:Antwerp (Belgium)
Posted 25 May 2007 - 02:54 PM
Now lock the left donut for few moments so you dont accidently select it.
Take the pen tool, first click on the outer left point of the half donut (the pen tool will change from a pen with cross to a pen with slash, so you will now that Illustrator is going to add lines to the object)
Now click, holding shift to make a rectangle that extends the half donut, last point you will see that the pen tool changes again to show you he is going to close the path.
Repeat this on the other side too.
This is what you should have now:
result_pentool.jpg 42.21KB
57 downloads
#14
Scythar
-
- Members
-
- 1,888 posts
Honored X Staff
- Gender:Male
- Location:Antwerp (Belgium)
Posted 25 May 2007 - 02:59 PM
Now choose the rectangle tool and draw a rectangle like this:
rectangle_behind.jpg 32.98KB
41 downloads
Now put this rectangle behind the rest, if needed we can always put it back in front:
send_to_back.jpg 26.09KB
57 downloads
rectangle_behind.jpg 32.98KB
41 downloadsNow put this rectangle behind the rest, if needed we can always put it back in front:
send_to_back.jpg 26.09KB
57 downloads
#15
Scythar
-
- Members
-
- 1,888 posts
Honored X Staff
- Gender:Male
- Location:Antwerp (Belgium)
Posted 25 May 2007 - 03:06 PM
The reason for this, is because i was wrong :oops:
you have to delete 2 points again with the direct selection tool
2 points are indicated here:
Deleting2points.jpg 20.37KB
54 downloads
This is the result: (hope your not lost again, sry bout mistake)
result_2.jpg 53.44KB
51 downloads
you have to delete 2 points again with the direct selection tool
2 points are indicated here:
Deleting2points.jpg 20.37KB
54 downloadsThis is the result: (hope your not lost again, sry bout mistake)
result_2.jpg 53.44KB
51 downloads
#16
Scythar
-
- Members
-
- 1,888 posts
Honored X Staff
- Gender:Male
- Location:Antwerp (Belgium)
Posted 25 May 2007 - 03:17 PM
Now make a copy of each donut and paste it in the back, give it a stroke 4 pts.
result_3.jpg 66.78KB
56 downloads
result_3.jpg 66.78KB
56 downloads
#17
Scythar
-
- Members
-
- 1,888 posts
Honored X Staff
- Gender:Male
- Location:Antwerp (Belgium)
Posted 25 May 2007 - 03:33 PM
k, for this last part i am just guessing, so chances are we need to do it another way, but ill try anyway:
select 2 upper donut and the rectangle and lock them.
then select everything (the locked objects wont be selected off course, thats the intention.
hide selected;
unlock the locked objects,
select 2 donuts, the get to the pathfinder tool again, then press unite:
uniteTool.jpg 10.13KB
53 downloads
(if you got CS2 - 3 version you should press expand afterwards)
then repeat this with the rectangle, result:
result_4.jpg 54.29KB
62 downloads
select 2 upper donut and the rectangle and lock them.
then select everything (the locked objects wont be selected off course, thats the intention.
hide selected;
unlock the locked objects,
select 2 donuts, the get to the pathfinder tool again, then press unite:
uniteTool.jpg 10.13KB
53 downloads(if you got CS2 - 3 version you should press expand afterwards)
then repeat this with the rectangle, result:
result_4.jpg 54.29KB
62 downloads
#18
Scythar
-
- Members
-
- 1,888 posts
Honored X Staff
- Gender:Male
- Location:Antwerp (Belgium)
Posted 25 May 2007 - 03:46 PM
next we are going to reshape the copy's with the stroke to substract it from the logo:
Try to hide the objects you dont need:
result_5.jpg 63.9KB
78 downloads
Try to hide the objects you dont need:
result_5.jpg 63.9KB
78 downloads
#19
Scythar
-
- Members
-
- 1,888 posts
Honored X Staff
- Gender:Male
- Location:Antwerp (Belgium)
Posted 25 May 2007 - 03:58 PM
I hate new versions,
erm... ok, after trial and error, this is what you do now...
click on the add anchor point tool (pentool with + sign):
addanchorpoint.jpg 14.46KB
44 downloads
This is the result:
addanchorpoint2.jpg 65.11KB
62 downloads
Then start deleting the points we dont need with the direct selection tool, after some trial and error, you should get this:
result_6.jpg 52.66KB
68 downloads
erm... ok, after trial and error, this is what you do now...
click on the add anchor point tool (pentool with + sign):
addanchorpoint.jpg 14.46KB
44 downloadsThis is the result:
addanchorpoint2.jpg 65.11KB
62 downloadsThen start deleting the points we dont need with the direct selection tool, after some trial and error, you should get this:
result_6.jpg 52.66KB
68 downloads
#20
Scythar
-
- Members
-
- 1,888 posts
Honored X Staff
- Gender:Male
- Location:Antwerp (Belgium)
Posted 25 May 2007 - 04:06 PM
Result of the operations:
result_7.jpg 53.4KB
70 downloads
For the cut out, ill be back here, cos it used to be very simple, but this version doesnt seem to react like it used to be...
yea yea i am ashamed i know...
give me some moments...
result_7.jpg 53.4KB
70 downloadsFor the cut out, ill be back here, cos it used to be very simple, but this version doesnt seem to react like it used to be...
yea yea i am ashamed i know...
give me some moments...


0 user(s) are reading this topic
0 members, 0 guests, 0 anonymous users

