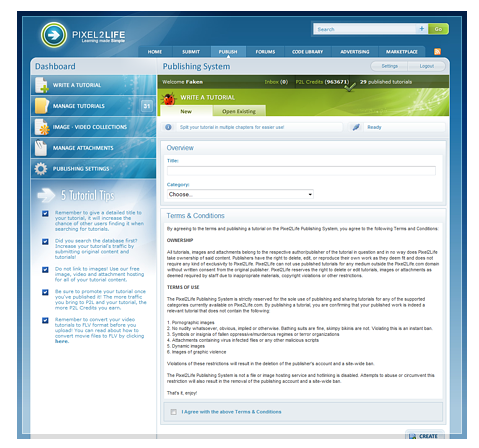
Ready to write your first tutorial? From the main Publishing System area, click on the "Write a Tutorial" button located in the main publishing menu at the top left and that will load up the start page for creating a brand new tutorial.
Once that loads up, you can go ahead and assign your new tutorial a title and select the category to which the tutorial should be assigned (you can change any of this this later down the road). If you''re new to the publishing system, you should also read our terms and conditions, which explains the kind of content we don''t allow, and explains exactly who owns the content you upload to us and how you or P2L can use it. In short, it says you own it, but we can remove or edit it at any time... but you should still make sure you read and understand the terms for your own peace of mind. You will need to check off the agreement box, then click the Create button to create your tutorial. Please note that your tutorial title needs to be at least 20 characters long! Once your tutorial has been successfully created, the tutorial work area is displayed. The work area allows you to edit all the parameters of your tutorial or the tutorial itself. You can access each area using the tabs that run along the top.
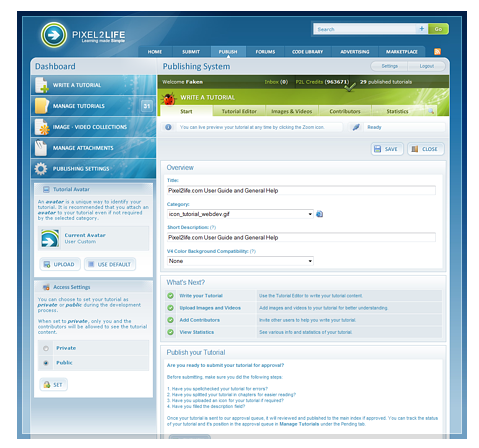
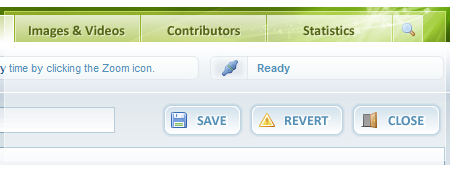
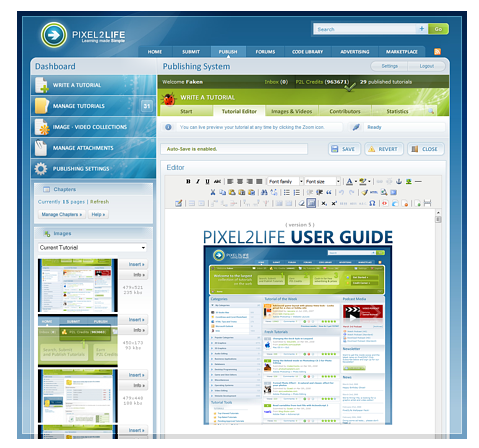
The tutorial writing area allows you to edit all the parameters of your tutorial, relevant attachments as well as the tutorial itself. You can also control the contributor access and view some general stats on your tutorial. You can navigate all of these areas by clicking the tabs without losing any data you''ve entered on other tabs, just be sure to click the save button to save any changes before you exit the writing area. There are six menu tabs in the writing area... Start, Tutorial Editor, Images & Videos, Contributors, and Statistics. The last tab with the magnifying glass icon is the preview function.
One of the great features of the Publishing system is that you can switch between tabs within the work area WITHOUT losing any of your changes! So if you are using the editor and need to upload an image, you can click on the Images & Videos tab without fear of losing any of your work. Just be sure to click Save before closing the browser window or leaving the main work area within the publishing system. This chapter covers an overview of all the tabs and their functions, however please refer to the next chapter for indepth instructions on using the Tutorial Editor system. Be sure to always save your tutorial before closing the browser or exiting the tutorial writing area! Failure to save your information before leaving the tutorial writing area will result in data loss. (The tutorial writing area refers to the Publishing System section with the tab menu as pictured above). Click the "Save" button located under the tab menu to save any changes you have made in any of the tab menus. If you have changes on several tabs, you only have to click the save button once from any of the tab menu items and all changes will be saved.
Start Tab The Start tab controls all of the viewable options of your tutorial, and from here you can change the following options:
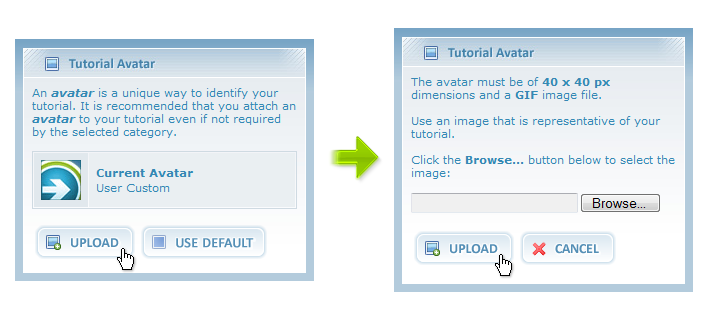
Tutorial Avatar - The tutorial''s avatar is always determined by the category to which the tutorial has been associated with. A new tutorial will always be set to display the default category avatar, however you may wish to use your own (This is actually recommended) or if the category requires a unique avatar you will need to upload one before publishing your tutorial. If you try to publish a tutorial with the default avatar and the category requires a unique avatar relevant to the tutorial (such as the Photoshop category), you will receive an error message. You can use the tutorial avatar box to either upload or edit a custom tutorial avatar, or set the tutorial to use the default category avatar. To upload an avatar, simply click on the "Upload" button to open the avatar upload function. Click browse to select the file you wish to upload and click "Upload" to submit the file.
Please remember that published tutorials use the same avatar guidelines and the regular submissions... all avatars must be 40 x 40 pixels in .GIF format with a filesize no larger than 5k. Access Settings - The access settings allow you to make your tutorial private or public, which has two primary uses. You can choose to allow users to see your tutorial while still in progress and unpublished (You must link them directly to your preview link) or once your tutorial is published, you can take it offline if you need to make some changes. Once you''ve set all the options for your tutorial and are ready to begin writing, you can proceed to click on the Editor tab to get started! Please go to the next page, which covers the use of the tutorial editor. Simply click on Private or Public and click the "Set" button to apply the changes. Tutorial Title - The tutorial title is the primary name of the tutorial and will use this field any time your tutorial is listed in a tutorial index listing. Try to be as descriptive as possible with the alloted characters for this field. Tutorial Category - Select the category under which the tutorial should be associated with. Short Description - You can use this field to enter a small description for your tutorial above and beyond the tutorial title. v4 Background Color Compatability - The previous generation of the Pixel2life website, which had the first version of the Publishing System used a solid white background rather than the slight gradient background you see at the top of live published tutorials. This may cause images to look a bit strange if they were designed to display on a solid white background, so users have the option to turn the gradient on or off. Tutorial Editor Tab The tutorial Editor Tab is the main editor used to actually type out the tutorial''s content and features a ton of great formatting options that most of us are used to from word processors such as Microsoft Word. The Editor is designed to be very powerful and allow you to do just about anything with your tutorial.
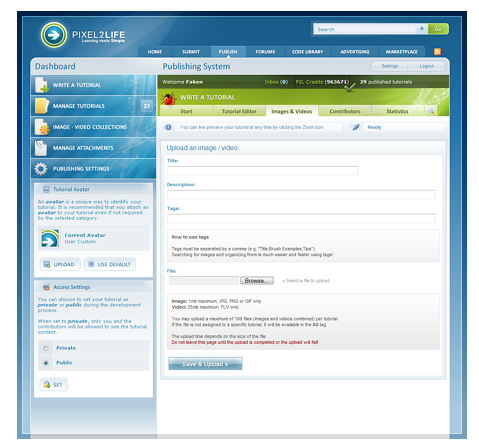
The tutorial editor requires quite a bit of documentation and requires it''s own section. Please view the next chapter (next page) for the detailed Editor section where we cover all the functions of the tutorial editor tab in depth. Images & Videos Tab The Publishing System includes a large area for managing your image and video collections however we knew that publishers would also like to be able to upload images and videos while they were in the middle of working on their tutorials. In fact, I am doing that very thing as I write this documentation! So to allow users to go back and forth between the editor and uploading images without losing anything, the Images and Videos Tab was created. Please note that at this time, video support is not enabled! Support is only for images at this time, however full video support is coming soon!
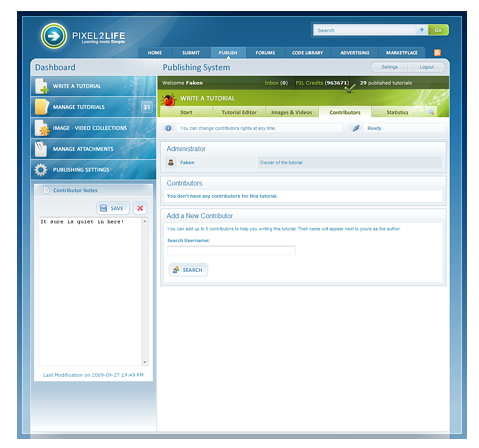
All fields on this page are optional except you do have to click "browse" to select the file you wish to upload. If you leave the title field blank, it will be automatically filled out based on the filename of the file you upload. You may actually find it easier to name your file using underscores ( _ ) so you don''t have to fill out the title yourself. Underscore characters are treated like spaces for the title, so if you upload a file named "whatever_you_want.jpg", then the title field will automatically be filled with "whatever you want". If you plan on having many images and will be publishing tutorials with us extensively, you may wish to use tags for your images to make them easier to find later down the road. The Image and Video Collections area includes an image search by tag function. Once you''ve selected the file you wish to upload, click on the "Save and Upload" button and your image will be uploaded and processed. When the upload is complete, you will be prompted for the next download, or you can decline and you will be returned to the editor window to continue editing your tutorial. Contributors Tab Publishers can form teams to create a single tutorial using the contributor feature! Members that would like to form a writing team and share a single document can now access the same tutorial, images, videos and attachments by becoming authorized contributors. One member must create the tutorial and become the "owner", then browse to the contributor tab to add additional members to the contributor list.
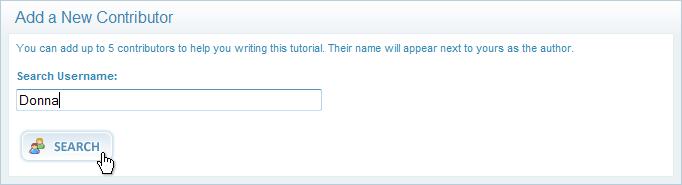
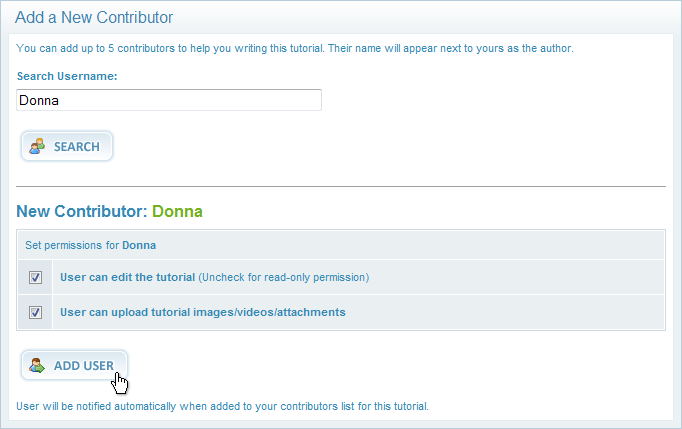
Adding or removing new contributors to the tutorial is a simple procedure that requires only a few seconds to complete. Start by entering the name or if you''re not sure on the user''s exact spelling, simply put in the first part of their name and click on the search button.
The search will pull up all members names matching your search criteria. Click the add user icon next to the correct member you would like to add as a contributor.
After clicking on the add icon for the correct user, you will be prompted to confirm that user''s access permissions for the tutorial. You have the option of giving the user read or write permission to the tutorial and permission to upload images, videos or attachments. Click the "Add User" button to confirm and save this person to your contributor list.
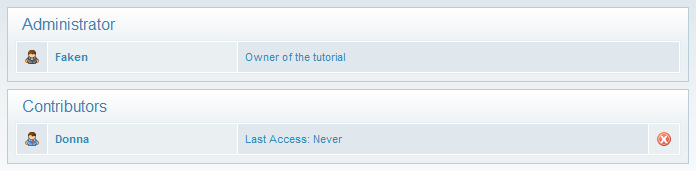
The user is now a tutorial contributor and can access the tutorial with the permissions assigned in the previous step. Should you need to remove the user''s contributor access at some point, simply click the red X icon to delete them from the list.
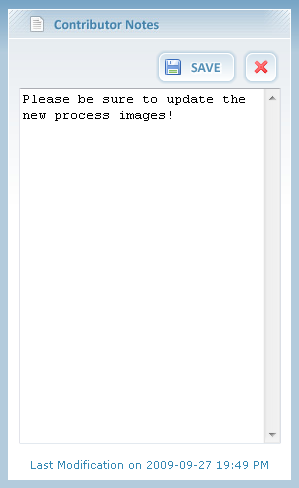
The Contributors area also has a notes field that can be used to share notes, ideas or a to-do list with other tutorial contributors. All contributors share the same list within a tutorial so any edits by a contributor will apply immediately to the rest of the contributor group. Using the notes field is simple... type whatever you need inside the note box and click the "Save" button above the note box to save your changes. The red X icon will clear the note box.
Statistics Tab The Statistics Tab displays some general stats on your tutorial to give you an idea of it''s traffic and overall popularity. The large colored meter shows you the average rating your tutorial has received from other members. You can also keep track of total rating votes, total views, how many users have added your tutorial to their favorites, total user comments, current status of your tutorial and when your tutorial was posted.
Preview Tab The Preview Tab can be clicked at any time to show an exact preview of what your tutorial will look like when published live and accessed by another user. Please note that the preview will only show your tutorial as of the last time you saved it. So if you make changes to your tutorial in the editor, those changes will not be reflected in the preview until those changes are saved by clicking the "Save" button.
Please continue to the next chapter for a detailed look at the Tutorial Editor tab and the functionality of the editor tools. �

Dig this tutorial?
Thank the author by sending him a few P2L credits!


|