When it comes to shooting a great timelapse at night, you don’t need all kinds of fancy equipment, like sliders or high-end lighting. With just a camera, wide-angle lens, tripod, trigger, a hiker’s headlamp, a lot of time, and a little knowledge of the constellations, you can get professional, stunning results. Here, Jay P. Morgan shows us a nice, easy way to shoot a Milky Way timelapse—something everyone can replicate:
Morgan is at Mono Lake in northern California, an area covered in tufas—unique and beautiful towers of calcium build up. He’s chosen the spot ahead of time, which is very important. You want a dark place that isn’t polluted by city lights. And, you want to get there early so you can get familiar with the location and set up properly.
Find the Milky Way
The first thing you need to know is where the Milky Way is going to be in the sky and when it will rise above the horizon. Do your research in advance to find out how you can know this, or you can get an app to help (like Star Tracker or Stellarium). The best time to view the Milky Way in the northern hemisphere is during the summer.

What to Bring
Since you’re going to be out on location for so long—hours, many, many hours—there are a few things you can bring along to make the experience better:
- Backpack. You might have to walk pretty far so a backpack will make it much easier to carry everything.
- Chair or foam pad. Get comfortable, it’s going to be awhile.
- Headlamps and extra batteries. It’s best to arrive when it’s still light out, but you’ll probably finish before the sun comes up, which means packing up in the dark.
- Dim flashlight. While the camera is recording, you don’t want to affect the subject with background light, but you’ll need to move around unnoticed; a small, dim light is good for this.
To light the tufas, Morgan used just a regular hiker’s headlamp, set on a stand on camera left. This provided sufficient lighting, but the batteries started to die after about three hours. To avoid that, you might want to bring extra batteries, or a small LED, like the Rosco LitePad.
Camera Equipment and Settings
- Canon 5D Mark III
- Two different lenses: 16 – 35mm f/2.8 to get as much sky in as possible and the Tamron 24 – 70mm f/2.8 to get a little tighter view
- Nero Trigger and Canon TC-80N3
- Aperture f/2.8
- Shutter speed of 20 seconds
- ISO 2000
- White balance set to daylight
The camera was set to a 20 second exposure and the triggers were set to a 25 second interval. This means that every 25 seconds, the device would trigger the camera to take the next image, which would take 20 seconds to complete.
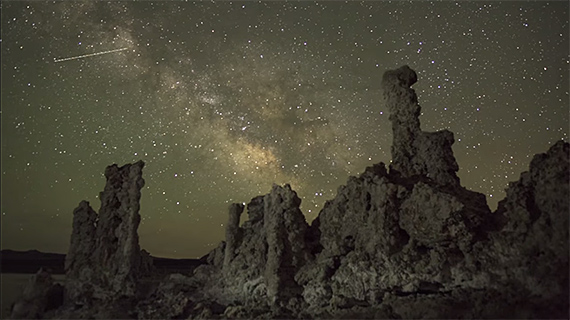
A still frame from Morgan’s timelapse sequence.
With a 20 second exposure, there is no perceptible movement in the stars so one image will look nearly identical to the next one. But, as Morgan says, if you compare image 1 with image 100 or 200, you can see that the stars have shifted a little. Each second of video in the timelapse represents about 12 minutes time—or 30 images.
And there you have it. Have you tried shooting a Milky Way timelapse? How did it go?
Like This Article?
Don't Miss The Next One!
Join over 100,000 photographers of all experience levels who receive our free photography tips and articles to stay current:


Leave a Reply