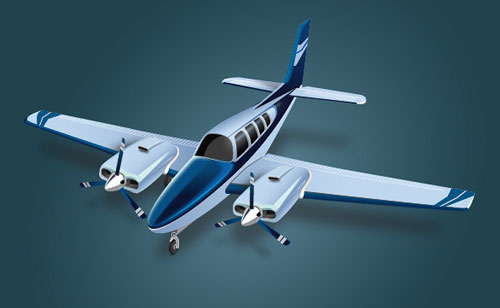
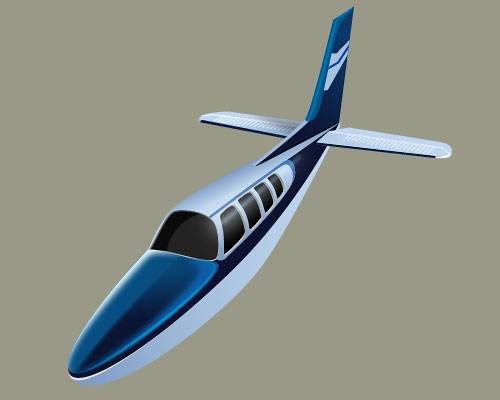
In the following steps you will learn how to create an airplane illustration in Adobe Illustrator. For starters you will learn how to using basic tools and vector shape building techniques along with the Pathfinder palette you will learn how to create the main airplane components. Moving on you will learn how to add shading and highlights for your airplane to give it more of a 3D look. Finally, you will learn how to add a simple background and some subtle shading.
Create a New document
1. Press (Ctrl + N) to create a new document. Select Pixels from the Units drop-down menu, enter 900 in the width box and 600 in the height box then click on the Advanced button. Select RGB, Screen (72ppi) and make sure that the Align New Objects to Pixel Grid box is unchecked before you click OK.
.
Create the Fuselage
2. Pick the Ellipse Tool (L) and use it to create a 370 by 72px object. Next select the anchor point highlighted with yellow and click on the “Convert selected anchor points to corner” button from the Properties bar. Reselect the resulting object, go to the Object > Transform > Rotate… Enter a 44 degrees Angle and then click OK.


3. Select the object created in the step 2, duplicate (Ctrl +C, Ctrl +F) it once, then move the copy 3px up and then 1px to the left. Now select the top anchor point of the red object and move it to the same position with the top anchor point of the black object.

4. Reselect the red object and go to the Object > Path > Offset Path… Enter a -2px Offset and then click OK. While the newly created object selected, move it 3px up and then 2px to the left. Make sure that the new object is still selected, pick the Add Achor Point Tool (+) and click on the two points highlighted with green. Next select the top anchor point of the yellow object and remove it. With the help of the Convert Anchor Point Tool (Shift +C), adjust the resulting object to get the result as shown in the third image below.


5. Fill the black object with R=223, G=223, B=221. Next fill the red object with R=13, G=19, B=46. Finally fill the yellow object with R=7, G=78, B=129.

6. Using the Pen Tool (P) create an object and then fill this object with the linear gradient like you see in the images below. While the resulting shape selected, go to the Effect > Stylize > Feather… Enter a 5px Radius and then click OK.


7. We are going to start making highlights on the newly created shape to give it more of a 3D look. Start with drawing two object using the Pen Tool (P) as shown below. Once your objects are drawn, fill the yellow object with R=233, G=255, B=255 and fill the yellow object with R=13, G=95, B=169. Reselect both newly created shapes and apply a 3px Gaussian Blur effect for them. Continue with the Pen Tool (P), use this tool to create a curved path like you see in the third image. Fill this object with none, add a 3px stroke (R=0, G=147, B=210), then apply the Width Profile 1 and a 2px Feather effect for the result. Now select and group (Ctrl +G) three objects created in this step. Next select the smallest shape created in the step 5, duplicate (Ctrl +C, Ctrl +F) it once and then bring the copy to front (Ctrl +Shift +Right Square Bracket). Keep this copy selected, hold down the Shift, click on the newly created group and go to the Object > Clipping Mask > Make (Ctrl +7).


Create the Wind Screen
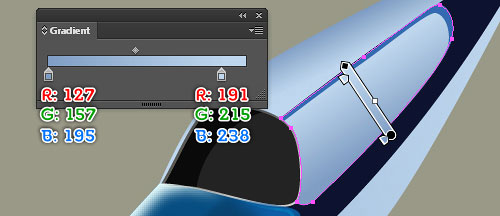
8. With the Pen Tool (P) create an object as shown below. Once your object is drawn, reselect it and go to the Object > Path > Offset Path… Enter a -1px Offset and then click OK. Keep the new object selected, go to the Object > Transform > Move… In the Move dialog box, enter a 0.5 in the Horizontal box and then click OK. Make sure that the new object is still selected, duplicate it once and then hide (Ctrl +3) the copy. Now reselect two newly created objects, open the Pathfinder palette (Window > Pathfinder) and click on the Minus Front button. Fill the resulting object with the linear gradient as shown in the sixth image below. Finally press (Ctrl +Alt +3) to show the object hidden in this step and then fill it with R=10, G=10, B=10.


9. To add some details on the wind screen, first draw a 96 by 96px ellipse and then place it to the position as shown below. Next select the black shape created in the step 8 and duplicate it once. While the copy selected, hold down the Shift, click on the newly created ellipse and then click on the Intersect button from the Pathfinder palette. Next fill the resulting object with R=255, G=255, B=255. Finally change the Blending Mode to Lighten and lower the Opacity to 10%.


10. Continue with the Pen Tool (P), create an object as shown below. Once your object is drawn, reselect the black shape created in the step 8 and duplicate it once. Keep this copy selected, hold down the Shift, click on the yellow object and then click on the Minus Back button from the Pathfinder palette. Next fill the resulting object with the linear gradient like you see in the final image.


11. Keep working with the Pen Tool (P), draw an object as shown below. Next reselect this object, duplicate (Ctrl +C, Ctrl +F) it once, then move the copy 4px down and 2px to the left. Reselect the yellow object and duplicate it once more. Keep the copy selected, hold down the Shift, click on the red object and then click on the Minus Front button from the Pathfinder palette.


12. Fill the newly created object with R=52, G=106, B=177. Next fill the remaining yellow object with the linear gradient as shown in the second image.

Create the Windows
13. With the help of the Pen Tool (P) create five object like you see in the images below. Once your objects are drawn, focus on the first window, fill the red object with R=10, G=10, B=10 and then fill the yellow object with the linear gradient. Next repeat the same process for the remaining three windows.


14. Now we’ll add highlights for the windows. First draw an object like you see in the image below. Next fill it with R=255, G=255, B=255 and then apply a 9px Gaussian Blur effect for the resulting shape. Continue create a path as shown in the third image, fill this path with none, add a 1px stroke (R=186, G=211, B=235), then apply the Width Profile 4 and a 2px Gaussian Blur effect for the result.


Create the Vertical stabilizer
15. Start with drawing two objects using the Pen Tool (P) like in the images below. Once your objects are drawn, fill the red object with R=158, G=185, B=216 and fill the yellow object with the linear gradient.


16. Using the Pen Tool (P), create an object and then fill it with R=1, G=82, B=130. Keep working with the Pen Tool (P), draw a path as shown in the third image. Next fill this path with none, add 1px stroke (R=0, G=178, B=254) and then apply a 1px Gaussian Blur effect for the result. Now reselect the bigger shape created in this step, duplicate it once and then bring it to front (Ctrl +Shift +Right Square Bracket). Keep this copy selected, hold down the Shift, click on the newly blurred object and go to the Object > Clipping Mask > Make (Ctrl +7).

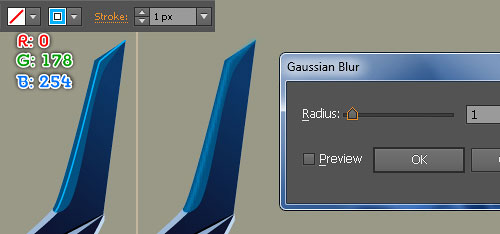

17. To add some details on the vertical stabilizer, draw two objects and then fill them like you see in the images below.

18. Before you continue, double-click on the Line Segment Tool (\) on the Tool palette. In the Line Segment Tool Options dialog box, enter a 775 in the Length box and enter a 0 in the Angle box, then click OK. Next rotate this path an angle of about -11 degrees and then place it to the correct position as shown below. Continue double-click on the Line Segment Tool (\) again. Enter a 238 in the Length box and enter a 0 in the Angle box, then click OK. Next rotate this path an angle of about -9 degrees and then place it to the correct position as shown in the second image below. We’ll create the horizontal stabilizers and the wings of the airplane based on these paths.


Create the Horizontal stabilizers
19. With the Pen Tool (P) draw an object like below. Next add two anchor points on the new object and then adjust them to get the result as shown in the second image. After you are done adjusting the object, reselect it and then fill it with R=179, G=179, B=179. While the resulting shape selected, duplicate it once and then replace the existing color of the copy with R=191, G=213, B=240. Next move this new shape 2px up and 1px to the left.


20. Continue with the Pen Tool (P), create another object and then fill it with the linear gradient as shown below. To add some details on the right horizontal stabilizer, first draw some paths with a 1px stroke (R=255, G=255, B=255) and no fill, then change the Blending Mode of them to Soft Light. Next with the Pen Tool (P) create a shape (R=12, G=27, B=64) like you see in the final image.


21. Now, follow the sequence of images and create the left horizontal stabilizer.


22. Now we’ll create the shadow of the vertical stabilizer on the left horizontal stablilizer. With the help of the Pen Tool (P), create an object and then fill it with the linear gradient as shown in the images below. Next apply a 3px Gaussian Blur effect for the resulting shape then set it to Blending Mode Hard Light and reduce the Opacity to 60%.
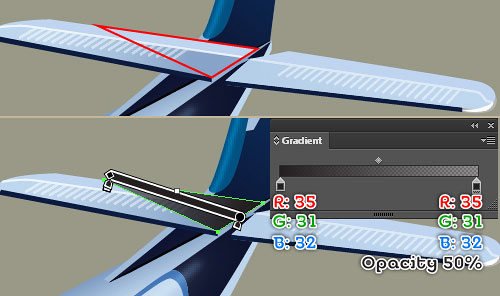

23. Now make a copy of the shape like in the image below and bring the copy to front. Keep this copy selected, hold down the Shift, click on the “shadow” shape created in the step 22 and go to the Object > Clipping Mask > Make (Ctrl +7).

24. Select and group (Ctrl + G) all objects created from beginning step 21 to this time. Next send this group to back (Ctrl +Shift +Left Square Bracket). In the end your artwork should look roughly like the third image.

Create the Wings of the Plane
25. Start with drawing an object using the Pen Tool (P) and then fill this object with the linear gradient like images below.

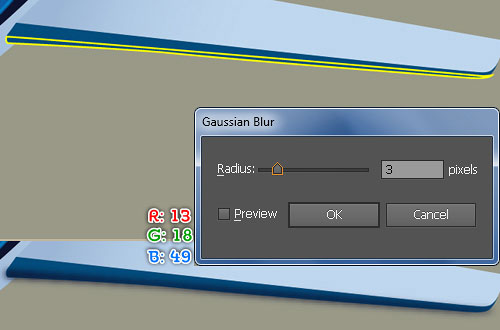
26. With the help of the Pen Tool (P), create an object as shown below and then fill it with R=2, G=72, B=124. Keep working with the Pen Tool (P), create another object like you see in the second image. Once your object is drawn, fill it with R=13, G=18, B=49 and then apply a 3px Gaussian Blur effect for the resulting shape. Now reselect the bigger shape created in this step, duplicate it once and then bring the copy to front. Make sure that this copy is still selected, hold down the Shift, click on the newly blurred shape and go to the Object > Clipping Mask > Make (Ctrl +7).


27. To add some details on the right wing, first draw some paths with a 1px stroke (R=255, G=255, B=255) and no fill, then change the Blending Mode of them to Soft Light. Now create another path as shown in the second image, fill it with none and then add a 3px stroke (R=85, G=85, B=86) for it. Continue add some more details for the right wing like you see in the final images below.


28. Now, follow the sequence of images and repeat the same techniques as the previous steps to draw the left wing of the airplane.


29. Select and group (Ctrl + G) all shapes created in the step 28. Next send this group to back (Ctrl +Shift +Left Square Bracket).

Create the Jet engines
30. Pick the Pen Tool (P) and draw two objects that you see in the images below. Once your objects are drawn, fill the bigger object with the linear gradient. Next fill the remaining object with the radial gradient and then apply a 7px Feather effect for the resulting shape. Now we’ll create the shadow of the engine on the right wing. First draw a black shape (R=35, G=31, B=32) as shown in the sixth image below and then apply a 8px Gaussian Blur effect for it. Finally hide the resulting shape behind the engine shapes.


31. Continue with the Pen Tool (P), create an object and then fill it with the linear gradient like you see in the images below. Next create another object and fill it with R=226, G=226, B=224. Finally draw a curved path, fill it with none, add a 1px stroke (R=147, G=149, B=152) and then apply the Width Profile 3 for the result.


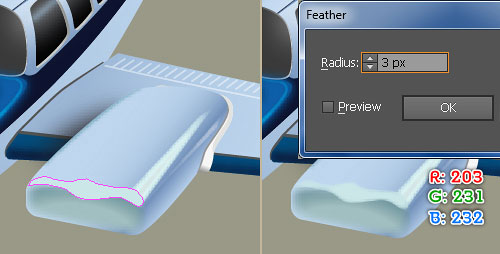
32. We are going to start making highlights on the engine to give it more of a 3D look. With the help of the Pen Tool (P), draw three objects as shown below. Once your paths are drawn, fill the red object with R=217, G=242, B=242, then fill the yellow object with R=209, G=211, B=212 and fill the green object with R=251, G=251, B=251. Now reselect three newly created shapes and apply a 3px Feather effect for them. Continue create a curved path like you see in the fifth image below. Next fill this path with none, add a 1px stroke (R=114, G=165, B=186), then apply the Width Profile 1 and a 1px Gaussian Blur effect for the result.


33. Now select and group (Ctrl +G) all objects created in the step 32. Next select the biggest shape created in the step 30, duplicate it once and then bring the copy to front. Keep this copy selected, hold down the Shift, click on the newly created group and go to the Object > Clipping Mask > Make (Ctrl +7). Continue create another shape (R=203, G=231, B=232) as shown in the fifth image and then apply a 3px Feather effect for it.


34. With the Pen Tool (P), create an object like in the image. Reselect this object and go to the Effect > Stylize > Round Corners… Enter a 2px Radius and then click OK. Fill the result with R=135, G=135, B=135. Keep the resulting shape selected, go to the Object > Path > Offset Path… Enter a -1px Offset and then click OK. Replace the existing color of the newly created shape with R=28, G=28, B=28.


35. Using the Pen Tool (P) draw two objects and then fill them with the linear gradient like you see in the images below.


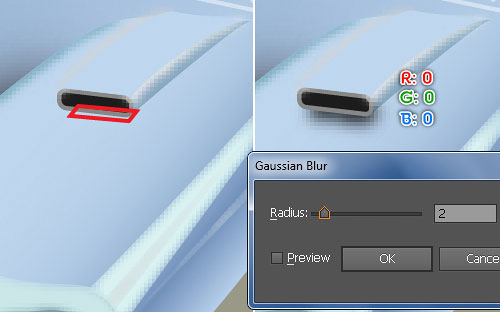
36. We are going to start making highlights and shadows on the newly created shapes. First create two curved paths with the Pen Tool (P) like in the image. Select the red path, fill it with none, add a 1px stroke (R=209, G=211, B=212) and apply the Width Profile 1 for the result. Next fill the remaining path with none, add 2px stroke (R=236, G=236, B=236) and then apply the Width Profile 4 for the result. Reselect two newly created objects, group them (Ctrl +G) and apply a 1px Gaussian Blur effect for it. Now select the bigger shape created in the step 35, duplicate it once and bring the copy to front. Keep this copy selected, hold down the Shift, click on the newly created group and go to the Object > Clipping Mask > Make (Ctrl +7). To add the shadow, first draw an object as shown in the fifth image. Once your object is drawn, fill it with R=0, G=0, B=0, then apply a 2px Gaussian Blur effect for the resulting shape and press (Ctrl +Left Square Bracket) some times to get the result as shown in the final image.


37. Using the Pen Tool (P) create two objects like in the image and then fill these objects with R=20, G=20, B=20. Continue with the Pen Tool create three other objects like in the third and fourth images. Once your objects are drawn, select two yellow objects and fill them with the linear gradient. Next select the red object and fill it with the radial gradient.


Create the Spinner
38. Start with drawing a 32 by 31px ellipse using the Ellipse Tool (L) and then fill it with the linear gradient as shown below. While the resulting shape selected, duplicate it once, then move the copy 1px down and 2px to the left. Next replace the existing color of the new shape with R=109, G=110, B=113. Continue draw another object with the Pen Tool (P) like in the fourth image and then fill this object with R=150, G=150, B=152.


39. To add some details for the spinner, follow the sequence of images and draw some objects similar to the ones from below.

Create the Propellers
40. It’s time to draw the propellers. Start with drawing an ellipse using the Ellipse Tool (L) and then fill this ellipse with the linear gradient like in the images below. Make sure that the resulting shape is still selected, duplicate it once, then decrease the size of the copy and replace the existing color of it with R=70, G=75, B=83.

41. With the help of the Pen Tool (P), create an object and then fill it with the linear gradient as shown in the images below. Keep the resulting shape selected and go to the Object > Path > Offset Path… Enter a -1px Offset and then click OK. Replace the existing color of the new shape with new linear gradient. To add some details for this propeller, create two shapes (R=191, G=198, B=205) like you see in the final image.


42. Now, follow the sequence of images and draw two other propellers.


43. Select and group (Ctrl + G) all shapes (except the shadow shape of the engine) created from beginning step 30 to this time. Make a copy of this group (Ctrl + C, Ctrl + F) and rotate this copy an angle of about -11 degrees. Keep the resulting group selected and go to the Object > Transform > Scale… In the Scale dialog box, check the None-Uniform, enter a 95 in the Horizontal box and enter a 103 in the Vertical box, then click OK. Next place the resulting group to the correct position as shown in the second image. Now we’ll create the shadow of the engine on the left wing. First draw a black shape (R=35, G=31, B=32) as shown in the third image below and then apply a 8px Gaussian Blur effect for it. Finally hide the resulting shape behind the engine group. We are done with the Jet engines for the moment. In the end your artwork should look roughly like the final image.


Create the Landing Gear
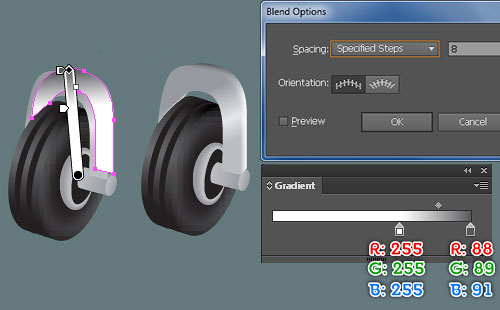
44. Let’s work on creation of the landing gear. Start with drawing a 11 by 22px object using the Ellipse Tool (L). Once your ellipse is drawn, reselect it and rotate this ellipse an angle of about -15 degrees. Make a copy of the resulting object (Ctrl +C, Ctrl +F), then move the copy 2px down and 5px to the right. Now reselect the red ellipse, duplicate it once again and hide (Ctrl +3) the copy. Next select two newly created ellipses and fill them with the linear gradient like you see in the fourth image. Reselect two newly created shapes and go the Object > Blend > Blend Options… In the Blend Options box, follow the data as shown in the final image and then click OK. Next go to the Object > Blend > Make (Ctrl +Alt +B).


45. Press (Ctrl +Alt +3) to show the red ellipse hidden in the previous step. While this ellipse selected, fill it with the radial gradient and then apply a 3px Feather effect for the resulting shape. To add some details for the wheel, first create two curved paths with the Pen Tool (P). Once your paths are drawn, fill them with none, add a 1px stroke (R=35, G=31, B=32) and then apply the Width Profile 1 for the result.


46. Reselect the ellipse shape created in the step 45 and go to the Object > Transform > Transform Each… Follow the data as shown below and then click Copy. Make sure that the new shape is still selected, open the Appearance palette (Window > Appearance) and remove the Feather effect. Next fill the resulting shape with none, add a 2px stroke (apply the linear gradient across stroke) and then apply the Width Profile 1 for the result.


47. Continue create two objects and then fill them with the linear gradient as shown in the images below.

48. With the Pen Tool (P) create an object and then fill it with the linear gradient like you see in the images below. Keep the resulting shape selected, duplicate it once, then move the copy 1px up and 1px to the right. Replace the existing color of the new shape with new linear gradient and then press (Ctrl +Left Square Bracket) to send the resulting shape backward. Now select two newly created shapes and create a blend between them.

49. Continue with the Ellipse Tool (L) create a 9 by 9.5px object and then fill this ellipse with the linear gradient. Make sure that the resulting shape is still selected, duplicate it once and then decrease the size of the copy. Next replace the existing fill color of the new shape with the radial gradient, add a 1px stroke (R=35, G=31, B=32) and then apply the Width Profile 1 for the result.


50. Using the Pen Tool (P) create two objects like in the image. Once your objects are drawn, reselect the red object and fill it with the linear gradient. Next select the remaining object and fill it with R=147, G=149, B=152, then press (Ctrl +Left Square Bracket) to send the resulting shape backward. Reselect two newly created shapes and send them to back (Ctrl +Shift +Left Square Bracket). To add the shadow for the wheel, first draw an object as shown in the fourth image. Next fill this object with the linear gradient and apply a 2px Gaussian Blur effect for the resulting shape, then send the result to back. Now select all shapes created from beginning step 44 to this time and send them to back.
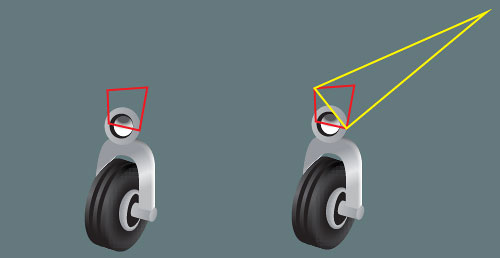


51. Now select all “wheel” shapes and go to the Object > Transform > Scale… In the Scale dialog box, check the Uniform and enter a 140 in the Scale box, then click Copy. While the copies selected, group (Ctrl +G) them and then place this group to the correct position as shown in the third image below. Finally send this group to back (Ctrl +Shift +Left Square Bracket).


Create the Shadow of the Airplane
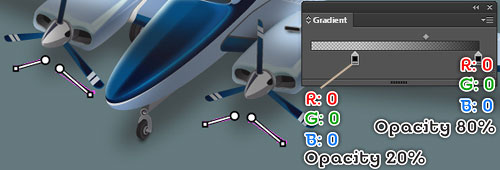
52. Using the Pen Tool (P), create five objects as shown in the images below. Once your objects are drawn, select the red object and fill it with R=35, G=31, B=32. Next apply a 10px Gaussian Blur effect for the resulting shape and then reduce the Opacity of it to 50%. Reselect four yellow objects, fill them with the linear gradient like you see in the fourth image and then apply a 7px Gaussian Blur effect for the resulting shapes. Next select all shapes created in this step and send them to back (Ctrl +Shift +Left Square Bracket). Now select and group (Ctrl + G) all shapes created from beginning step 2 to this time. We are done with the airplane for the moment.




Create the Background
53. Using the Rectangle Tool (M) create a 897 by 555px object. Next fill this object with the radial gradient as shown below. The last thing to do is place the “airplane” group to the position like you see in the final image.


To download the source file for this tutorial, you will need to login as a member.
Sign up today to access all exclusive members content!
