How to Specify a Default Screen Saver for All Users in Vista
This will show you how to set or change a specific screen saver of your choice to be used as the default screen saver for all users on the computer with the users not being able to change the screen saver.
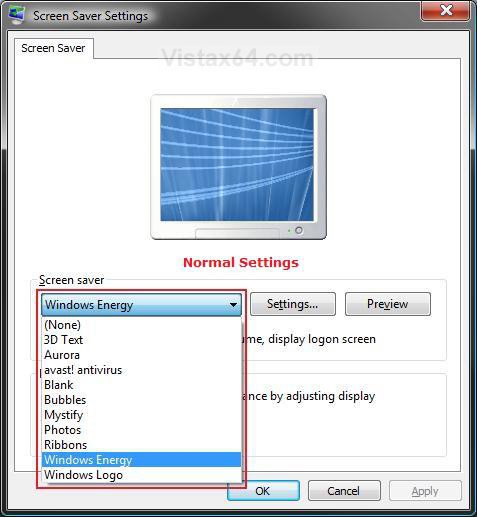
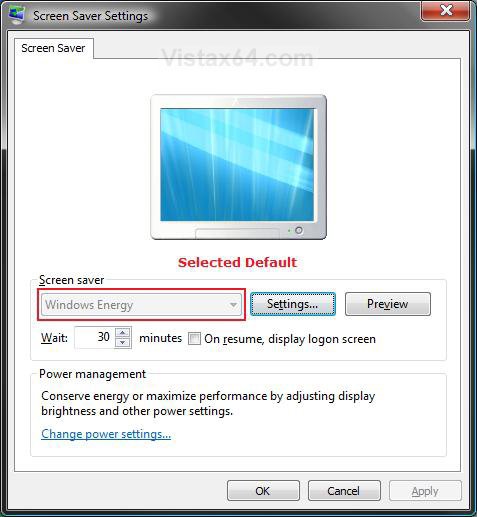
Even though a user cannot change a default screen saver to another one when set, they can still change their individual screen saver settings for it. See right example screenshot below.
EXAMPLE: Screen Saver Settings Before and After a Default is set
NOTE: Notice that when a default screen saver is set, the Screen Saver drop down menu is grayed out to prevent the screen saver from being changed to another one. (See right screenshot below)
 METHOD ONE
NOTE: This method is only available for the Vista Business, Ultimate, and Enterprise editions. See Method Two below for the Vista Home Basic and Home Premium editions.
1. Open the all users, specific users or groups, or all users except administrators Local Group Policy Editor for how you want this policy applied.
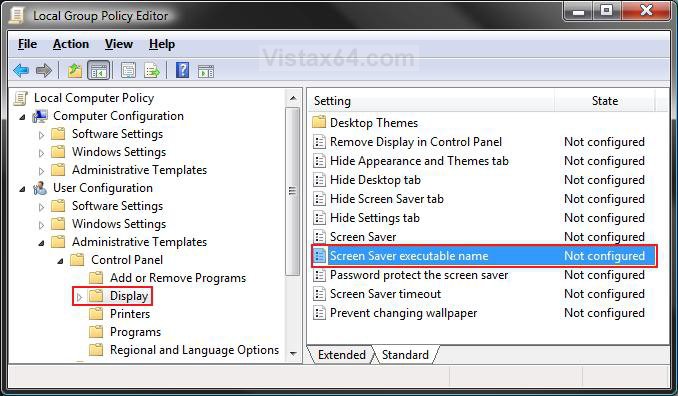
2. In the left pane, click on User Configuration, Administrative Templates, Control Panel, and Display. (See screenshot below)
3. In the right pane, right click on Screen Saver executable name and click on Properties. (See screenshot above)
4. To Allow Users to Select any Screen Saver
A) Dot Disabled or Not Configured and click on OK. (See screenshot below step 5B)
B) Go to step 6.
5. To Set a Default Screen Saver
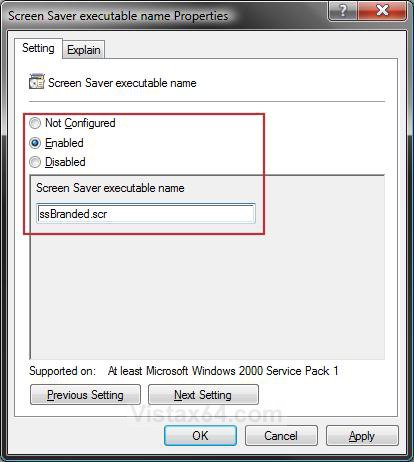
A) Select (dot) Enabled. (See screenshot below table)
B) In the white line, type the screen saver file name (see table below) you want as the screen saver and click on OK.
NOTE: Type just the screen saver file name (Ex:ssBranded.scr) if it is located in the C:\System32 folder. If it is not, then you will need to type in the full path of the screen saver file instead.
Screen Savers that come with Vista:
Screen Saver | Location |
Aurora.scr | C:\Windows\System32\Aurora.scr |
Bubbles.scr | C:\Windows\System32\Bubbles.scr |
logon.scr (default Windows Logo) | C:\Windows\System32\logon.scr |
Mystify.scr | C:\Windows\System32\Mystify.scr |
PhotoScreensaver.scr (Photos) | C:\Windows\System32\PhotoScreensaver.scr |
Ribbons.scr | C:\Windows\System32\Ribbons.scr |
scrnsave.scr (Blank) | C:\Windows\System32\scrnsave.scr |
ssBranded.scr (Windows Energy) | C:\Windows\System32\ssBranded.scr |
ssText3d.scr (3D Text) | C:\Windows\System32\ssText3d.scr |
6. Close the Local Group Policy Editor window.
 METHOD TWO
NOTE: This method will work for all Vista versions.
1. Open the Start Menu.
2. In the white line (Start Search) area, type regedit and press Enter.
3. Click on the Continue button in the UAC prompt.
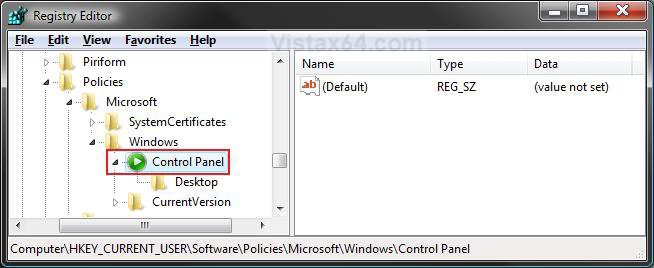
4. In regedit, do the steps below at both locations in bold below: (See screenshot below)
NOTE: If you do not have Control Panel in the left pane, then right click on Windows and click on New and Key. Type Control Panel and press Enter.
HKEY_CURRENT_USER\Software\Policies\Microsoft\Windows\Control Panel
5. To Set a Default Screen Saver
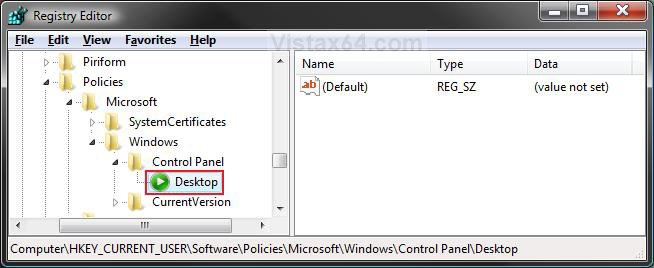
A) In the left pane, right click on Control Panel and click on New and Key. Type Desktop and press Enter. (See screenshot below)
NOTE: If you already have Desktop in the left pane, then skip this step 5A and go to step 5B instead.
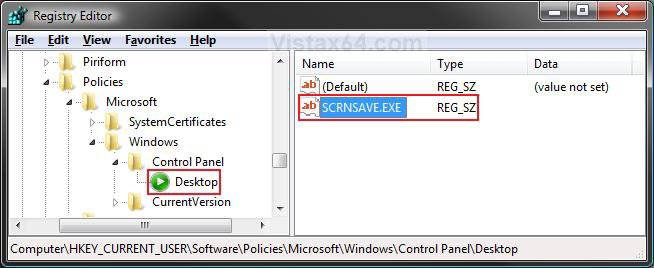
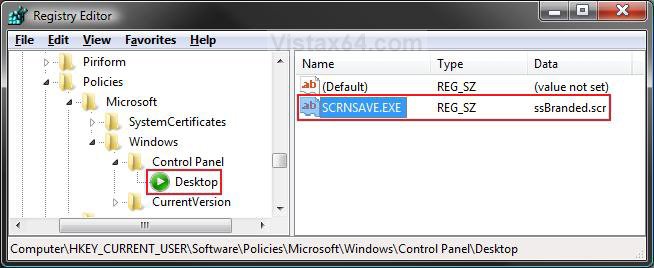
B) In the right pane of Desktop, right click on a empty space and click on New and String Value. Type SCRNSAVE.EXE and press Enter. (See screenshot below)
C) Right click on SCRNSAVE.EXE and click on Modify.
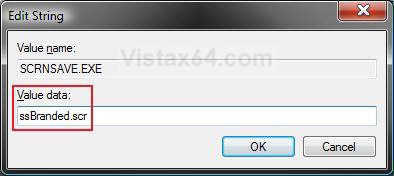
D) Type the screen saver file name (see table below) you want as the screen saver and click on OK. (See screenshot below table)
NOTE: Type just the screen saver file name (Ex:ssBranded.scr) if it is located in the C:\Windows\System32 folder. If not, then you will need to type in the full path of the screen saver file instead.
Screen Savers that come with Vista:
Screen Saver | Location |
Aurora.scr | C:\Windows\System32\Aurora.scr |
Bubbles.scr | C:\Windows\System32\Bubbles.scr |
logon.scr (default Windows Logo) | C:\Windows\System32\logon.scr |
Mystify.scr | C:\Windows\System32\Mystify.scr |
PhotoScreensaver.scr (Photos) | C:\Windows\System32\PhotoScreensaver.scr |
Ribbons.scr | C:\Windows\System32\Ribbons.scr |
scrnsave.scr (Blank) | C:\Windows\System32\scrnsave.scr |
ssBranded.scr (Windows Energy) | C:\Windows\System32\ssBranded.scr |
ssText3d.scr (3D Text) | C:\Windows\System32\ssText3d.scr |
E) The registry will now look similar to this. (See screenshot below)
F) Go to step 7.
6. To Allow Users to Select any Screen Saver
A) In the right pane, right click on SCRNSAVE.EXE and click on Delete. (See screenshot above)
B) Click on Yes to confirm deletion.
C) In regedit, navigate to the location below, and repeat steps 6A and 6B if there is a SCRNSAVE.EXE entry here as well.
Code:
HKEY_LOCAL_MACHINE\SOFTWARE\Policies\Microsoft\Windows\Control Panel\Desktop7. Close regedit.
8. Restart the computer to apply.
That's it,Shawn
Related Tutorials
- How to Change the Logon Screen Saver Wait Time in Vista
- How to Change the Logon Screen in Vista
- How to Add or Remove the Screen Saver Option in Vista
- How to Use and Change a Screen Saver in Vista
- How to Enable or Disable the Log On Screen Saver in Vista
- How to Enable or Disable Screen Savers in Windows 7 and Vista
Attachments
Last edited by a moderator:

