


While working on my site, I discovered that I needed a spiderweb however all the tutorials I could find didn't look very realistic. While there are some very nice web brushes out there, I thought it might be fun to attempt my own web with my limited drawing abilities. This web is the easiest thing ever and for the amount of effort, looks decent:
 Step 1. Open up a new document any size you want. I picked 300x300px. Step 2. Fill the first layer with black just so that we can clearly see our web and then make a new layer on top of it called web. Step 3. Now take the brush tool and set it to one pixel with 100% opacity and flow. Select 838383 as your color. It should be a nice gray but if that's not your thing, change it. Neon green would make a cool mutated spiderweb. Step 4. Determine where your center will be and draw several lines coming out of it like bicycle spokes. If you want your lines to be perfectly straight, just use the line tool instead of the brush. My spider is full from insects, so he's a little less straight.  Step 5. Next, take your brush tool, still with one pixel size, and from the center draw a spiral shape outwards until you just about get to the end of the spokes.  Step 6. Now apply the satin style to it. These are the settings I chose to use but you can experiment with what looks good to you. 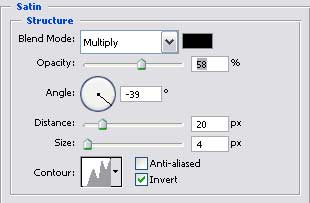  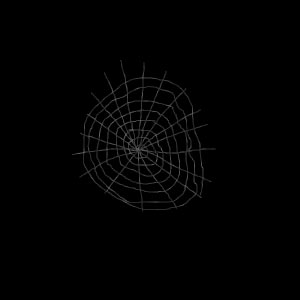 And we're done! I imagine you're thinking, "This it it?..." I know it doesn't look like much on its own. In fact, it looks like something out of mspaint than an 8 year old would draw...but throw the web layer in front of a picture with some variation in color and it takes on a much spookier effect. To get a corner web, just have the corner spokes go out further and make your spiral a little more lopsided. Enjoy! 
|


