
Sometimes when you are recording a new track it is good to turn off the metronome and auto-quantize using your software, just hit record, and play from the heart. A spontaneity and more human quality can be captured in the performance. This works particularly well with solo guitar or piano.
Or maybe you want to use some audio from a live recording or a studio session where no click track was used. When it comes to adding other sequenced parts to audio that has been recorded in this way it can be difficult to get the timing of the midi notes right. The metronome and auto-quantize will be out of sync with the audio.
Obviously you can leave these turned off and try to record your other parts in time with your original audio, but this is going to be difficult, especially with several parts. What we need to do is make the tempo of the project follow the timing of the audio, and in this tutorial I’m going to demonstrate my preferred method of achieving this by creating hitpoints on the downbeats of the audio, converting these to markers, and using the warp tool to adjust the tempo track so that the tempo will vary and fit exactly to the audio. The end result will be that the metronome will follow the timing of the audio exactly and quantize will snap to the audio events correctly.
Step 1
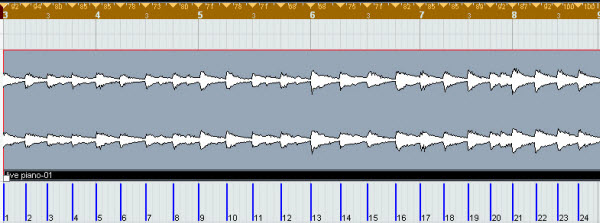
Here’s a piece of audio, a piano piece which I’ve opened up in Cubase, where the timing deliberately slows then speeds up to demonstrate the varying tempo track that I’m going to create. I’ve already trimmed the audio so that it starts exactly on the first downbeat, and I’ve lined it up (with snap turned on) to start at bar 3. Take a listen to the audio clip and you will hear that the metronome is totally out of time with the music, and would be useless in giving a count in or to play along with.

Track with unmatched tempo
Step 2
From the new tracks menu I’ve made a marker track, and with the pencil I’ve drawn a marker into the marker track at the start of the audio at bar 3.

Step 3
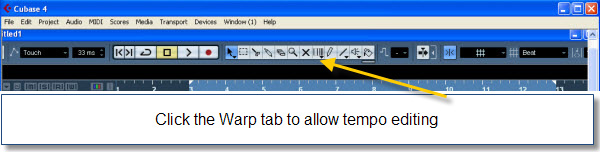
Next I’ve clicked on the warp tab. This allows us to edit the tempo track.
Step 4
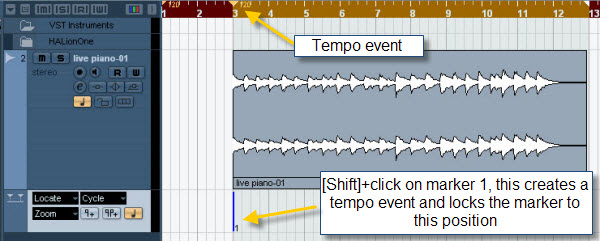
Now by pressing [Shift] + clicking on marker 1, we create a tempo event and lock the marker to that position in the audio. The yellow triangle and 120 symbol at the top of the picture show that the tempo at that point is locked to 120BPM.
Step 5
Now I’ve double-clicked the audio part to open it up in the sample editor. Clicking the hitpoints tab allows us to draw and edit hitpoints on the audio waveform.

Step 6
The first part of the next step is to draw in all the hitpoints. To bring up the pen tool we need to press and hold Alt/Option with the cursor over the waveform. I’ve chosen to draw a hitpoint on every downbeat of the audio, which will create a lot of markers, but it should be nice and accurate.
You should be able to see where the hitpoints should go, but just play throught the sample and use your ears if you are not certain. When you are satisfied that you’ve got the hitpoints in the right positions, click the Create Markers tab on the left hand side and then close the sample editor.

Step 7
We can see here that there are now 24 markers. The next task will be to use the warp tool to drag bars so that they snap into place where the markers are. For example, I want bar 3.2 to line up with marker 2 and so forth.

Step 8
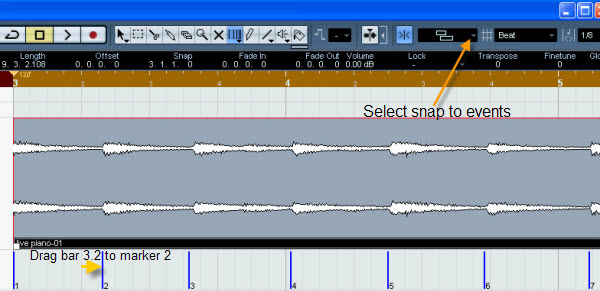
Make sure that snap is set to events from the drop down menu shown in the top right of the screenshot. In the bottom left of the screenshot you can see the faint gray line which represents bar 3.2. Click and drag this to the right (you must be in warp mode) and it should snap to marker 2.
Step 9
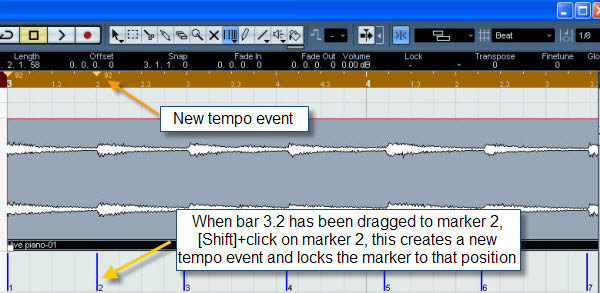
The click of the metronome is now going to fall correctly in time with the audio on bars 3 and 3.2. Obviously we need to go through all the markers dragging the appropriate nearest bar to snap to them, but before we move on we must lock the marker in position and create another tempo event. As before, pressing Shift and clicking on the marker whilst in warp mode will do this.
Step 10
Next we move on to marker 3, dragging bar 3.3 to it and locking it, and the same with bar 3.4 to marker 4, bar 4 to marker 5, then working through all the markers. At this point it should be obvious which bars you should drag to each marker.

Step 11
All the bars are now correctly lined up with the markers, which have all been locked, and you can see all the tempo events created in the ruler at the top. Each one represents a change in tempo. The tempo now follows the timing of the audio, which means our metronome will be in sync with the audio.
Equally important: when using quantize or editing any midi parts we record, the notes will snap to the tempo of the audio. Have a listen to how the metronome now follows the audio:
Track with matched tempo
Step 12
In this final track, I’ve recorded two midi parts - a drum track and a bass line. It was a lot easier to play along with the audio now that the metronome follows the tempo correctly, and when I recorded the parts, if I made any mistakes it was easy to go in and edit the notes with them now snapping to their correct positions.
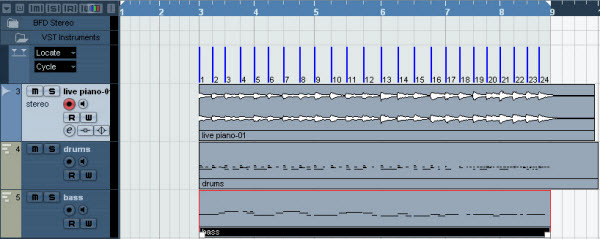
Final track


