
Twice a month we revisit some of our reader favorite posts from throughout the history of Audiotuts+. This tutorial was first published in November 2008.
In 2008, perhaps no song has dominated the charts more than Lil’ Wayne’s Lollipop. Produced by Jim Jonsin, Lollipop is a prime example of how a hit song does not have to be complex; instead, it is a perfect blend of simplicity and catchiness.
In this tutorial, we will look at how to go about recreating this track in Reason 4, and also what helped make it such a successful song.
Introduction
Let’s start by analyzing the track.
It has a short introduction that features the main melody without drums for about 12 seconds, before picking up the beat.
Then it follows the typical chorus-verse-chorus-verse-chorus style of most songs. The melody is a simple synthesizer pop sound, over some typical hip-hop drums, with bass and a synthesizer pad.
Overall, it’s rather straightforward, and there are no little tricks to get caught up on. You can download the samples that I used for this tutorial in the Play Pack.
Step 1 - Setup + Drums
As I’ve done in previous remake tutorials, the easiest place to start is with the drums. The drums are automatically quantized to the tempo (if you’re using Redrum). This helps us set up our backbone of the song, and it helps us set our project tempo to the proper number.
Open up Reason 4.0 (or equivalent DAW), and set up the basis for the track as follows:
- Create -> MClass Mastering Suite Combi, and rename it “Mastering”.
- Create -> Mixer 14:2, and rename it “Main Mixer”.
- Create -> Redrum Drum Computer, and rename it “Drums”.
- Project Tempo -> 73.000 BPM.
- Quantize During Recording -> ON.
- Loop On/Off -> ON.
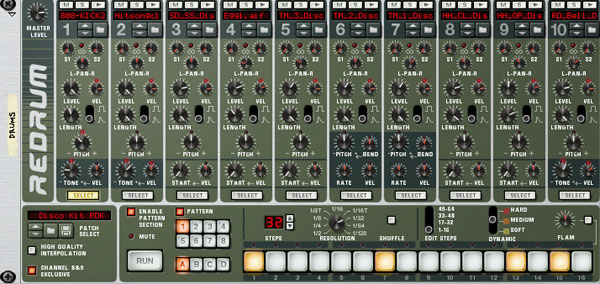
Pretty similar to how we did it last time, so now let’s load up some drum samples. Load up 808-KICK2 into sample slot #1, and Hitsongclap into sample slot #2. Leave the rest of the samples in the Redrum machine—we’re not going to use them.
Now, let’s program up our drums. We need 32 steps, so use the little “Steps” lever to increase the number of steps to 32. Change the “Resolution” dial to 1/32 (this makes it so that each ‘step’ in the sequencer is a smaller increment of time).
Our kicks are going to be on steps 1, 7, 13 and 15 for the first 16 steps. Now, using the slider that says (1-16, 17-32, 33-48, 49-64), select 17-32 to edit the second set of 16 steps. For our second 16 steps, our kick drum is going to be on steps 3 and 5. This gives us our drum base.
Now, put a clap on step 9 on both the first 16 steps, and the second 16 steps. If you hit Run, you should hear the familiar drum beat. It’s not yet perfect—we need to tweak our drum samples.
Settings for the kick drum:
- LEVEL = 127
- LENGTH = 59
- PITCH = -15
- TONE = -36
Settings for the clap:
- LEVEL = 127
- LENGTH = 127
- TONE = 20
- VEL = 5
This gives the drums a similar feel to the original song.
Step 2 - Melody
Onto the ever-famous melody. Go to Create -> Combinator, and load up the Lil Jon Whistle.cmb patch into your combinator.
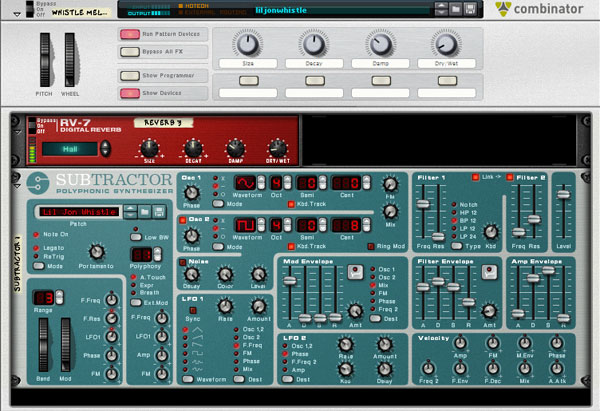
I’ve gone to the work of creating this patch for this tutorial, so I won’t walk you through all the tedious details of getting this synth to work right. Instead, you can download it from the Play Pack and use it as you see fit.
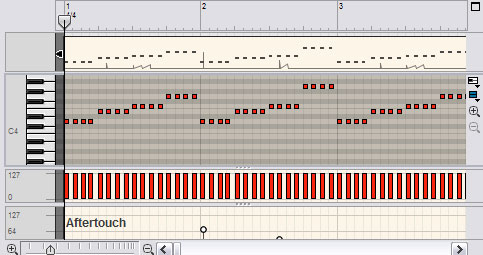
The notes for the melody are shown below, it’s a very simple melody line.
The key here is to make sure the notes are being quantized, as this melody has a very programmed feel to it. Also, try to make the dynamic levels even (you can do this using the pen tool and just clicking across the dynamic range (the vertical bars).
Step 3 - Bassline
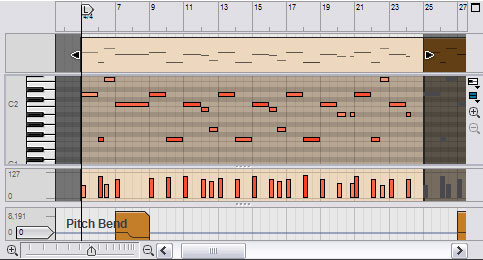
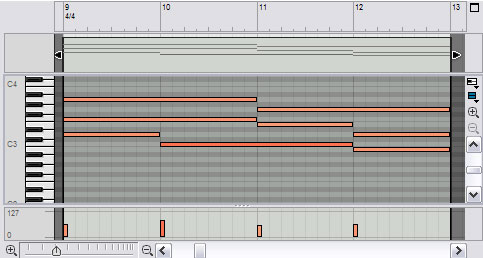
This is probably the hardest part of this song, because the bass changes quite a bit. For this bass sound, the closest sound I could find was the LA Riot Bass, so go Create -> Subtractor Analog Synthesizer, and load up the LA Riot Bass.zyp (included in Play Pack).
The notes are shown below. The bass is a bit of a rolling bassline, but note how the bass notes change on the drum beats. This is how most hip-hop producers give their kick drum some melodic value. In reality, the kick is monotone, but the bass creates the movement. Also, the bass does utilize the pitch bend (I’ve included an example in the screenshot, and it should be rather prominent in the production).
Step 4 - Synthesizer Line
We now have our drums, our main melody, and our bassline. The core elements of the song are now essentially complete. However, if were were just to loop this track over and over again, it would be rather dull (and probably not a hit song).
Therefore, we need to add some more instrumentation. In Lollipop, the instrumentation that is added is a synthesizer. So, just like with all our other instruments, let’s load up our sound patch.
Go to Create -> Combinator, and load up Fast Pad 02. It’s a rather simple pad, and while not the exact sound that Jim Jonsin used, it’ll do the trick.
The notes are shown below. It gives it a more coherent feel. Note that this is the difference between the album version of the song and the video version of the song. The video version has replaced this synthesizer with an electric guitar synthesizer. The concept is the same.
Step 5 - Drums Revisited
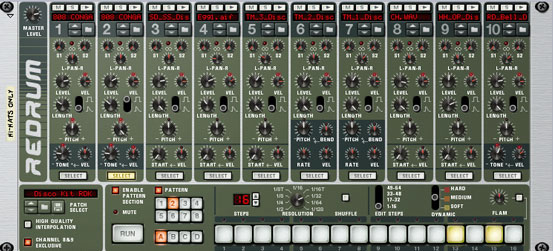
Well, we now have pretty much the entire track done. However, we’re missing the hi-hats that are rather prominent in the song. We could add them in our other Redrum drum computer, but I don’t like having several patterns all on one machine.
Let’s create another Redrum. Go to Create -> Redrum, and ignore all the patches except for channel/slot 8. Load up our club hi-hat (CH.wav) into this slot, set the Level to 110, and Length to 124. Now, program up the pattern seen below (note the dynamic level change for the hi-hat roll).
Now, the only other drum components on this track are:
- A snare roll, occasionally used throughout the song.
- A stutter effect on the clap, again, only occasionally used throughout the song.
I’ll let you guys and gals mess around with it (try the stutter effect in Reason tutorial). The project file is included in the Play Pack for your experimentation and enjoyment.
Just another note on this subject: most of the snare rolls and clap stutters were probably added after the vocals were recorded. Because of the way that the song is structured, I presume the engineer for the studio session did most of the post-production work on the track.
The reason that these additional drum components are so effective is because of their placement in relation to the chorus.

Step 6 - Intro Congas
We almost forgot the infamous little drum pops on the intro, so let’s go ahead and add those now. Interestingly, it’s actually a conga sound that is used. Now, the congas are self-contained in the Reason file, but I can’t distribute them separately as they are embedded in a separate sound set.
Load up the 808 CONGA sound into slots 1 and 2 on our second Redrum (same one we used for hi-hats).
For slot 1, Pitch should be 5. For slot 2, Pitch should be 63. This will give us the sound that we want.
Now, using the pattern selector, select pattern A2 and put our first conga sound on step 11. Then select our second conga sound, and put it on steps 13 and 15.
Have your dynamic set to soft, as this should give us the appropriate levels without having to mix separately. Now, just use the same pattern automation method as before to add a small A2 pattern.
We’ll deal more with this below in the song structure.
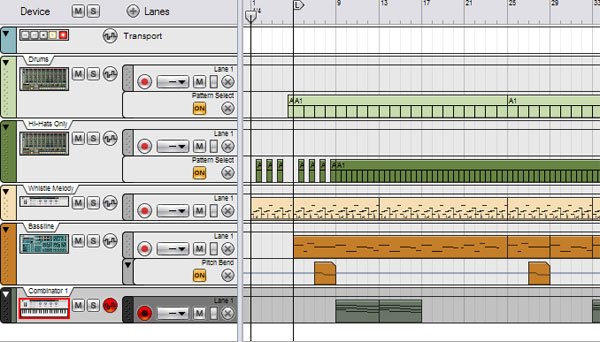
Step 7 - The Song Structure
Right now, we essentially have a repeating loop going throughout the entire song. In the actual instrumental, the whistle plays alone for the first 13 seconds, before the drums kick in (excluding the hi-hats), and then the synth and hi-hats come in.
So, we need to setup our song structure. The way that I usually go about this starts with the drums. Hit record, and then select a different pattern on Redrum (such as A2). This will set up a pattern automation lane, so we can select our drum pattern (there are multiple ways of doing this, although this is my preferred method).
Now, resize/edit your patterns so that a blank pattern (or simply don’t select a pattern) plays for the first bar, and then the A1 pattern (the pattern with the drums) plays from then on. Also, create a new pattern A3, and put only a clap on step 9. This will give us the small clap just before the drums start.
Do the same thing with the other Redrum computer (the one with the hi-hats), except make it silent for the first 2 bars. Then, make sure pattern A1 is selected from then on.
We need to do this with our other instruments too (refer to the image below to get the proper setup).
Step 8 - Wrap Up
Well, now we have the instrumental done for the song Lollipop. Hopefully you didn’t find it too hard to replicate, and as always, the Play Pack is below with the Reason Project File, as well as the various sounds I’ve used for this tutorial.
This song is a pretty good example of how simplistic hip-hop is these days, and literally, anyone with a keyboard is (theoretically) capable of making a high quality instrumental. A note to all the aspiring producers out there: being able to vary the track is very important, and so is having connections within the industry! Making an amazing beat won’t get you very far if you can’t get it on the desk of someone who can do something with it.
Until next time, happy beat-making.
My final instrumental:
And, for your comparison, the actual instrumental.
Download the Play Pack for this tutorial (440KB)
Contents
- Reason 4 Source Files
- WAV Samples
- Combinator & Synth Patches


