
Really bad at playing keyboards? Lost that creative spark? Here’s a tutorial showing you how to create some cool ideas using a little known object in Logic called the Chord Memorizer. Buried inside the dreaded Environment, this MIDI tool can help you build anything from new musical ideas to complex layered sounds — with one finger!
Step 1
When you first start using Logic, the Environment can be a bit of a scary place and many users tend to never visit it that often, if at all. The truth is that no signal, MIDI or audio, gets in or out of Logic without going through the Environment. The easiest way to visualize it is like a giant patch bay. A bit like Reasons ‘Tab’ view.
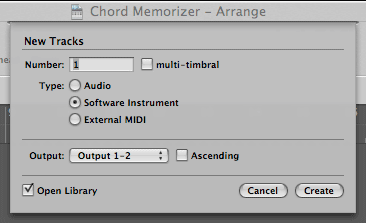
Open up a ‘New’ blank Logic song from the File > New menu. Create a new ‘Software Instrument’.
Step 2
Now open up the Environment from the ‘Windows’ menu or press Command+8.
In the Environment you should see the Software Instrument you just created. Insert your favorite synth (I’ve used Spectrasonics ‘Ohmnisphere’) and pull up a nice ‘Pad’ preset. If you look at the channel strip you’ll see a small socket in the top right corner. If you click, hold and drag that socket you’ll see a patch cable appear which can be connected to any other object to pass MIDI information. All objects in the Environment have one of these. You use the same socket when plugging into an object.

Step 3
Let’s create a new object. We’re going to use the Chord Memorizer. This cool little thing lets you map anything up to a 12 note chord onto one note on your MIDI keyboard. You can store 12 chords over a one octave range per object. If your keyboard skills aren’t great this really is the ‘one finger’ cheat to playing complex chord progressions both live and when composing. Make the new object by choosing New > Chord Memorizer.

Step 4
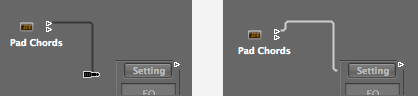
Select the new Chord Memorizer and rename it ‘Pad Chords’ in the left hand dialogue box. Now grab its socket and plug it in to the Audio Instrument channel socket. You may notice that a new socket has appeared on ‘Pad Chords’. We’ll come back to that later.
Step 5
Now double click the Chord Memorizer. A new floating window will appear with two keyboards on it. The top row is the ‘trigger’ key and the bottom row is where you assign the chords. Click the C3 note on the top keyboard (by default top and bottom notes are the same) and you should see this:

Step 6
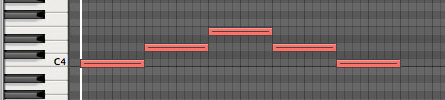
Now let’s map a chord. With C3 still selected on the top row I’m going to add the notes of an Amin9 chord on the bottom row. Press ‘OK’ to store the chord. You may find it useful to map your chord to its corresponding root note. For this example C3 will work just fine. Here’s what it looks like:

Step 7
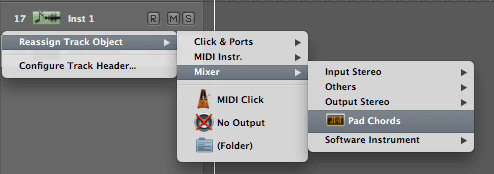
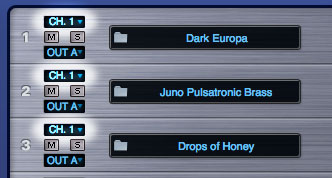
Now we’re set up to test it out. Go to your Arrange page and double click below ‘Track 1’ to make a new track. Right click the new track over its name. A menu will open. Choose Reassign Track Object > Mixer > Pad Chords.
With ‘Pad Chords’ selected in the Arrange page, play C3 on your MIDI keyboard and instead of hearing C3 you should hear an Amin9 chord. Nice!
Play C2 and you should hear the chord an octave below, and so on.
Step 8
Let’s map two more chords. Go back to the Environment and follow Step 7. This time on D3 we’ll add an Fadd9 chord and on E3 a G chord. Don’t forget to press ‘OK’.


Step 9
Go back to the Arrange page and play about with new chords on C3, D3 and E3. I’ve recorded a sequence at 120bpm on ‘Pad Chords’ like this.
Step 10
Here’s where the possibilities of this tutorial really take off. Now we have some chords and a sequence we can start to really experiment with layering some sounds. I’m going to give you two examples of how you can do this.
Step 11: Add a new instrument
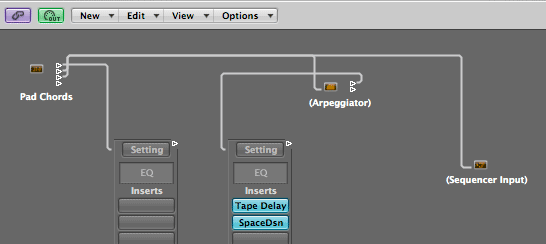
In the Arrange view create a new Software Instrument (see Step 1). Load in an ES2 and select the patch called ‘Fat Grey’ in ‘Sequence Elements’ from the plug-in menu. Add some Reverb and Delay if you want. Go to the Environment and from the ‘New’ menu select ‘Arpeggiator’. Drag a cable from that new socket on ‘Pad Chords’ into the arpeggiator socket. Then drag a cable from the ‘new’ socket on the arpeggiator into the channel strip with the ES2. You should now see something like this. With the arpeggiator highlighted, set its parameters like the image below.

Step 12
Go back to the Arrange view and select the track ‘Pad Chords’ and hit ‘Play’ (the arpeggiator only works when Logic is playing). Now hit C3 or play back your sequence if you’ve recorded one. You should now hear both the pad and the arpeggiator playing the mapped chords.
You can keep doing this with new instruments until your processor blows up. Every time you drag a new cable, another will appear as if it’s almost daring you!
WARNING: The bigger the mapped chord the more power it will take to process the voices. Make sure your synth’s polyphony (or voices) are set high enough.
Step 13
Many soft synths are multi-timbral meaning that they can play more than one preset using discrete MIDI channels. A good example being Kontakt 3, SampleTank, StylusRMX and of course Spectrasonics Ohmnisphere. In order to access the multi-timbral properties of these plug-ins, its channel strip MIDI channel must be set to ‘ALL’. For this example though I’m simply going to set each parts MIDI channel to 1 to create my layers.
TIP: The Modwheel will transmit to all synths connected to the Chord Memorizer track. That should get your creative juices flowing!!!
Step 14: Recording the Chord Memorizers output
After some experimenting with the Chord Memorizer you probably come up with some cool new progressions and ideas. But what if you want to tweak the chords by adding some passing notes or suspending one chord, or just want the chords as a MIDI part? You can record the chords back onto another track if you like. Simply create a new ‘Sequencer Input’ object in the Environment and plug a cable from the Chord Memorizer into it.
Step 15
Go to the Arrange page and create a new track. Set it to ‘No output’ using ‘Reassign Track Header’. With the track selected, line up the start of your sequence and hit ‘Record’. When your done you should have a MIDI part with all the chords ready for some tweaking. Now delete the cable between Sequencer Input object and ‘Pad Chords’ by selecting the cable and pressing ‘delete’.

You can also use the exact same technique to record the Arpeggiator’s output as well.
Conclusion
I hope you’ve enjoyed this tutorial. As you can imagine, the creative possibilities of this Environment object are massive. And it’s not just chords. You can do some pretty interesting stuff with scales too, but that’s a whole new tutorial by itself. I hope you experiment with it and come up with some cool ideas of your own.


