
In past tutorials I have covered side chaining in Reason and touched on side chaining effects busses in Logic Pro, but after a few emails on the subject, I felt it was about time to cover the slightly less transparent side chaining method that Cubase 4 has adopted since the introduction of the VST3 protocol.
I’ll cover side chaining using gates and compressors for varying effects and results. Obviously this isn’t one for the more seasoned Cubase user but it seems there are still some people out there that are slightly baffled by the process. Hopefully this will clear things up for those concerned.
Step 1
First of all we’ll look at how to create a classic ducking effect using the new side chain enabled compressor from Cubase 4. Once I have demonstrated how to use the compressor in this fashion you should be able to route any side chain capable VST3 plug-in in Cubase with relative ease.
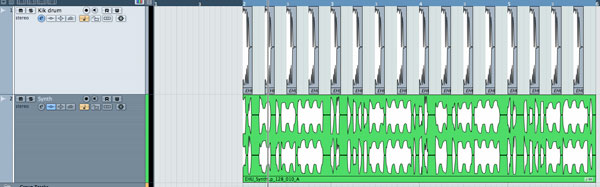
First start by choosing the signal you wish to be processed with the ducking effect. In this case I’ve got a synth loop. At this point the loop is playing back on its own channel with no processing at all.

Step 2
Now insert a basic Cubase compressor from the dynamics section onto the sound to be processed. You will notice on loading the compressor that some gain reduction does occur immediately due to the default setting on the compressor not being initialized fully and therefore some processing will take place.


Step 3
Now initialize the compressor so that no gain reduction is taking place. This is easily achieved by zeroing the ratio and threshold parameters. It is also a good idea to turn the attack, hold and release controls to zero as well, this will make later adjustment easier to perform.
Notice that the auto-gain function is turned off and the ‘peak - rms’ dial is turned all the way to the left to favor peak mode. This will also make editing in the next stages easier and a cleaner ducking effect will be achieved in peak mode.

At this stage you can engage the side chain mode. This resides in the top bar of the compressor and is illuminated orange when activated. Whenever you see this symbol on a plug-in it indicates that is is capable of receiving a side chain input.

Step 4
Now we need to focus on the sound that will supply our ‘key input’ or side chain input. You can pretty much use anything you like to create a ducking effect, a vocal can duck a guitar or background music, or you could even duck a ride cymbal with a closed hi-hat. Here I have stuck to the classic kick drum ducking effect to keep things simple and a 4/4 kick has been placed on its own track adjacent to the synth loop.
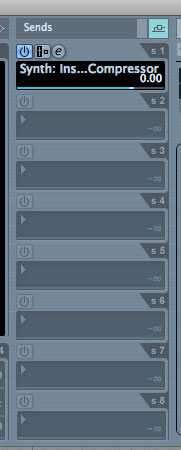
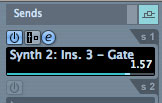
On opening the kick drum’s channel strip you will see there are no inserts or sends set up as it is a fully initialized channel. Looking towards the right of the strip you will see the empty send slots, the first of these is where we will create the side chain routing.

Clicking on the first slot will bring up a drop down menu and you should see the side chain routing available towards the bottom of the list. Select this option and go back to the channel strip. You can now turn this send on and send a healthy amount of level to the compressor.

Step 5
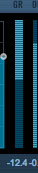
Now on returning to the original compressor on the synth channel we can start to apply the ducking effect. At first glance you will see that there is still no movement in the gain reduction meter and the sound remains unaffected. This is simply because the plug-in remains in its initialized state and we need to dial in some settings before any processing takes place.


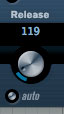
Turn the threshold down and the ratio value up until gain reduction starts to take place. You should really start to hear the sound ‘pumping’ in time with the kick drum now. You will need to balance these two controls to get the correct amount of gain reduction. Timing the release with the other elements in your track is also important.
Step 6
Similar routings can be used with many other Cubase 4 bundled plug-ins and depending on the type of processor, drastically different results can be achieved. Try triggering a noise gate with a secondary sound to create a rhythmical gated effect.
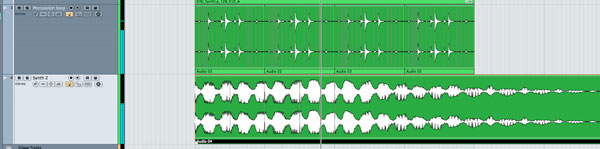
Take two sounds, one sustained and musical and another percussive and dynamic. I have selected a percussion loop and a sustained synth sound. Then insert your gate on the synth channel and adjust the settings until you cant hear the sound due to the gate being activated.


Step 7
Now route the side chain as before with the compressor set up and send a good amount of signal to your gated channel. At this point if you need to hear the gated sound more clearly to perform adjustments to the gate itself, you can simply set the output of the percussion channel to ‘No Buss’. This will allow you to hear the pad alone but the percussion loop will still activate the side chain input of your gate plug-in.


Step 8
Now adjust the gate until the peaks of the percussion loop open it and allow signal to be heard. This will cause an interesting rhythmical effect that can be adjusted using the threshold and release settings.

To make things a little more exciting try applying some effects. I have used a high pass filter and some delay to open things up a little.

Step 9
Be sure to check out the other plug-ins that can accept side chain input. As I said before there are loads of bundled Cubase 4 plug-ins that can be set up in this way — take a look at the filters, for example. There are also more and more third party plug-ins that are utilising the VST3 routing capabilities now and these often feature a side chain input. Fabfilter’s Volcano 2 filter and Pro C compressor both offer this feature.


