
![]()
The following article will help you use our PDF Label Templates in Adobe InDesign (CS1-4). The author, Anne-Marie Concepción, is Chicago’s top source for cross-media publication design and authorized Adobe InDesign, Photoshop, Illustrator, Acrobat and Quark training.
- Download the PDF template that matches the type of labels you’ll be printing on, and save the template to a convenient location, like your desktop. In the example you’ll be using throughout this tutorial, you’re printing out standard address labels, 30 per page, so you’ve downloaded the WL-OL875 template. For standard business cards, use this template WL-OL244. The general steps outlined here should work with any template, though of course the settings you’ll enter should be customized to your particular template.
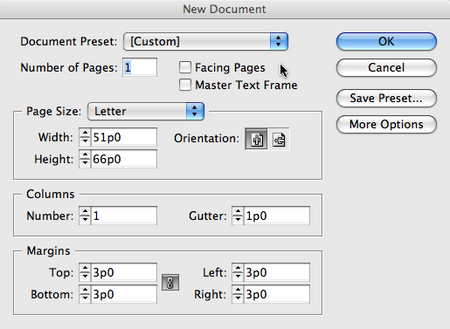
- Create a new InDesign document (File > New > Document) and set its page size and orientation (portrait or landscape) to match the page size and orientation of your blank label paper. In the example, the page size is a standard letter size (8.5″ by 11″, portrait). Turn off (uncheck) the Facing Pages checkbox, and make sure that the Master Text Frame checkbox is also turned off. You’ll be setting margin and column settings later on, so you can leave these at the default measures for now. Click OK.
- InDesign creates a new one-page document and shows you the first document page. Switch to the Master Page by double-clicking the “A-Master Page” name at the top of the Pages panel.
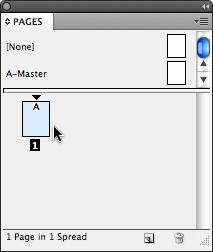
You’ll import the PDF template to this master page so it appears on every document page you create for your labels. (Anything you add to a master page automatically appears on each document page based on that master, and by default, all document pages are based on “A-Master Page.”).
- Choose File > Place and locate the template you downloaded in Step 1. Select the file and click the Open button.
- Your cursor is “loaded” with the PDF file. Move the cursor so the tip of its arrow is exactly at the top left corner of the master page, and then click to place the file.

The PDF should appear at full-size, exactly overlaying your master page. Keep the PDF selected and verify it’s correctly positioned. To do this, click the upper-left dot in the Reference Point grid at the far left on the Control panel. The values for both the X and Y Position fields immediately to the right of the grid should be “0 in” (if you’re using inches) or “0p0” (if you’re using picas).
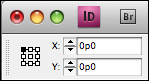
If the positions aren’t at 0, enter 0 for each field. The PDF will move into the correct position.
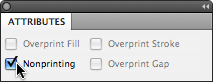
- The PDF template art should still be selected. Open the Attributes panel (Window > Attributes) and turn on the Nonprinting checkbox. This prevents the thin label borders in the template, which are there only for a visual check, from appearing in the printed label output.
- Open the Layers panel (Window > Layers) and lock the current layer by clicking in the Lock square to the left of the layer name. This prevents you from accidentally selecting or moving the PDF artwork if you need to work on the master page in the future.
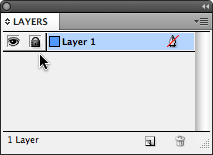
- Since you can’t edit a locked layer, add a new layer by clicking the Create New Layer button at the bottom of the Layers panel.

You’ll be working in layer 2 (two) from now on, so keep it highlighted. You can optionally double-click each layer name to give them custom names, if you like.
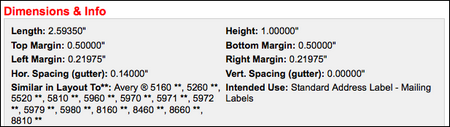
- Now set up your margin and column guides. Make sure you’re still working on the master page (it’s highlighted in the Pages panel), and choose Layout > Margins and Columns. In the Margins and Columns dialog box, turn on the Preview checkbox, and enter the measures for your label paper’s margins and gutters (space between columns) as well as the number of columns of labels per page. You can find measurement information on the label paper’s box or on the template’s preview page on WorldLabel.com.
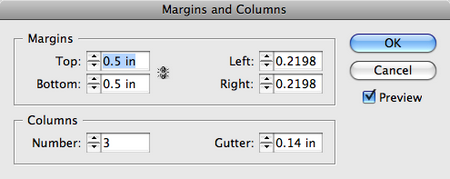
Note: If the top/bottom margin fields need a different measure than the left/right margins (as in our example), and you’re using InDesign CS3 or CS4, make sure to turn off the dialog box’s “Make all settings the same” button. That is, click the linked chain icon so it looks broken. Now you can enter different measures.
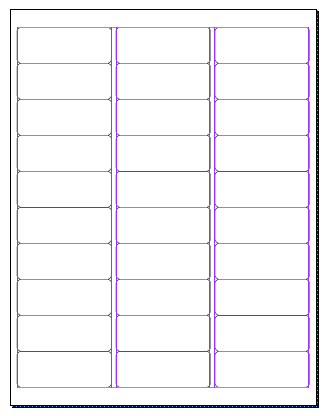
Since the Preview checkbox is turned on, as you adjust the margin, column and gutter measures in the dialog box you can confirm that their guides correctly match the template on the master page.
When you’re satisfied, click the OK button in the Margins and Columns dialog box.
- In the Pages panel, double-click the first document page icon to make it active. Here is where you’ll be entering the data to fit within the labels.

At this point you should save your changes to the document. If you plan on reusing this document in the future to output different sets of labels, save it as an InDesign template (INDT) from the Format menu in the Save or Save As dialog box. Whenever you need to run more labels, open the INDT file to create a new Untitled document.
Your options for entering the data for the labels are:
- Manually enter the data into a single large text frame you create on the document page, one column or text frame per label column. Use the margin and column guides to position your text frame edges. For multiple labels within a text frame’s column, use paragraph formatting to ensure each entry fits within the label’s printable area. The manual formatting method is best suited for one-up or two-up labels. With the 30-up label pages in this example, it would require a fair amount of experimentation to get the vertical spacing between labels correct. (But once it’s correct, the settings can be saved within Paragraph Styles.)
- Manually enter the information into one large table overlaying the PDF template preview on the document page. It should have the same number of columns and rows as a single label page. In our example, this would be a table with three columns and ten rows. Format the cell insets so they match the column guides, and set the row height to an exact measure so they match the height of the labels. Tables can continue onto additional pages, just like text frames.
- If the data is already prepared as a tab- or comma-delimited text file, you can use InDesign’s DataMerge feature (Window > Automation > DataMerge) to automatically import and format the labels, adding pages as necessary. This is the fastest option for multiple-up labels, such as the 30-up labels we’re using in our example, or for any label project that requires a great number of labels, even if there’s only one or two per page. Start by creating a single text frame that matches the size and positioning of a single label, the first label on the page, per your guidelines and the template. DataMerge will duplicate the frame automatically, entering one address (one record) per label. More information on using the DataMerge feature can be found in InDesign’s help files.
By Anne-Marie Concepción of http://www.senecadesign.com
Read our post on Ten free Open Source Graphic and Text Viewer/Editor Programs
Pingback: Graphic Design Links and Tutorials
Anne-Marie articles are always top class. She knows her stuff. Billy Gee
Thank you for your informative site. This is just what I was looking for. Great detailed info.