
Whether you are looking to add or remove sub-bass frequencies from your mix, it's essential you're armed with the right tools and techniques. Everything from a simple EQ to multi-band treatments and enhancers can be used, so there are certainly a few routes to choose from here.
If you are in the business of creating club music of any kind, nailing these all important lows is a must. Get it right and your track will rock, leave them unchecked and your mix is in danger of becoming colored and your master distorted and quiet.
Step 1 - Monitoring Sub-Bass
If you're planning on making bass-heavy music with frequencies that register anywhere below about 50 - 60hz, the first thing you should do is check that your monitors are actually able to reproduce sounds in this range. There is no point in using processors to enhance or cut in this area if you can't here what you are doing.
Some larger monitors will go as low as 35-40hz giving you a pretty clear representation of what is happening with your subsonics but smaller monitors might only be capable of producing lows down to about 50 or even 60hz. This really leaves a huge gap in your mix. These frequencies may not be critical in certain genres of music but when it comes to music destined for the dance floor, they are nothing short of essential.
Of course some of you may work in an environment where small monitors are a must to keep down noise levels, or budget maybe an issue so larger speakers may not be a viable option. If this is the case it may be worth thinking about mixing your music elsewhere, maybe a friend has a studio with a larger set of monitors where you can perform your final mix-down. Unfortunately the bottom line is these frequencies have to be heard if your mix is to work well on a large system.
Another solution is to acquire a pair of monitors that are capable of reaching the low frequencies needed here. There are a few issues though; in order to reproduce sub-bass, speakers tend to utilize large bass drivers. 8 or 10 inch drivers are often required for the job and this tends to make the cabinets pretty large, which can be an issue if desktop space is limited. Large speakers can also present problems when used in smaller spaces and in close proximity to the listener.
Arguably the best solution to evade all these issues is to install a dedicated sub woofer, and although this does involve some expense it is certainly the most streamlined method for reproducing very low frequencies. Professional quality subs can be extremely expensive but there are products on the market now that deliver a lot of bang for your buck and sport features that may not have been available even a few years ago. Most modern sub woofers will play back frequencies as low as 20-30hz with ease.
If you do decide to use a dedicated sub then there are a few things you should look out for. An active sub is most likely to be the sensible choice for the modern digital set up as the amp is not only integrated into the unit but also matched to the drivers in the cabinet, a protection circuit is often present in this configuration, which helps avoid blowing anything up at high volume.
Other features to look out for are internal crossovers which allow you to connect your main speakers to the sub and handy extras such as bypass foot switches for taking the sub out of the mix. Companies such as M-Audio and KRK are producing products with all these features for very reasonable prices.

KRK sub

M-Audio sub
Step 2 - Using EQ to Control Low Frequencies
Once you have decided on the best way to monitor your sub-bass frequencies you will be able to hear exactly what you are doing across the whole frequency range. Assuming that you are good to go in this area, let's have a look at some different tools and techniques we can use to manipulate our low end.
Perhaps the most straight forward way to control the subs in a sound is to use a simple shelving EQ. This may seem a little obvious but once you have a monitor set up that produces low frequencies that were previously missing you may be surprised the effect a small amount of EQ has on a sound. As most EQ plug-ins go all the way down to 20hz it is pretty simple to add a few db of boost or attenuation to a sound in the area of 20-80hz.
When you first start to focus on these lower frequencies it can be a good idea to use a spectrum analyzer to get some visual feedback on the changes you are making using the EQ. This, combined with some critical listening, can really help to fine-tune your ear to the subtle differences you will experience here. Some EQ plug-ins such as Logic Pro's actually include a spectrum analyzer within its interface.
As with most forms of processing the majority of us strive for transparency and attempt to avoid over-coloring our sound. With this in mind, using a shelving EQ to mildly boost or cut the subs in our mix can be preferable to using an enhancer or exciter for the job. Sometimes of course these more intense methods are necessary but it's worth trying a more subtle approach first.

Logic EQ and Analyzer

UAD Cambridge EQ
Step 3 - Using Filters to Remove Subs
Some sounds in our mixes will need to have their very low frequencies removed, to let other elements shine in this area. For instance a sampled guitar loop may need to have some low end removed to allow a kick drum or bass part to really stand out. You should really think about each sound in relation to the rest of your mix and ask yourself if its low frequencies should be removed or left intact. Closely managing your sub frequencies in this way will help you create a clear and focused low end mix, with real power.
Even sounds that have had their low frequencies boosted can sometimes benefit from having some sub-bass removed. Most sound systems, even very large ones, don't tend to produce frequencies much below 30hz, so having a lot of energy present in this area is not really necessary. This means you could be boosting 30-80hz and cutting below 30hz at the same time. This sort of treatment can also be useful in mastering.
When it comes to the right tool for cutting these lows it should be pretty obvious that a standard shelving EQ just isn't powerful enough, so we have to turn to high pass filtering for the task. A filter is a lot more abrupt than your average EQ and deals in absolute values. If we set a high pass filter to 200Hz, all signal below 200Hz will be removed. Filters can be pretty extreme but in some cases this is exactly what is needed. Saying this, many filter plug-ins will allow the curve to be altered thus reducing the intensity of the effect.
When looking for the right filter plug-in to use, there are generally a couple of types to choose from. You will find many dedicated filters are resonant models, which work in pretty much the same way as the filter section on a synth. These are fine for removing specific frequencies from a sound as long as they are used without any resonance. Fabfilter produce an excellent filter plug-in called 'Simplon' which is perfect for removing low frequencies and features a few different curves.
If you find these resonant filters are too harsh or color your sound in any way, you can opt for something a little more musical. Many EQs, in both hardware and software form, feature built in high pass filters and these are often a lot more subtle and not quite as severe as their resonant counterparts. Try this approach when working with more organic sounds, such as recordings of acoustic instruments and vocals.
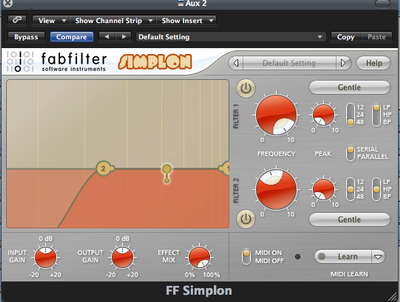
Fabfilter Simplon

Neve 88RS Filters
Step 4 - Multi-band Processing
An alternative to using EQ and filters is multi-band processing, specifically multi-band compression. There are a huge number of excellent multi-band compressors on the market now and many DAWs such as Cubase and Logic include them as bundled stock plug-ins.
The good thing about these processors is not just the transparent sound they deliver but also the fact that they are capable of adding or subtracting sub-bass frequencies.
By simply adjusting the lower band of your multi-band compressor to cover everything from 20hz - 80hz you are able to process the sub frequencies in total isolation. Because these plug-ins are dynamics processors you also have the ability to tweak ratio, threshold, attack and release of the effect, as you would have in a standard compressor. This extra control creates the perfect environment for controlling sub-bass.
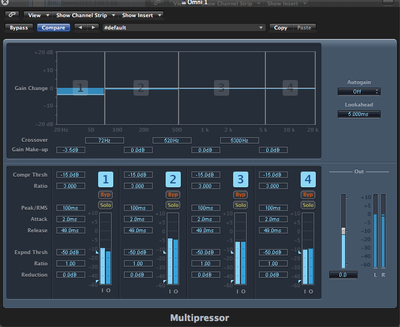
Logic Multi-band

Cubase Multi-band
Step 5 - Sub-Bass Enhancers
The final type of processor we will look at here is the dedicated sub-bass enhancer. The reason I have left this until the end is that in my opinion it should really be used as a last resort. Not that this family of processors don't often have a lot to offer but as with any other enhancer there is a danger that if you are not 100% sure what is happening under the hood, you could be doing more damage than good.
Of course it is likely that you get what you pay for here and products from companies such as MaxxBass from Waves or even Logic Pro's Sub-Bass can produce excellent results but some free plug-ins offering similar algorithms may play havoc with your low end mix. This doesn't mean there aren't some excellent free plug-ins out there, it just may be wise to choose very carefully in this area.
If you feel that all other methods just aren't cutting it, then you may want to try one of these plug-ins and if you find some of them a little intimidating or just fancy, try something with very few controls. Look at the classic BBE Sonic Maximizer, now revamped and market by Nomad plug-ins. With only two knobs this little processor can work wonders on both the low and high end of any audio fed through it.

Logic Sub-Bass
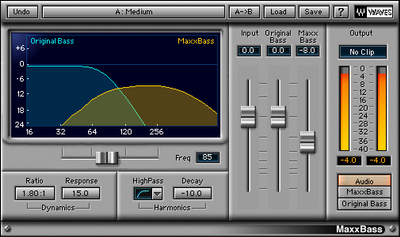
Waves Maxxbass

BBE Sonic Maximizer
Step 6 - Layering Sounds
If you want to try a technique that involves little to no processing to achieve a boost in your sub-bass frequencies, you could experiment with layering different parts. This can work with everything from bass lines to kick drums and percussion. It's simply a case of adding a duplicate MIDI track under the original part and pointing it at a new instrument that is generating a low frequency rich sound.
For example you may feel that a bass part doesn't pack enough low end punch, simply duplicate the MIDI and use it to control a synth with a sine wave bass patch pitched one octave lower. Mixed carefully this simple technique can add all the bass you need without any processing at all.
If you find yourself wanting to use a similar method but your bass line is an audio loop or sample, you may still be able to achieve the same result. Many DAWs now include technology that allow you to convert audio to MIDI. Simply put, this should allow you to generate a MIDI file from any pitched audio sequence. Of course, the quality of results will vary from one case to another but it is certainly an option here.


