

In this tutorial I'll show you the process I use for creating a 3D floorplan from scratch, in 6 easy steps. This technique can be applied to infographics, such as escape-plans or to show the layout of a building that you normally wouldn't be able to see. Let's get started!
Final Image Preview
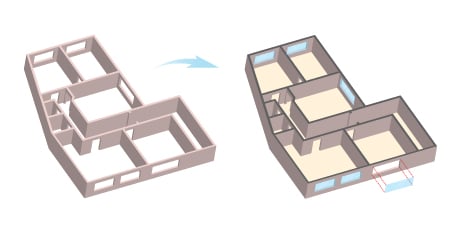
Below is the final image we will be working towards. Want access to the full Vector Source files and downloadable copies of every tutorial, including this one? Join Vector Plus for just 9$ a month.
Tutorial Details
- Program: Adobe Illustrator CS3/4
- Difficulty: Beginner
- Estimated Completion Time: 30-45 minutes


Step 1: Creating the Blueprint
Draw a blueprint of the building that you would like to create, using the Pen Tool or Line Segment Tool (holding Shift for straight lines). Don't mind the doors or windows yet, we're just looking for the basic layout. When the blueprint looks the way it should, thicken the weight of the strokes depending on the scale you're working at.


Step 2: Expanding and Clean-Up
Select all the lines, and hit Object > Expand to expand the lines. Keep all the lines selected, and use Unite (in the Pathfinder palette) to combine the lines into one solid shape (remember to keep a copy of the original blueprint, just in case). You'll notice that some lines may not be perfect, as seen below. Correction is needed in some places, use the Pen Tool to clean up your blueprint.


Step 3: Windows and Doors
Now it's time to place our windows and doors. Using simple square shapes, position them on the places where the doors or windows should be located. I used two different colors to avoid confusion, blue for windows and red for doors.


Step 4: The 3 Different Blueprints
Select all and make three copy's of the blueprint, complete with the shapes that represent doors and windows. These three are going to be our blueprints for the 3D. Using the Divide function of the Pathfinder tools, cut out the doors and windows on "blueprint 1." Cut out the doors only on "blueprint 2" and leave "blueprint 3" as door and windowless.


Step 5: Applying the 3D
On your first copy, apply Effect > 3D > Extrude and Bevel, using the preview function to achieve a nice result or the perspective you desire (I used -40°, -25° and 16°). Give it an Extrude Depth of 15pt. Take note of your rotation parameters, and apply the same with copy 2 and 3, only changing the Extrude Depth. Copy 2 should be extruded 20 to 23pt, and the 3rd copy 15pt.


Step 6: Stacking and Final Steps
Now place them on top of each other in a stacking manner. Change the color of your 3 building layers to a desired shade (I used #fddfd9). Your end result should look like that shown below.
Your building's basic structure is done, but looks quite dull. This can be changed through selecting the whole building, and then hitting Object > Expand Appearance. You can now put in a floor (#fff0d9) and windows. You can also give the top of your wall a dark color (#606161). After this you could go crazy on detail, or leave it like as is.

Subscribe to the Vectortuts+ RSS Feed to stay up to date with the latest vector tutorials and articles.


