

How to Change Windows 7 Homegroup File and Folder Sharing Settings
InformationWhen you create or join a homegroup, you select the libraries and printers you want to share with other people in the homegroup. Selected Libraries are set to be shared with Read only access by default, which means that you can look at or listen to what's in the library, but you can't make changes to the files in it unless this is changed by the owner of the shared library to allow the homegroup to be able to do.
When you join a homegroup, all user accounts, except the Guest account, on your computer become members of the homegroup. Each user controls access to his or her own libraries.
This will show you how to change your user account's library files and folders level of access settings for how you specifically want them to be allowed or prevented for sharing with the homegroup.
OPTION ONEAllow or Prevent Sharing Libraries or Printers
NOTE: This allows you to allow (check) or prevent (uncheck) an entire library or printer from being shared with the homegroup with Read only access unless the level of access (Read or Read/Write) is changed in the other options below. This option is the same one that you initially set when you created or joined a homegroup.
1. Open the Control Panel (icons view), and click on the HomeGroup icon.
A) Go to step 4.OR
2. Open the Control Panel (icons view), and click on the Network and Sharing Center icon.
A) In the Network and Sharing Center, click on the Choose homegroup and sharing options link. (see screenshot below)3. Open Windows Explorer, then right click on Homegroup in the navigation pane and click on Change HomeGroup settings. (See screenshot below)
B) Go to step 4.
4. Check (to allow) or uncheck (to prevent) what libraries and printers that you want to share from your user account on your computer with everyone on any other computer that joins this homegroup, then click on Save Changes. (see screenshot below)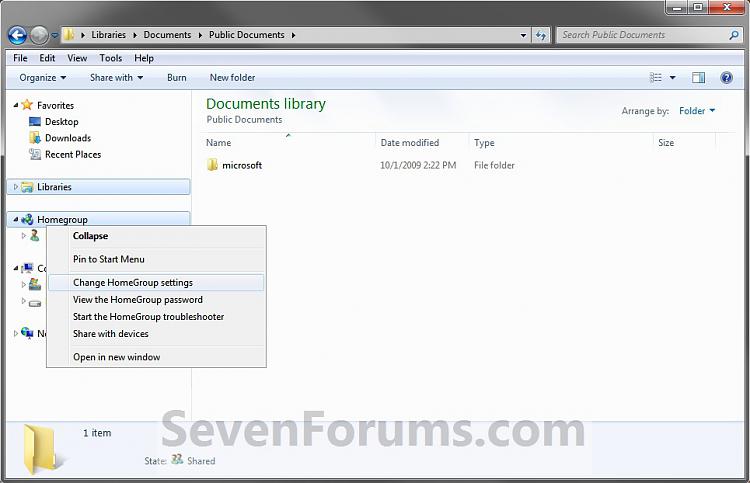
OPTION TWOAllow or Prevent Sharing User Files and Folders in Libraries
NoteThis will show you different ways on how to set specific files and folders from your personal user folders that are included by default in a library to either have a Read only or Read/Write sharing level of access for everyone who joins the homegroup, or to Remove (Specific People) from the homegroup and not be shared at all.
LEVELS OF ACCESS:
- Nobody - This option removes and prevents the selected file, folder, or library from being shared with the homegroup.
- Homegroup (Read) - This options allows the selected file, folder, or library to be shared with your entire homegroupbut people in your homegroup can only open the item. Other homegroup members can't modify or delete it.
- Homegroup (Read/Write) - This option allows the selected file, folder, or library to be shared with your entire homegroup and lets them open, modify, or delete it.
- Specific People - This option allows you to select to Remove and prevent the selected file, folder, or library from being shared with the homegroup.
1. Open Libraries from within a Windows Explorer window.
2. Select (highlight) one or more Library folders, or files or folders in a library that you want to remove or change the level of access for sharing with the homegroup.
NOTE: This is not available with the public folders included in the libraries. You will need to use OPTION THREE below for these folders and files instead.
3. From the Toolbar
A) Click on the Share with toolbar button, and select what level of access you want to have for it. (see screenshot below)OR
4. From the Navigation Pane
A) Right click on the Library folder, or a folder in a library, then click on Share with and select what level of access you want to have for it. (see screenshot below)OR
5. From a File or Folder in a Library
A) Right click on the selected single or more than one file and folder, then click on Share with and select what level of access you want to have for it. (see screenshot below)OR
6. From a Library
A) Right click on the selected library or libraries, then click on Share with and select what level of access you want to have for it. (see screenshot below)
OPTION THREEAllow or Prevent Sharing Public Files and Folders in Libraries
NOTE: This will allow or prevent sharing all of your computer's public folders included in libraries with everyone that joined the homegroup. You cannot select to allow or prevent specific public folders, or files and folders in these public folders though.
1. Open the Control Panel (icons view), and click on the HomeGroup icon and select Change advanced sharing settings. (see screenshot below)That's it,
A) Go to step 4.OR
2. Open the Control Panel (icons view), and click on the Network and Sharing Center icon and click on the Change advanced sharing settings link. (see screenshot below)
A) Go to step 4.OR
3. Right click on a Public folder or file from any of the same locations in OPTION TWO above, then click on Share with and Advanced sharing settings. (see screenshot below)
4. Under the Home or Work (current profile) settings, go to the Public folder sharing section. (see screenshot below)
5. To Allow Sharing Public Files and Folders
A) Select (dot) to Turn on sharing so anyone with network access can read and write files in the Public folders, and click on Save changes. (see screenshot above)6. To Prevent Sharing Public Files and Folders
A) Select (dot) to Turn off Public folder sharing..., and click on Save changes. (see screenshot below step 4)
Shawn
Related Tutorials
- How to Link your Live ID and Share Files in Windows 7 HomeGroup
- How to Turn Media Streaming Using Windows Media Player On or Off in Windows 7
- How to Enable or Disable Media Sharing from Windows Media Player in Windows 7
- How to Change the Default HomeGroup Icon in Windows 7
- How to Add or Remove Homegroup from the Windows 7 Navigation Pane
- How to Add or Remove the HomeGroup Desktop Icon in Windows 7
- How to View or Print Your Windows 7 Homegroup Password
- How to Change the Windows 7 Homegroup Password
- How to Join or Add a Computer to a Windows 7 Homegroup
- How to Create a Homegroup in Windows 7
- How to Leave a Windows 7 Homegroup
- How to Create a HomeGroup Troubleshoot Shortcut in Windows 7
- How to Create a HomeGroup Settings Shortcut in Windows 7
- How to Create a HomeGroup Folder Shortcut in Windows 7
- How to Turn Password Protected Sharing On or Off in Windows 7
Homegroup - Change File and Folder Sharing Settings
-
New #1
Hi.
Good tutorial. Very explanatory.
I have two Windows 7 computers on the same network at home and have been sharing files and folders between them for a while. How ever, suddently one of them has lost the "Share with Homegroup" options in the "Share with" menu. I may only select "Nobody" and "Specific People". I can still access the the computers from the network folder and everything else seems fine. Have I done something stupid and not been paying attention or could it be something else?
Best regards,
Tommy
-
New #2
Hello Tommy, and welcome to Seven Forums.
Well, at least it's still working.
You might double check the settings at step 4 in the tutorial to make sure that it's still set the same as the screenshot.
Also, double check to make sure that Use Sharing Wizard is checked in Folder Options.
Hope this helps,
Shawn

Homegroup - Change File and Folder Sharing Settings
How to Change Windows 7 Homegroup File and Folder Sharing SettingsPublished by Brink


 Quote
Quote
Related Discussions