

In this tutorial we'll be creating a text system similar to what you see in a lot of role-playing games. Our class will dynamically display an icon for the characters as they speak, and will type each block of text letter by letter.
Final Result Preview
Here's an example of the text system we'll be creating:
Step 1: Set Up Your Flash File
Create a new Flash file (Actionscript 3). Your movie settings will vary depending on your game. For this demo I'm setting up my movie as 500x300, with a black background and 30 fps.

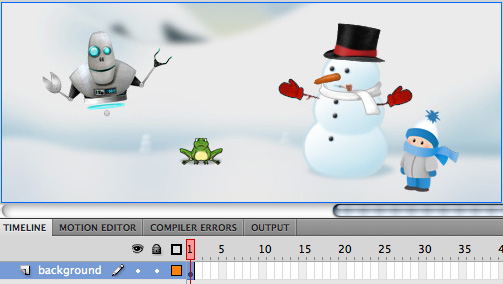
Step 2: Add a Background Image
You'll most likely be showing the text module over an image or animation from your game. For this demo I'm just using an image I threw together with a few of the characters from my games standing in a field of snow.
Put your background image on a layer called "background".
Step 3: Create the RPGText MovieClip
Create a new MovieClip on the stage (Insert > MovieClip) named "RPGText."
In the Symbol Properties check "Export for Actionscript" and set the class name to "RPGText". We'll use this class name later to link code to this MovieClip.
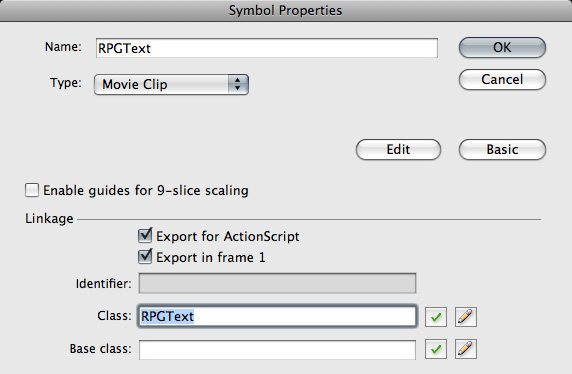
Click OK. If you see a warning here that the class definition could not be found, that's OK. It just means there isn't any code to link to this symbol (yet).
Give your MovieClip the instance name "rpgText." Remember, when I'm talking about "RPGText" (uppercase) I'm referring to the class (or MovieClip); "rpgText" (lowercase) is the name of an instance of that class.
Step 4: Add a Text Panel Background
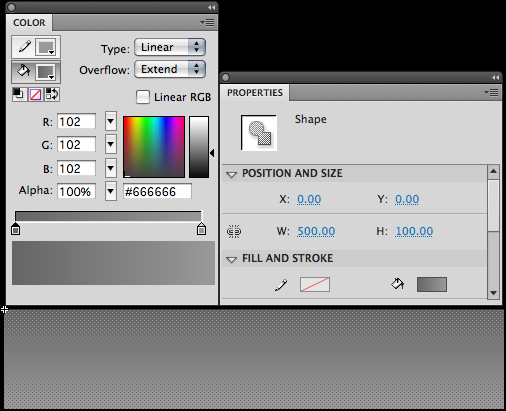
Draw a rectangle inside your new RPGText MovieClip. This will be the background for the character icons and speech bubble. Design it however you like, but it should span the entire width of your movie and be short enough that it doesn't cover too much of your game.
I made mine 500px wide (to match my movie) and 100px high. I filled it with a gradient from #666666 to #999999 (dark gray to lighter gray).
Quick Tip: to draw a rectangle of a specific size, select the rectangle tool and Alt-click on the stage. You'll get a dialog box where you can enter the dimensions of your rectangle.
Step 5: The Character Icon MovieClip
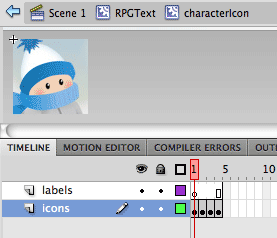
Create a new layer inside the RPGText MovieClip called "icon." Create a new MovieClip on this layer called "characterIcon" and give it the instance name "characterIcon."
Inside the characterIcon MovieClip create two new layers: "icons" and "labels." The icons layer will contain all of your character icons (each on its own keyframe) and the labels layer will contain frame labels that we'll use to display the characters at the proper time.
Import (or draw in Flash) an icon for each of the characters in your game that will be speaking. For this demo I made a 75x75px JPG for each of my characters. Add the icons to the icons layer, making a new keyframe for each character. The order in which they appear is not important, but make sure each icon is placed at x:0, y:0 so they don't appear to jump around when you switch characters.
Step 6: Add Frame Labels
Now create a new keyframe on each frame of your labels layer. A quick way to to do this is to select all the frames and hit F6.
Select each label keyframe one by one and add a frame label that corresponds to the name of the character that appears in that frame. If you add a few empty frames (F5) in between your keyframes, it will make it easier to read the frame labels, just make sure your labels keyframes stay lined up with your icons keyframes.
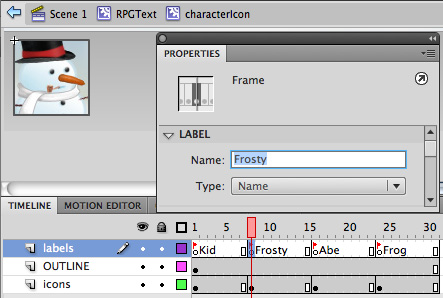
Make sure that each of your labels has a unique name. If you have two characters with the same name, you'll need to differentiate them somehow ('John_L' and 'John_K' for example).
Step 7: Draw the Speech Bubble
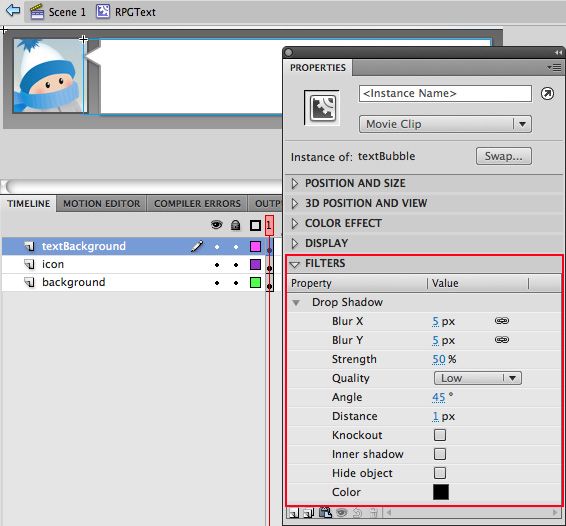
Go back to the RPGText MovieClip and create a new layer called "textBackground."
Draw a speech bubble. I drew a simple bubble with squared corners, but you can make yours look however you want. Make it big enough that it fills most of the background rectangle and sits nicely next to your character icons.
Select your speech bubble and convert it to a MovieClip (Modify > Convert to Symbol). Now that it's a MovieClip we can add a drop shadow filter to it. I set mine to black, 50% strength, 5px blur and 1px distance.
Step 8: Add the Dynamic Text Field
Create a new layer in the RPGText MovieClip called "text." Use the text tool to draw a text box. Make it fit just inside the edges of the speech bubble graphic.
Make it a multiline dynamic text field with the instance name "txt." Remember to embed the font if you're not using system text. I'm using 13pt Courier.

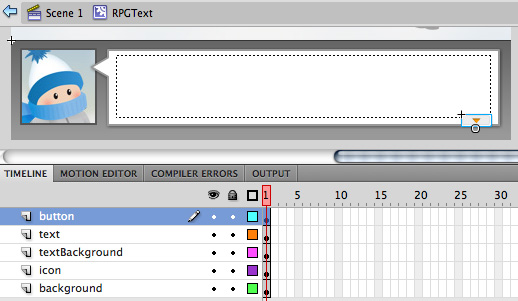
Step 9: Add the Next Button
We need a way for the player to advance to the next text block when the player has finished reading. Let's add a small "next" button in the corner.
Create a new layer in the RPGText MovieClip called "button." Add a new button symbol called "b_next." Design the four states of your button however you like. I used a small down arrow as the button symbol because I see that in a lot of games and assume players are familiar with it.
Put your button in the lower right corner on top of your speech bubble. Don't worry about giving it an instance name. I'll explain why later.
Step 10: Create the Document Class
Create a new Actionscript file called "Main.as" and add this code to create the empty shell for the class:
1 |
package { |
2 |
import flash.display.MovieClip; |
3 |
public class Main extends MovieClip { |
4 |
|
5 |
// CONSTRUCTOR
|
6 |
public function Main() { |
7 |
}
|
8 |
}
|
9 |
}
|
Set Main as the Document Class in your Flash file. If you'd like a quick refresher on using a Document class, this Quick Tip from Michael Williams is one of the best explanations I've seen.
Step 11: Add the Text Blocks
If you're using this in a game you'll probably choose to put it elsewhere, but for now we'll be adding it to the Document Class. Add this code to the constructor function in the Main class:
1 |
var textBlocks:Array = new Array( |
2 |
["Kid", "Look, a robot!"], |
3 |
["Abe", "BLEEP-BLOOP. I am an Autonomous Botanical Engineer. You can call me ABE."], |
4 |
["Kid", "Hi Abe. Meet Frosty the Snowman."], |
5 |
["Frosty", "Happy Birthday!"], |
6 |
["Abe", "BEEP-BIP. Hello, Frosty."], |
7 |
["Abe", "Does this frog belong to you?"], |
8 |
["Frog", "Ribbit..."], |
9 |
["Kid", "No I've never seen him before. Aren't you cold frog?"], |
10 |
["Frog", "Ribbit..."] |
11 |
); |
12 |
|
13 |
rpgText.textBlocks = textBlocks; |
Here we're creating a two-dimensional array (an array that contains other arrays) to hold the script for our scene. Before you change anything, take a look at how it's structured. Each array is a separate text block that contains two elements. The first is the character's name and the second is the text that he'll speak. The text blocks are listed in the order that they will appear in the scene.
The last line just sends the textBlocks array to the rpgText MovieClip (remember "rpgText" is the instance name of the RPGText MovieClip on the stage). More on this later.
Go ahead and edit this section to fit your scene. Be extra careful that the character names correspond exactly to the names you used for the frame labels in the characterIcon MovieClip.
Step 12: Create the RPGText Class
We're finally ready to start writing the code for the RPGText class.
Create a new Actionscript file named "RPGText.as" and add this code:
1 |
package { |
2 |
import flash.events.Event; |
3 |
import flash.events.MouseEvent; |
4 |
import flash.display.MovieClip; |
5 |
import flash.media.Sound; |
6 |
public class RPGText extends MovieClip { |
7 |
private const SPEAKER:int = 0; |
8 |
private const TEXT:int = 1; |
9 |
private var _currentTextBlockIndex:int=0; |
10 |
private var _currentTextBlock:String; |
11 |
private var _textBlocks:Array; |
12 |
// CONSTRUCTOR
|
13 |
public function RPGText() { |
14 |
}
|
15 |
|
16 |
}
|
17 |
}
|
This is just a basic shell for the class. It doesn't do anything yet, but let's take a look at what's there:
- The first few lines are just importing some of the classes we're going to need.
- In the class declaration we're extending the MovieClip class. We need to do this because this class is linked to the RPGText MovieClip in the Library (see Step 3).
- Next, we have two constants, SPEAKER and TEXT that we'll use to get the speaker name and text from the textBlocks array we set up in the previous step.
- The variable _currentTextBlockIndex will keep track of which block of text we're currently displaying.
- _currentTextBlock will hold the actual text.
- _textBlocks will hold the entire array of text blocks.
- Lastly, there's the empty class constructor.
(Note: I'm using the underscore in my variable names to indicate private variables.)
Step 13: The textBlocks Setter Function
Since our _textBlocks variable is private we'll need a way to access that variable from the Main class where we're setting up the text blocks. We'll do that by creating a "setter" function. Add this to the RPGText class just below the constructor function:
1 |
public function set textBlocks(txt:Array):void {
|
2 |
_textBlocks = txt; |
3 |
} |
The cool thing about setters in Flash is that we can access this function as though it were a public property of the RPGText class. Which is exactly what we did on line 21 of the Main class in Step 11:
1 |
rpgText.textBlocks = textBlocks; |
Step 14: Add the updateText Function
Add this function to the RPGText class:
1 |
private function updateText(e:Event):void {
|
2 |
if(txt.text.length < _currentTextBlock.length){
|
3 |
txt.text = _currentTextBlock.substr(0, txt.text.length+1); |
4 |
} else {
|
5 |
removeEventListener(Event.ENTER_FRAME, updateText); |
6 |
fillText(); |
7 |
} |
8 |
} |
This is the core functionality of the class, where the letter-by-letter typing takes place. Let's take a closer look at what's happening here:
- Line 27: This function accepts an Event as an parameter because we'll be calling it using an ENTER_FRAME event.
- Line 28: We compare the length (number of characters) currently in the txt text field to the number of characters in the _currentTextBlock String.
- Line 29: If there are fewer characters in the text field then we use the substr method to get all the characters from the beginning of _currentTextBlock up to one more than the number of characters currently in the text field. We put all those characters into the text field, which has the effect of adding one more character to the end of the text in the text field.
- Line 31: If there are the same number of characters in the text field as in the _currentTextBlock String, remove the ENTER_FRAME event that calls this function.
- Line 32: Call the fillText function. We'll write this function in the next step.
Step 15: Add the fillText Function
Add this function to the RPGText class:
1 |
private function fillText(e:MouseEvent = null):void {
|
2 |
txt.text = _currentTextBlock; |
3 |
if(_currentTextBlockIndex < _textBlocks.length-1){
|
4 |
addEventListener(MouseEvent.CLICK, nextTextBlock); |
5 |
} |
6 |
} |
The main purpose of this function is to fill the txt text field with the text from the _currentTextBlock (line 37). If we let the animation play through, the updateText function should take care of that, but it's good to make sure nothing went wrong. We can also hook this function up to our "next" button to allow players to skip the text animation and immediately fill the text field with the entire text block.
Notice this function accepts a MouseEvent as an argument, but we set its default value to null. This allows us to use this function with a MouseEvent listener, since it will accept the event. Since we give the event a default value we can also call the function without sending an event as we do at the end of the updateText function.
After we fill the text field, we do a check to see if this is the last text block in the array (if the _currentBlockIndex is less than the number of elements in the _textBlock array). If not, we add a CLICK listener to trigger a function called nextTextBlock which we'll write next.
Step 16: About that Click Listener
Remember when we created the "next" button and I said not to worry about giving it an instance name? Did you notice in the last step how we attached the CLICK listener to the entire RPGText MovieClip instead of the button? This makes it so the player can click anywhere on the MovieClip to advance the text. We really don't even need the button, but I like to put one in so there is some indication that you click to advance the text.
Of course this is just a personal preference of mine. If you want you could give the button an instance name and attach the CLICK listener to the button instead. I just find the bigger hit area to be easier to use.
Step 17: Add the nextTextBlock Function
Back to business. Add this function to the RPGText class:
1 |
private function nextTextBlock(e:MouseEvent):void {
|
2 |
removeEventListener(MouseEvent.CLICK, nextTextBlock); |
3 |
txt.text = ""; // clear the text |
4 |
_currentTextBlockIndex++; |
5 |
_currentTextBlock = _textBlocks[_currentTextBlockIndex][TEXT]; // set the text |
6 |
characterIcon.gotoAndStop(_textBlocks[_currentTextBlockIndex][SPEAKER]); // set the character icon |
7 |
addEventListener(Event.ENTER_FRAME, updateText); // start updating the text |
8 |
addEventListener(MouseEvent.CLICK, fillText); |
9 |
} |
The first three lines are pretty simple. Remove the MouseEvent listener, clear the text field, and increment the _currentTextBlockIndex var to point to the next text block.
Line 47 is using the TEXT constant to get the current text string from the _textBlocks array and assign it to _currentTextBlock.
Next we use the SPEAKER constant to get the name of the character. Since the character names match the frame labels in our characterIcon MovieClip we can use gotoAndStop to send the characterIcon MovieClip to the frame that displays that character icon.
Finally, we add an event listener to start typing on the new text string and then add a CLICK listener to run fillText when the MovieClip is clicked.
Step 18: Add the startText Function
We're almost done, we just need to add a function that will get everything started. We'll do that with a public function called "startText." Since this is a public function let's put it near the top of the RPGText class, just below the textBlocks setter:
1 |
public function startText():void {
|
2 |
_currentTextBlock = _textBlocks[_currentTextBlockIndex][TEXT]; |
3 |
characterIcon.gotoAndStop(_textBlocks[_currentTextBlockIndex][SPEAKER]); |
4 |
addEventListener(Event.ENTER_FRAME, updateText); |
5 |
addEventListener(MouseEvent.CLICK, fillText); |
6 |
} |
Look familiar? This code does almost the exact same thing as the nextTextBlock function. It sets the current text and character icon, and adds the event listeners for updateText and fillText. Since this function only runs when the text first starts we don't need to worry about clearing the text field or incrementing the _currentTextBlockIndex like we did in nextTextBlock.
Step 19: Invoke the startText Function
Now we have a publicly accessible way to start the text. Let's put it to use.
Add this line to the bottom of the Main class constructor function:
1 |
rpgText.startText(); |
This is just calling the startText function inside the RPGText class. That should get everything going.
Step 20: Add Sound
You should be able to test your movie now and see everything working. There's just one thing missing though: sound.
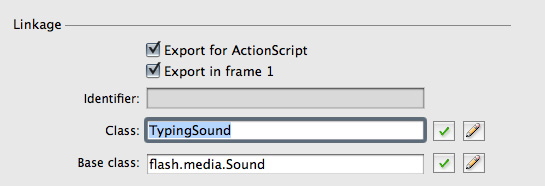
Find (or create) a sound to play as the text is typing on. When choosing a sound for this keep it very short, since this sound will play over and over as the text types on. A small "boop" or button click works best for this effect.
Import the sound into the Library in your Flash file, check "Export for Actionscript" and give it the class name "TypingSound."
To get this sound to play we only need to add two lines to the RPGText class. First we need to instantiate the sound. Add this line at the top of the class beneath the three other private variables:
1 |
private var _typingSound:Sound = new TypingSound(); |
Now skip down to the updateText function and add a line that will actually play the sound each time the text updates (line 38 is new):
1 |
private function updateText(e:Event):void {
|
2 |
if(txt.text.length < _currentTextBlock.length){
|
3 |
txt.text = _currentTextBlock.substr(0, txt.text.length+1); |
4 |
_typingSound.play(); |
5 |
} else {
|
6 |
removeEventListener(Event.ENTER_FRAME, updateText); |
7 |
fillText(); |
8 |
} |
9 |
} |
Step 21: Taking it Further
That's it for the demo. Everything should work at this point, but if you want to integrate this into a game, you've still got some work ahead of you.
First, depending on how your game is set up you'll probably want to pull the text blocks out of the document class. You might have a Scene class that you use to set up the individual conversations that occur in your game, or a Strings class that holds all the text for every conversation.
Second, you'll want to think about how and when the text module will appear in your game. You might want to add a tween animation that makes it slide in and out from the bottom when a conversation starts and ends. You'll also want to be listening for when the conversation is over, to either hide the text module or start the next conversation.
Since we're already checking to see if the last text block has been reached in the fillText function, you could easily add something there that handles the end of the conversation.
I'm not including these topics in the tutorial because the way you go about these things will be very specific to your game. This should be enough to get you started though.
I hope you liked it! Post a comment and let me know what you think.


