
A Short Introduction to 3DS Max Materials
3ds max is one of the most popular CG packages out there today. It’s used in film, TV, games, and architectural visualization. One of the fundamental parts of 3ds max is the Material Editor.
With the introduction of the node-based Slate material editor in 3ds max 2011, the traditional Material Editor has received a boost in importance, since it’s now part of two separate material pipelines, one generated the old-fashioned way, and one generated through Slate. Knowing the basics of 3ds max materials is essential and that’s what we’ll discuss here.

Types of Materials
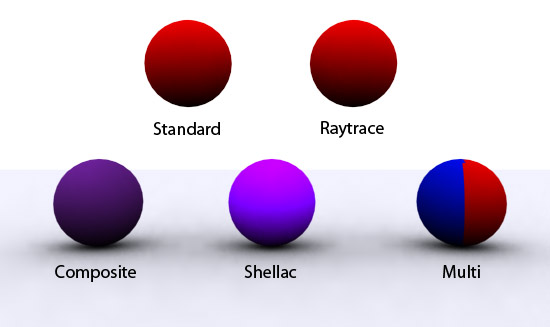
- Standard – this is the most common material type. It’s good for 90% of the work you need done. If you’re working with a different renderer than 3ds max’s default scanline, you might be using another type as your standard material, so be sure to research what the proper default type for your renderer is.
- Raytrace – another common material type, the primary difference here being that reflections and refractions of the material are ray traced. Ray tracing helps objects look more lifelike and is generally preferred in situations where reflections or refractions are prominent and must be of a high quality.
- Composite, Blend, and Morpher – these three are used to combine and/or mix between two or more different materials. Composite stacks 10 materials together, Blend mixes two materials with an optional mask, and Morpher is used with the Morpher geometry modifier to animate between different materials.
- Shellac – similar to the above blending types, but Shellac is an additive blending material, not a mixing one. The blending percentage can be overloaded and the resulting material color can look very interesting.
- Multi/Sub-Object – the most useful material type when it comes to texturing models. The MSO material type holds several materials inside and allows you to assign the various materials to specific geometry, models, particle systems, etc. MSO can also be used to extend the limited Material Editor library of materials infinitely.
Types of Shaders
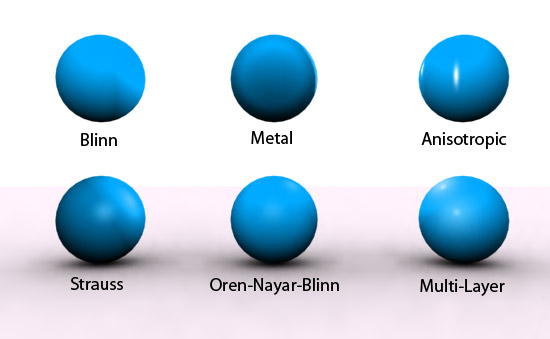
- Blinn/Phong – Blinn is the default for Standard materials and Phong is the default for Raytrace materials. It’s relatively straightforward and generic, which makes it good for any situation where a particular shading model is irrelevant. Blinn/Phong shaders are not the most realistic-looking, but if realism isn’t a priority, they work just fine.
- Metal – no explanation needed here, however Metal shaders, unlike the other shaders on this list, generate their own specular highlights.
- Anisotropic – this is a very useful shader for a variety of real-world objects, such as hair, glass, or brushed metal. If the specular highlight on an object should come together in a narrow beam, instead of the broad circle that the Blinn/Phong shaders generate, then the Anisotropic shader is what you need.
- Strauss – this shader is best used for more advanced modeling of metallic surfaces. Its specular highlights can be modified, but it doesn’t quite look like the Metal shader.
- Oren-Nayar-Blinn – this is a more advanced version of the standard Blinn shader. It has a variety of diffuse controls that make it ideal for matte surfaces like fabric.
- Multi-Layer – when you need complex anisotropic highlights and the basic Anisotropic shader doesn’t quite measure up, the Multi-Layer shader can help by offering two controls for specular highlights. Quite a few objects in the real world have highlights on more than just one point across their surface, so if realism is a top priority, the Multi-Layer shader is an excellent choice.
Shader Components
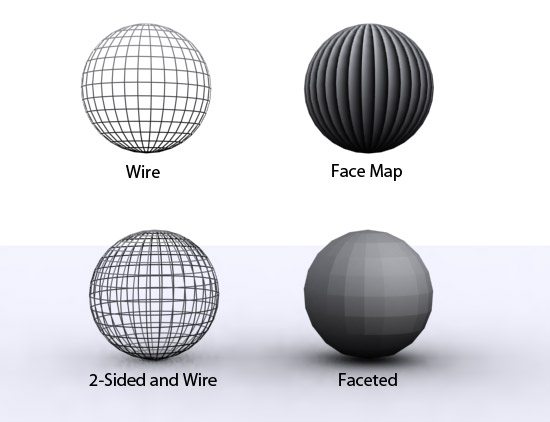
- Wire – renders a wireframe of the model with the material. Useful when modeling nets, webs, and other constructs that have fine lines.
- Face Map – renders the material onto every face of the model. This approach is better than increasing levels of tiling and has very many uses, including rendering billboard particles.
- 2-Sided – normally all materials are rendered without consideration to the back side of the model. In the majority of cases, this is useful optimization, but in the case of transparent or translucent objects, the back side must be visible in order for the object to look believable.
- Faceted – ignores the smoothing function of the shader and makes the model look as it actually appears geometrically.
- Ambient/Diffuse – there’s a reason these two are locked (i.e. they are identical) by default: modifying the Ambient color doesn’t change much in ordinary situations. Some renderers have functions directly related to the Ambient color, but for most cases, it can be treated like its neighbor, Diffuse: the color of the material when light strikes it. The diffuse part of a material can be a map.
- Self-Illumination – if shading is undesired and a material must have a uniform luminosity across its surface, you need to crank up the Self-Illumination setting to 100. This setting can also use maps, which creates very interesting effects like balls of lightning.
- Specular – the color of the specular highlight. Normally this color should be whatever the color of the light is. Leaving it as the default white makes some objects look artificial.
- Specular Level – how “glossy” a material appears. A plastic ball might have quite a high specular level, but a textbook likely won’t.
- Glossiness – how wide the specular highlight appears. At low levels, the highlight spans the whole model. At higher levels, the highlight becomes focused.
- Opacity – how transparent the material appears. This can be a map, which can be very useful in modeling small holes in an object.
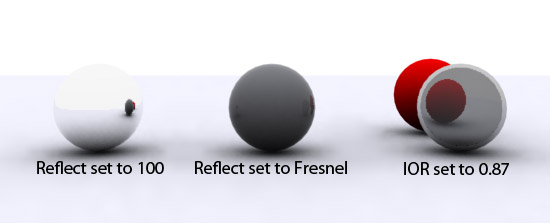
- Reflect – how reflective the material is. The higher the number value or the brighter the color, the more light is reflected. This option can also be set to “Fresnel,” which is a highly realistic reflection mode.
- Index of Refraction – the most important setting when modeling realistic glass, water, and air effects. The IOR of a material defines how light bends when it enters the object. Low IOR values make the object reflect along its edges, while high IOR values distort the appearance of objects behind the refracting object.
Conclusion
Materials in 3ds max have many more options than are listed here, but this introduction should be sufficient to help most casual users and beginners get up and running. Many material slots take maps, which is a really useful property as it enables you to create very complex materials easily. Hopefully this introduction helped you out. Thanks for reading!Author: admin
Howdie stranger!
If you want to participate in our photoshop and photography contests, just:
LOGIN HERE or REGISTER FOR FREE
-
says:
-
says:
wow…
Now.. I’ve done 3DS Max modeling for a while, and frankly, this is the first time I’ve come accross such a sweet, perfect, simple, and great way of explaining things!I’ve learned mostly by doing, and trial & error. But this here even thought me a few things. Nice one! 🙂
( 2 years and 4362 days ago ) -
says:
This is right till this but how to use them in the work
( 2 years and 4324 days ago ) -
says:
really doing gr8 job. this is powerful tonic for a 3d-max learner. Thanks!
( 2 years and 4295 days ago ) -
says:
Just wanted to congratulate you on a short yet perfectly written introduction to materials in 3dsmax!
( 2 years and 3703 days ago ) -
says:
Very nice tutorial….expecting a video tutorial using 3ds max 2013 …thank u.
( 2 years and 3528 days ago )
Pxleyes
Photography and photoshop contests
We are a community of people with
a passion for photography, graphics and art in general.
Every day new photoshop
and photography contests are posted to compete in. We also have one weekly drawing contest
and one weekly 3D contest!
Participation is 100% free!
Just
register and get
started!
Good luck!
Follow us:


© 2015 Pxleyes.com. All rights reserved.
Wow, cool program. 🙂 I had it, but didn’t know how to use it… 🙁 Still don’t.
( 2 years and 4366 days ago )