

How to Allow or Prevent Users and Groups to Hibernate, Restart, Shut Down, and Sleep the PC
InformationThis will show you how to allow or prevent specific users and groups from being able to Shut Down, Restart, Sleep, and Hibernate the computer in Vista, Windows 7, and Windows 8.
You will need to be logged in as administrator to be able to do this tutorial.
NoteDefault Users and Groups Allowed to Shut Down the Computer
NOTE: This security setting determines which users who are logged on locally to the computer can shut down the operating system using the Shut Down command.
On a Local Computer or Workstation (ex: home computer): Administrators, Backup Operators, Users
On a Server: Administrators, Backup Operators
On Domain: Administrators, Backup Operators, Server Operators, Print Operators
EXAMPLE: Shut Down Set to be Prevented
OPTION ONEThrough Local Security Policy
1. Open the Local Security Policy window, expand Local Policies in the left pane, and select User Rights Assignment. (see screenshot below)
2. In the right pane of User Rights Assignment, double click on Shut down the system. (see screenshot above)
3. To Prevent Users or Groups to be able to Shut Down the Computer
A) Select (highlight) listed user(s) and/or group(s) that you do not want to be allowed to shut down the computer anymore, then click on the Remove button. (see screenshot below)
NOTE: You can press and hold the CTRL key to select more than one listed user and group.
TipTo Only Prevent Specific Users
- To only prevent specific "standard users", you will also need to remove the Users group in addition to step 3A, then only add each standard user account name in step 4 that you want to be able to shut down the computer.
- To only prevent specific "administrators", you will also need to remove the Administrators group in addition to step 3A first, then only add each administrator user account name in step 4 that you want to be able to shut down the computer.
B) Click on Apply. (see screenshot below)4. To Allow Users or Groups to be able to Shut Down the Computer
A) Click on the Add User or Group button. (see screenshot above)5. When finished, click on OK. (see screenshots below steps 3B and 4I)
B) To Change the Location to Search for "Object Types"
NOTE: This is only if you wanted to search for object types to allow from a location other than your local computer. If you only want to search from your computer, then skip this step and go to step 4C.
- Click on the Locations button. (see screenshot below step 4C)
- Select a location, and click on OK. (see screenshot below)
C) Click on the Advanced button. (see screenshot below)
D) Click on the Object Types button. (see screenshot below)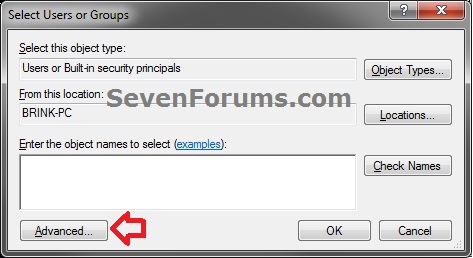
E) Check all boxes or the "object types" (ex: Users or Groups) that you want to find and select from in step 4G, and click on OK. (see screenshot below)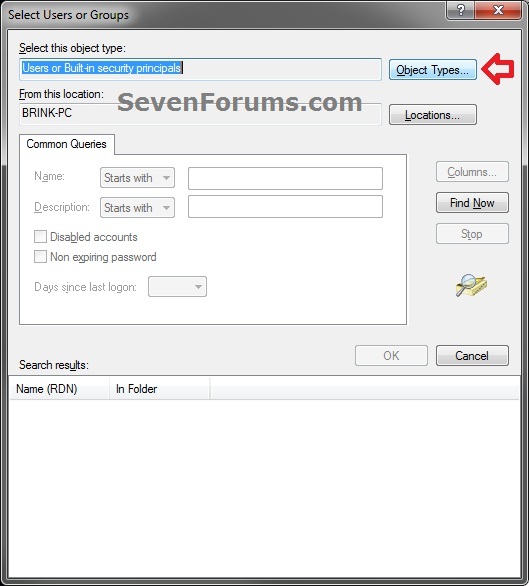
F) Click on the Find Now button. (see screenshot below)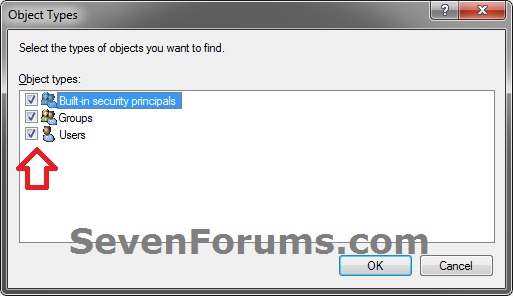
G) In the bottom pane under Search results, select the user account name(s) and/or groups that you want to be allowed to shut down the computer, then click on OK. (see screenshot below)
NOTE: You can press and hold the CTRL key to select more than one listed users (user account names) or group.
H) Click on OK. (see screenshot below)
TipTo Only Allow Specific Users
- To only allow specific "standard users", you will need to remove the Users group in step 3 first, then add each standard user account name that you want to be able to shut down the computer.
- To only allow specific "administrators", you will need to remove the Administrators group in step 3 first, then add each administrator user account name that you want to be able to shut down the computer.
I) Click on Apply. (see screenshot below)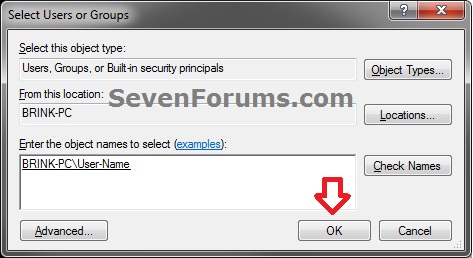
6. Close the Local Security Policy window. (see screenshot below step 1)
7. Sometimes you may need to log off and on, or restart the computer to apply.
OPTION TWOUsing "ntrights.exe" and an Elevated Command Prompt
NOTE: Be sure to write down changes you make to the user rights assignment so that you will know what you changed later. Please see the NOTE box at the top of the tutorial for the default user rights assignments.
1. If you have not already, click/tap on the Download button below to download the ntrights.zip file originally from within the Windows Server 2003 Resource Kit Tools.That's it,
2. Open an elevated command prompt (Run as administrator).
Download
A) Save the ntrights.zip file to your desktop.
B) Unblock the ntrights.zip file.
C) Open the ntrights.zip file, and extract (drag and drop) the ntrights.exe file to your desktop.
D) Right click on the ntrights.exe file, and click on Move.
E) Open Windows Explorer and navigate to and open the C:\Windows\System32 folder, then Paste the ntrights.exe file to move it here.
F) If prompted, click/tap on Continue and Yes to approve moving the ntrights.exe file into the System32 folder, then close the Windows Explorer window.
3. To Prevent Users or Groups to be able to Shut Down the Computer
A) In the elevated command prompt type in the command below and press enter. (see screenshot below)4. To Allow Users or Groups to be able to Shut Down the Computer
NOTE: Substitute User or Group in the command below with the actual user account name (ex: Users) or group name within quotes that you want to prevent.
ntrights -U "User or Group" -R SeShutdownPrivilege
TipTo Only Prevent Specific Users
- To only prevent specific "standard users", you will also need to remove the Users group in addition to step 3A, then only add each standard user account name in step 4A that you want to be able to shut down the computer.
- To only prevent specific "administrators", you will also need to remove the Administrators group in addition to step 3A first, then only add each administrator user account name in step 4A that you want to be able to shut down the computer.
A) In the elevated command prompt type in the command below and press enter. (see screenshot below)5. When finished, close the elevated command prompt.
NOTE: Substitute User or Group in the command below with the actual user account name (ex: Users) or group name within quotes that you want to allow.
ntrights -U "User or Group" +R SeShutdownPrivilege
TipTo Only Allow Specific Users
- To only allow specific "standard users", you will need to remove the Users group in step 3A first, then add each standard user account name that you want to be able to shut down the computer.
- To only allow specific "administrators", you will need to remove the Administrators group in step 3A first, then add each administrator user account name that you want to be able to shut down the computer.
6. Sometimes you may need to log off and on, or restart the computer to apply.
Shawn
Related Tutorials
- How to Lock, Sign out (Log off), Restart, Shut Down, and Switch User in Windows 8
- How to Create a "Slide to Shut down" Shortcut in Windows 8.1
- How to Add or Remove Users and Groups from "User Rights Assignment"
- How to Add or Remove User Accounts from Groups in Windows 7 and Vista
- How to Allow or Prevent Users and Groups to Take Ownership
- How to Change the Default Action of the Windows 7 Alt+F4 Shut Down Window
- How to Change the Default Windows 7 Start Menu Power Button Action
- How to Speed Up the Shut Down Time in Windows 7
- How to Create a Shut Down Windows Shortcut in Windows 7
- How to Create a Shut Down Computer Shortcut in Windows
- How to Create a Task that will Shut Down the PC Automatically
- How to Enable or Disable Shut Down without Having to Log On
- How to Change the "Shutting down..." Text Message at Shut Down in Windows 7 and Vista
- How to Add or Remove the Shut Down, Restart, Sleep, and Hibernate Commands in Windows 7
- How to Add or Remove Power Button on Start Screen in Windows 8.1 Update
- How to See the Last Shutdown Time of Your Windows PC
- Add or Remove Shutdown Power Menu from Sign in Screen in Windows 8 and 8.1
- How to Perform an Emergency Restart in Vista, Windows 7, and Windows 8
- How to Add or Remove "Hibernate after" in Power Options in Windows
Shut Down Computer - Allow or Prevent Users and Groups
-
-
-
New #3
Now I'll just have to go in the BIOS and configure the shutdown switch
-
New #4
kinda worked
this kinda help but i want to still allow users to lock,restart, log off. i only want to prevent them from shutting down, sleep, and hybernate
-
New #5
Hello USA, and welcome to Seven Forums.
Yeah, unfortunately "Restart" is part of the shutdown options. I do not know of another option that would disable all of these without it also including "Restart".
A workaround for restart being disabled would be to log off, then manually restart the computer using the restart button on the computer case.
Hope this helps,
Shawn
-
New #6
It works!!!
Worked just as expected on Seven Home Premium x64. Does the tool in option 2 work in Vista Home Premium x86? How about XP Pro? As always, any help is very appreciated.
Thanks everyone for your posts.
Dusty
-
New #7
Hello Dusty, and welcome to Seven Forums.
Both options work in Windows 7 and Vista, but I haven't tried option two in XP though. It's not going to hurt anything to try it XP though. It'll either work or not. :)
-
New #8
Thanks, will try on XP Pro.
Also, does this prevent shutdown from cmd prompt? I would like to restrict Vista Home Premium x86 but the system only has one user (admin) so the only way to shut down if I do this is a cmd prompt.
Thanks,
Dusty
No, option 2 doesn't work in XP Pro, returns "invalid application" messageLast edited by Brink; 01 Jan 2012 at 20:28. Reason: merged
-
New #9
Dusty,
When they (tested with standard user) run the shutdown /f command in a command prompt, it will only log them out instead. The other switch options get a access denied message. So, yep it basically still prevents them in a command prompt as well. :)
Thank you for confirming that it doesn't work in XP.

Shut Down Computer - Allow or Prevent Users and Groups
How to Allow or Prevent Users and Groups to Hibernate, Restart, Shut Down, and Sleep the PCPublished by Brink


 Quote
Quote
Related Discussions