
by Tony Thomas
April 19, 2011
Tony creates pixel-perfect UI kits & icons. His pug, Wednesday, is Medialoot's beloved mascot.
How to Create a Grunge Polaroid Photo in Adobe Fireworks
In this tutorial we will show you how to create a grunge Polaroid photo using Adobe Fireworks and its unique ability to work with textures. The way Adobe Fireworks handles texture is substantially different to how Photoshop does things, and in fact it's one of the main things that stump a lot of Photoshop users when they first use Fireworks. However, with a bit of experience and experimentation, you can learn how to combine bitmap textures with vector drawing in Fireworks for an excellent result.
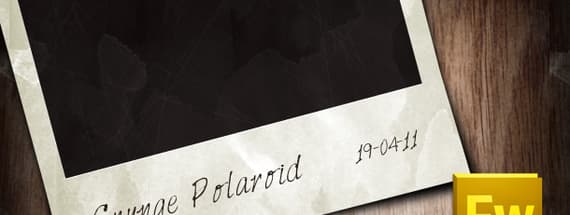
Final Result
Here is a quick preview of what we will be creating in the tutorial.
Textures Used
Stained Texture Before we get into Fireworks, the first thing to do is obtain a texture to work with, as we're going to be creating an old, grungy polaroid we need something that looks aged and dirty, this is a great excuse to get out of the office and into the kitchen, using a thick envelope I had knocking about and the remnants of this mornings coffee I could quickly mash up a vintage looking coffee stained texture. If you haven't the time or facilities to do this step, you can download the texture used in this tutorial here. Wood Texture The wooden texture used can be obtained in this set of textures, or you can use your own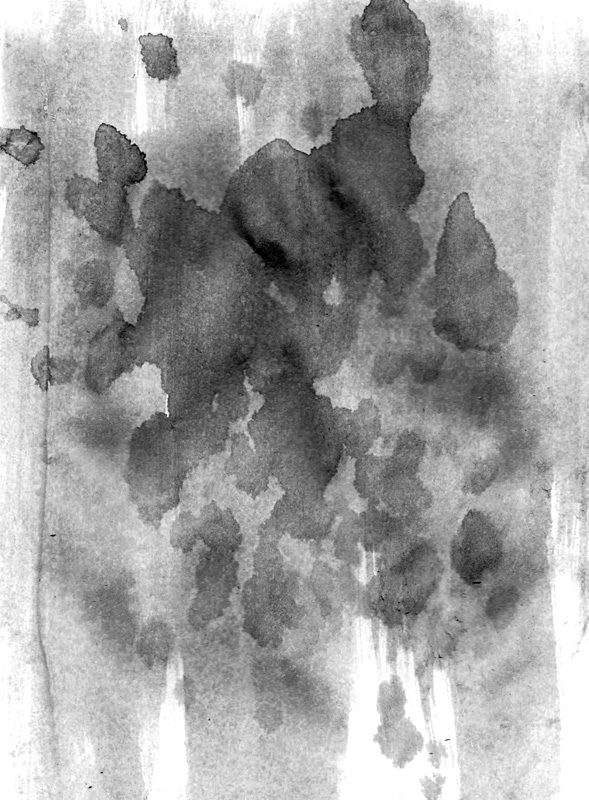
New Document
Create a new document, 500px wide and 500px high, set the dpi to 72 and background to white.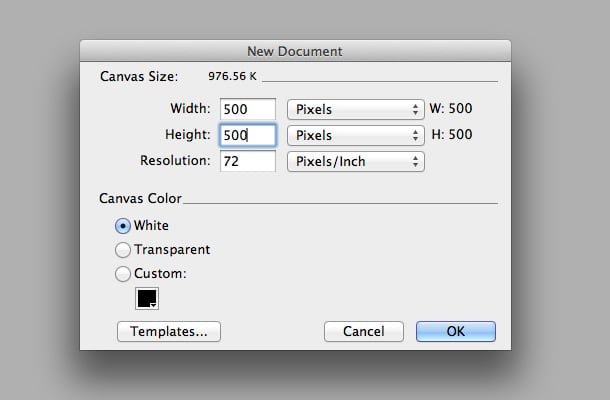
The Background
Place your wood texture onto the canvas at full resolution, and make sure the first thing you do is right click and Convert to Symbol, give the new symbol a name, and select Graphic. Hit OK to confirm. Now that you've converted the texture to a graphic symbol you're free to resize and scale to your hearts content without losing the original quality. Once you're happy with the position of the texture, apply a color adjustment filter by selecting Add Live Filter > Adjust Color > Hue/Saturation..., use the sliders to reduce the saturation of the texture and tweak the hue and brightness if required for a washed out look.
 Next, using the Rectangle Tool (U) draw a black rectangle that fills the whole document.
 Now in the properties window (with the black rectangle selected) go to Texture > Other... and locate the stained paper texture you will be using, and increase the Amount of Texture to 100%.
Set the blending option of the layer to Overlay and the opacity to about 80%.
The result should produce something like the image below.
Now in the properties window (with the black rectangle selected) go to Texture > Other... and locate the stained paper texture you will be using, and increase the Amount of Texture to 100%.
Set the blending option of the layer to Overlay and the opacity to about 80%.
The result should produce something like the image below.
 Draw another black rectangle exceeding the size of the canvas by at least 20%, and a slightly smaller rectangle within that. Then from the Path window (Window > Others > Path) select Punch Paths to subtract the top rectangle from the bottom rectangle, leaving you with a thick black border around your document.
 Underneath the Edge drop down menu in the properties window select Feather and set the value to the highest option (which is 100).
This step will blur the edges of the black border giving a vignette effect, this is also why we made the first shape larger than the canvas as it blurs the inside and outside of the shape, you can adjust the shape at any time by editing it's path with the Pen tool though because the blur is dynamic and doesn't rasterize the original shape.
Underneath the Edge drop down menu in the properties window select Feather and set the value to the highest option (which is 100).
This step will blur the edges of the black border giving a vignette effect, this is also why we made the first shape larger than the canvas as it blurs the inside and outside of the shape, you can adjust the shape at any time by editing it's path with the Pen tool though because the blur is dynamic and doesn't rasterize the original shape.
 At this point you should have a total of 3 layers forming the background texture of the document, group all of these and lock them to avoid them getting in the way during the rest of the tutorial.
The Polaroid
Draw a rectangle in the centre of the document at around 365px wide and 370px tall. Use the Gradient Tool (G) to draw a line from the bottom left corner to the top right corner of the rectangle, in the properties window set the first stop of the gradient to #B5B08F and the last stop to #DAD8C8. This may seem a little dark at the moment but when we apply the texture above it the lightness will be adjusted. Draw a black rectangle on top of the first rectangle at around 325px by 255pxcentred and near the top of the first shape (where you would expect the photo to be a on a polaroid).
 Back to the first shape, and now using the Pen (P) tool, add 4 new points to the shape.
- One in the middle of the top line
- One adjacent to the point on the top line on the bottom line
- One near where the bottom of the black rectangle on the left side
- And, one near the bottom of the black rectangle on the right side
 In the properties window apply the stained paper texture Texture > Other..., and increase the Amount of Texture to 100% (as the background is very light, the applied texture will also be light).
 Still on the bottom rectangle, apply a new Drop Shadow live filter, set the Color: Black , Distance: 2, Opacity: 60%, Softness: 3, and Angle: 270.
 Select the black rectangle again and also apply the stained paper texture, because this is a dark background and we want a subtle effect 10% is a suitable amount of texture. Also tick Transparent to apply a transparent texture.
 On the black rectangle apply a Drop Shadow live filter, set the Color: White, Distance: 2, Opacity: 100%, Softness: 0, and Angle: 270.
 The Polaroid is almost there now, however we want the polaroid to look old, not just as if someone has been using it as a coaster for a week, so over time it would probably have gotten pretty scratched up too, not just stained.
Final Touches
Use the Line Tool (N) to randomly draw thin lines, set the stoke options to Color: White, and Hard Line, focus the scratches on the photo area of the polaroid, as this is where scratches are usually most visible. Group all the new layers you just created by drawing lines into a folder called Scratches and set the blending options to Overlay and Opacity to 25%.
 Finally, we can probably improve on the drop shadow we created earlier, so go back to the bottom rectangle layer and duplicate that layer, change the fill to black and nudge the extra points we created in even more, as demonstrated below.

 Apply a new Live Filter > Gaussian Blur at around 5.
 There you have it, a grungy polaroid created using vectors and textures in Fireworks, of course the beauty of using vector layers is that you can resize and scale the finished product (within the limits of the original texture used).

Use Your Own Photo
Optional last step, to add your own portrait or any photo for that matter to the polaroid, just place your image above the black rectangle and then copy the black rectangle and Modify > Mask > Paste as Mask onto your photo to clip it to the correct size.
Comments