

The study of forces is of central interest in dynamics, the study of causes of motion and changes in motion. Gravitational force is one example; it is this which causes satellites to revolve around planets and us to stay on the ground.
In this tutorial, we will build a simulation of such phenomenon and be able to observe, experiment and play with particles on the scene.
Among all particles generated, one main particle will attract others. As these particles move towards the main one, users can click on this main particle to drag it around, causing these particles to redirect their course. These particles will stop moving as they collide with the edge of main ball, but they won't overlap each other.
The structure of this tutorial is arranged in a manner where a brief theory in Physics in delivered before introducing the implementation of the simulation. Enjoy!
Final Result Preview
Let's take a look at the final result we will be working towards:
Click and drag the big green circle to move it around, and watch how the little blue circles react.
Step 1: Gravitational Force, Formula

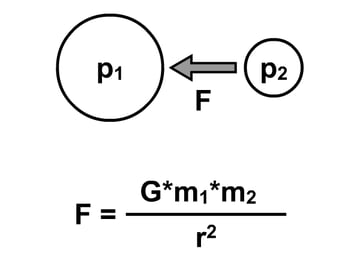
First, a Physics preface. The attractive gravitational force between any two objects is expressed through the following formula:
F: attractive force being exerted onto object of interest (p2) by
an arbitrary particle (p1).
G: Gravitational constant
m1: mass of p1
m2: mass of p2
r: distance between p1 and p2
Take special note of the following:
- The relationship between gravity and distance: F is inversely proportional to the square of the distance separating the two particles. This means the closer A and B are to each other, the higher the attractive force between them and vice versa. If you double the distance, the force goes down to a quarter of its original value.
- Value of gravitational constant, G, is scientifically 6.67259 x 10⁻¹¹ N * m2 / kg2. However, 500 will substitute this value in Flash environment.
- We can relate particle’s width to their mass. For this example, I’ve defined a particle’s mass to be half of its radius.
Step 2: Newton's 2nd Law, Equation
In order to translate force into kinematics, we need to calculate particle’s acceleration. The famous equation by Sir Isaac Newton is shown below:
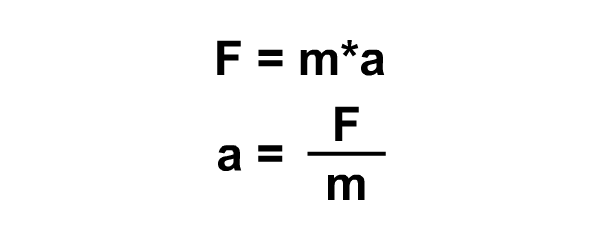

F: gravitational force being exerted onto object of interest (p2)
m: mass of object of interest (p2)
a: acceleration of object of interest (p2) under influence of F
Here, the implication is that a higher force applied onto particle A results in a higher acceleration (assuming its mass stays the same). This acceleration will change the particle’s velocity.
Step 3: Starting Project
Implementation will be done in FlashDevelop IDE. Build your project file.
- Start a new Project, PROJECT > NEW PROJECT…
- Select from pop up window, AS3 PROJECT
- Name your project. In my case, Attractor
- Select your project location
See this guide for an introduction to FlashDevelop.
Step 4: Classes You Need
There are 4 classes to create in folder \src\: Main.as, Vector2D.as, Ball.as & Math2.as. It is advisable that you download all these files from the source package and try to map them against steps to come to get a general understanding of the mechanism before modifying them. Their roles are expressed as below:
| Class Name | Purpose of Organisation |
| Main.as | Class to create the balls visually and to attach animation to events. |
| Vector2D | Class that holds all vector manipulation functions. |
| Ball | Class that contains functions to visually generate a ball, implements dynamics and kinematics of a ball. |
| Math2 | Static class that holds a function to facilitate randomizing the initial location of balls. |
Step 5: Randomising Values
Lets talk about the Math2 class first. The function below will help to generate a random number within the specified range. Accepts two inputs, minimum limit and maximum limit in range.
1 |
|
2 |
public static function randomiseBetween(range_min:int, range_max:int):int |
3 |
{
|
4 |
var range:int = range_max - range_min; |
5 |
var randomised:int = Math.random() * range + range_min; |
6 |
return randomised; |
7 |
}
|
Step 6: Vector2D, Getters and Setters
The bulk of Math used is located in Vector2D. This tutorial assumes a level of familiarity in vector analysis in the users. The functions below are generally used to get and set vector components, plus a method to reset all components to zero. In any case, if you are uncomfortable with Vectors, visit a great post on Euclidean Vectors by Daniel Sidhion.
1 |
|
2 |
public function Vector2D(valueX:Number, valueY:Number) |
3 |
{
|
4 |
this._x = valueX; |
5 |
this._y = valueY; |
6 |
}
|
7 |
public function set vecX(valueX:Number):void |
8 |
{
|
9 |
this._x = valueX; |
10 |
}
|
11 |
public function get vecX():Number |
12 |
{
|
13 |
return this._x |
14 |
}
|
15 |
public function set vecY(valueY:Number):void |
16 |
{
|
17 |
this._y = valueY; |
18 |
}
|
19 |
public function get vecY():Number |
20 |
{
|
21 |
return this._y |
22 |
}
|
23 |
public function setVector(valueX:Number, valueY:Number):void |
24 |
{
|
25 |
this._x = valueX; |
26 |
this._y = valueY; |
27 |
}
|
28 |
public function reset():void |
29 |
{
|
30 |
this._x = 0; |
31 |
this._y = 0; |
32 |
}
|
Step 7: Vector2D, Operations
The major uses of Vector2D lie in the following functions, which:
- obtain the magnitude of vector
- obtain the angle made by vector in relation to the origin
- obtain the vector direction of vector
- perform simple vector operations of addition, subtraction and scalar
multiplication
1 |
|
2 |
public function getMagnitude():Number |
3 |
{
|
4 |
var lengthX:Number = this._x; |
5 |
var lengthY:Number = this._y; |
6 |
return Math.sqrt(lengthX * lengthX +lengthY * lengthY); |
7 |
}
|
8 |
public function getAngle():Number |
9 |
{
|
10 |
var lengthX:Number = this._x; |
11 |
var lengthY:Number = this._y; |
12 |
return Math.atan2(lengthY, lengthX); |
13 |
}
|
14 |
public function getVectorDirection():Vector2D |
15 |
{
|
16 |
var vectorDirection:Vector2D = new Vector2D(this._x / this.getMagnitude(), this._y / this.getMagnitude()); |
17 |
return Vector2D(vectorDirection); |
18 |
}
|
19 |
public function minusVector(vector2:Vector2D):void |
20 |
{
|
21 |
this._x -= vector2.vecX; |
22 |
this._y -= vector2.vecY; |
23 |
}
|
24 |
public function addVector(vector2:Vector2D):void |
25 |
{
|
26 |
this._x += vector2.vecX; |
27 |
this._y += vector2.vecY; |
28 |
}
|
29 |
public function multiply (scalar:Number):void |
30 |
{
|
31 |
this._x *= scalar; |
32 |
this._y *= scalar; |
33 |
}
|
Step 8: Ball.as Drawing
The Ball class is where all the interesting operations take place. To begin our animation, we need to draw a ball and set several kinematics- and dynamics-related variables. The function to draw a ball is as below:
1 |
|
2 |
private function draw(radius:Number, color:uint) :void |
3 |
{
|
4 |
graphics.beginFill(color, 1); |
5 |
graphics.drawCircle(0, 0, radius); |
6 |
graphics.endFill(); |
7 |
}
|
Step 9: Ball.as Private Variables
The mentioned several kinematics and dynamics related variables are stated as below:
1 |
|
2 |
private var _disp:Vector2D; //displacement vector, relative to the origin |
3 |
private var _velo:Vector2D; //velocity vector |
4 |
private var _acc:Vector2D; //acceleration vector |
5 |
private var _attractive_coeff:Number = 500; |
6 |
private var _mass:Number; |
Step 10: Ball.as Initiation
As the constructor of Ball class is called, graphics is drawn. Once drawn, the ball will be placed on the stage randomly. We will also set the private variables. All vector quantities will also be initialized at 0, except for the displacement which is measured relative to origin.
1 |
|
2 |
public function Ball(radius:Number = 20, color:uint = 0x0000FF) |
3 |
{
|
4 |
this.draw(radius, color); |
5 |
this._mass = radius / 2; //assuming mass is half of radius |
6 |
this.x = Math2.randomiseBetween(0, 550); |
7 |
this.y = Math2.randomiseBetween(0, 400); |
8 |
this._disp = new Vector2D(this.x, this.y); //set initial displacement |
9 |
this._velo = new Vector2D(0, 0); |
10 |
this._acc = new Vector2D(0, 0); |
11 |
}
|
Step 11: Ball.as Calculate Attractive Force
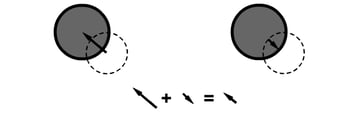
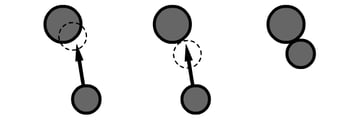
We need to calculate the underlying force that causes our particles to animate. Guess what, it's the gravitational force. The function below will help in calculating this force. Note that a cap is applied on the acceleration at 5. The horizontal and vertical components of force are derived using trigonometry; the animation above may help in understanding the mathematics of this.
1 |
|
2 |
public function get mass():Number |
3 |
{
|
4 |
return _mass; |
5 |
}
|
6 |
private function getForceAttract (m1:Number, m2:Number, vec2Center:Vector2D):Vector2D |
7 |
{
|
8 |
/* calculate attractive force based on the following formula:
|
9 |
* F = K * m1 * m2 / r * r
|
10 |
*/
|
11 |
var numerator:Number = this._attractive_coeff * m1 * m2; |
12 |
var denominator:Number = vec2Center.getMagnitude() * vec2Center.getMagnitude(); |
13 |
var forceMagnitude:Number = numerator / denominator; |
14 |
var forceDirection:Number = vec2Center.getAngle(); |
15 |
|
16 |
//setting a cap
|
17 |
if (forceMagnitude > 0) forceMagnitude = Math.min(forceMagnitude, 5); |
18 |
|
19 |
//deriving force component, horizontal, vertical
|
20 |
var forceX:Number = forceMagnitude * Math.cos(forceDirection); |
21 |
var forceY:Number = forceMagnitude * Math.sin(forceDirection); |
22 |
var force:Vector2D = new Vector2D(forceX, forceY); |
23 |
return force; |
24 |
}
|
Step 12: Ball.as Calculate Acceleration
Once force vector has been obtained, we can calculate the resulting acceleration. Remember, F = ma, so a = F/m.
1 |
|
2 |
public function getAcc(vecForce:Vector2D):Vector2D |
3 |
{
|
4 |
//setting acceleration due to force
|
5 |
var vecAcc:Vector2D = vecForce.multiply(1 / this._mass); |
6 |
return veccAcc; |
7 |
}
|
Step 13: Ball.as Calculate Displacement
With acceleration calculated, we can effectively calculate the resulting displacement.
Remember that force calculated is actually based upon the displacement between the center of the balls.
1 |
|
2 |
private function getDispTo(ball:Ball):Vector2D |
3 |
{
|
4 |
var currentVector:Vector2D = new Vector2D(ball.x, ball.y); |
5 |
currentVector.minusVector(this._disp); |
6 |
return currentVector; |
7 |
}
|
8 |
public function attractedTo(ball:Ball) :void |
9 |
{
|
10 |
var toCenter:Vector2D = this.getDispTo(ball); |
11 |
var currentForceAttract:Vector2D = this.getForceAttract(ball.mass, this._mass, toCenter); |
12 |
this._acc = this.getAcc(currentForceAttract); |
13 |
this._velo.addVector(this._acc); |
14 |
this._disp.addVector(this._velo); |
15 |
}
|
Step 14: Ball.as Implement Displacement
Then, we are able to move our ball to its new location, through the function below. Note that displacement calculated is never implemented onto the ball's current location straightaway. Such design is to allow checking be done: collision detection between balls.
1 |
|
2 |
public function setPosition(vecDisp:Vector2D):void |
3 |
{
|
4 |
this.x = Math.round(vecDisp.vecX); |
5 |
this.y = Math.round(vecDisp.vecY); |
6 |
}
|
Remember, the force is based upon distance between centers. Therefore, the balls will penetrate and continue moving due to attractive force being higher when they are closer. We need to reset acceleration and velocity to 0 when the balls touch one another’s edge. However, we need to obtain a means of detecting the collision between two balls.
Step 15: Ball.as Collision Detection
Collision can be easily checked. Separation between any two balls should not be less than the sum of their radii. Here’s the collision detection function:
1 |
|
2 |
public function collisionInto (ball:Ball):Boolean |
3 |
{
|
4 |
var hit:Boolean = false; |
5 |
var minDist:Number = (ball.width + this.width) / 2; |
6 |
|
7 |
if (this.getDispTo(ball).getMagnitude() < minDist) |
8 |
{
|
9 |
hit = true; |
10 |
}
|
11 |
|
12 |
return hit; |
13 |
}
|
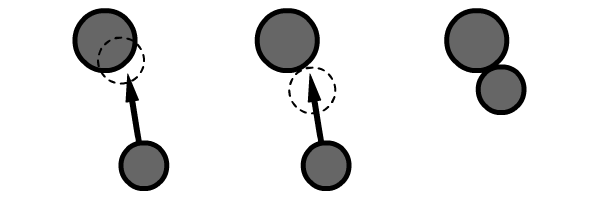
Step 16: Ball.as Calculate Displace to Repel

Usually when collision has been detected between two balls, their state is overlapping each other. We need to make sure that they will just sit nicely on the edge and not overlap. How? We can displace one of the balls away from the other, but we need to calculate the right displacement to adjust first. Here’s the displacement calculation:
1 |
|
2 |
public function getRepel (ball:Ball): Vector2D |
3 |
{
|
4 |
var minDist:Number = (ball.width + this.width) / 2; |
5 |
//calculate distance to repel
|
6 |
var toBall:Vector2D = this.getDispTo(ball); |
7 |
var directToBall:Vector2D = toBall.getVectorDirection(); |
8 |
directToBall.multiply(minDist); |
9 |
directToBall.minusVector(toBall); |
10 |
directToBall.multiply( -1); |
11 |
return directToBall; |
12 |
}
|
Step 17: Ball.as Implement Displacement to Repel
After we have calculated the right displacement, we need to implement it. The action is like repelling one of the balls. In addition, we need to do another two extra commands. Remember, we are dealing with a dynamic environment. Even after we have set the displacement one of the ball to the edge, acceleration due to force and the resulting velocity will animate it, causing an undesirable movement of jerking in and out. We need to reset these values of acceleration and velocity to zero.
1 |
|
2 |
public function repelledBy(ball:Ball):void |
3 |
{
|
4 |
this._acc.reset(); |
5 |
this._velo.reset(); |
6 |
var repelDisp:Vector2D = getRepel(ball); |
7 |
this._disp.addVector(repelDisp); |
8 |
}
|
Step 18: Ball.as Animate
Finally, we can animate (render) our ball as if it were being attracted by another. When collision is detected, displacement will be adjusted so that it will not penetrate the edge. This will happen first for the balls when they collide with center, and then for the balls when they collide with one another.
1 |
|
2 |
public function animate(center:Ball, all:Array):void |
3 |
{
|
4 |
this.attractedTo(center); |
5 |
if (collisionInto(center)) this.repelledBy(center); |
6 |
for (var i:int = 0; i < all.length; i++) |
7 |
{
|
8 |
var current_ball:Ball = all[i] as Ball; |
9 |
if (collisionInto(current_ball) && current_ball.name != this.name) this.repelledBy(current_ball); |
10 |
}
|
11 |
this.setPosition(this._disp); |
12 |
}
|
Step 19: Main.as Private Variables
Moving on to our last class, Main. Main class is generated at the start of the project. Private variables will include the one ball that attracts all the others and the number of balls in our Flash presentation.
1 |
|
2 |
private var mainBall:Ball; |
3 |
private var totalBalls:int = 10; |
Step 20: Main.as Draw Balls
First of all, we should initialize balls. There will be one main ball that attract all the others. The others are named so that referencing can be easily done later.
1 |
|
2 |
private function createBalls ():void |
3 |
{
|
4 |
mainBall = new Ball(50, 0x00FF00); |
5 |
this.addChild(mainBall); |
6 |
for (var i:int = 0; i < this.totalBalls; i++) |
7 |
{
|
8 |
var currentBall:Ball = new Ball(); |
9 |
currentBall.name = "ball" + i; |
10 |
this.addChild(currentBall); |
11 |
}
|
12 |
}
|
Step 21: Main.as Implement Ball Interaction
Then, assign events to the main ball to make it draggable when clicked and stop when released.
1 |
|
2 |
private function init(e:Event = null):void |
3 |
{
|
4 |
removeEventListener(Event.ADDED_TO_STAGE, init); |
5 |
// entry point
|
6 |
createBalls(); |
7 |
mainBall.addEventListener(MouseEvent.MOUSE_DOWN, onMouseDown); |
8 |
stage.addEventListener(MouseEvent.MOUSE_UP, onMouseUp); |
9 |
animateAll(); |
10 |
}
|
11 |
private function onMouseUp(e:MouseEvent):void |
12 |
{
|
13 |
stopDrag(); |
14 |
}
|
15 |
private function onMouseDown(e:MouseEvent):void |
16 |
{
|
17 |
e.target.startDrag(); |
18 |
}
|
Step 22: Main.as Animate Balls
Animating balls that are being attracted by the main. An EnterFrame event is assigned to each ball.
1 |
|
2 |
private function animateAll():void |
3 |
{
|
4 |
for (var i:uint = 0; i < totalBalls; i++) |
5 |
{
|
6 |
//each ball is pulled by main_ball
|
7 |
var current_ball:Ball = this.getChildByName("ball" + i) as Ball; |
8 |
current_ball.addEventListener(Event.ENTER_FRAME, enterFrame); |
9 |
}
|
10 |
}
|
11 |
private function enterFrame(e:Event):void |
12 |
{
|
13 |
var allObj:Array = new Array(); |
14 |
for (var i:int = 0; i <= totalBalls; i++) |
15 |
{
|
16 |
var current_ball:Ball = this.getChildAt(i) as Ball; |
17 |
allObj.push(current_ball); |
18 |
}
|
19 |
e.target.animate(mainBall, allObj); |
20 |
}
|
Step 23: Test Movie
Finally, press Ctrl + Enter to preview the animation.
Conclusion
To bring this tutorial one step further, readers may extend this project by implementing other linear forces.
In any case, simulations serve as a great tool in delivering ideas difficult to explain by plain text and image in a Physics classroom environment, especially when the state changes over time.
I hope this little tutorial helps you in some way. Terima kasih (that is "thank you" in Malaysia) for taking time to read and looking forward to hearing comments from fellow readers.


