Hey everyone! I am creating a new portfolio site and thought Id share some of what I've learned as I am going along. These are not my actual content box designs but gives you an idea of how I created them. This tutorial will consist of creating content boxes horizontally using the html5 tag appropriately and also the div tag. Many people think the div tag is fully replaced by the section tag. Before we start this tutorial, be sure to know that this is NOT true, the div is still using for styling and such.
Ok now on to the fun stuff. 1) Open up your favorite text or code editing program (I suggest topstyle, styles, or a IDE enviroment such as Dreamweaver)
2) Be sure to use the correct doctype in your initial document in order to render the new html5 tags we will be using and structuring (will explain later).
3) Most IE versions won't be able to understand what to do with the new tags of html5 so a javascript file link is required in order to make this happen. Html5shiv or Html5shim has the full javascript saved online in order for ie the render such elements/tags. Place this code into your head tag AFTER your CSS link. I am just using the Javascript for the tag in order to simplify this tutorial, please read into the forementioned names and learn how to link to the online JS if the user is using a version of IE.
--------------------------- So far your html should look like this (this is very stripped down and just showing you the basics)
I do alot of indenting in my sites all over the place to declare hierachy for my own liking but I wont do all the indents in here. For example. Under head I would indent to the right the meta, link, script and other tags (so I know that these tags are "inside" the head.
Also, always use an external style sheet for your CSS, its more practical. But for this exercise, I will be using styling right on the page itself for less confusion.
4) The next thing we have to do is make sure the browser renders the html5 element. I also set the background to black so we can get a better understanding of what we are trying to accomplish. The * and html styles I used reset the page and also will help us center our site container in the browser! Easier to code when starting from scratch!
*, html {
	padding:0;
	margin:0;
	text-align:center;
}

body {background-color:#000}

section {display:block}
5) Now on to the html coding. > I will be wrapping the whole site in a div container.
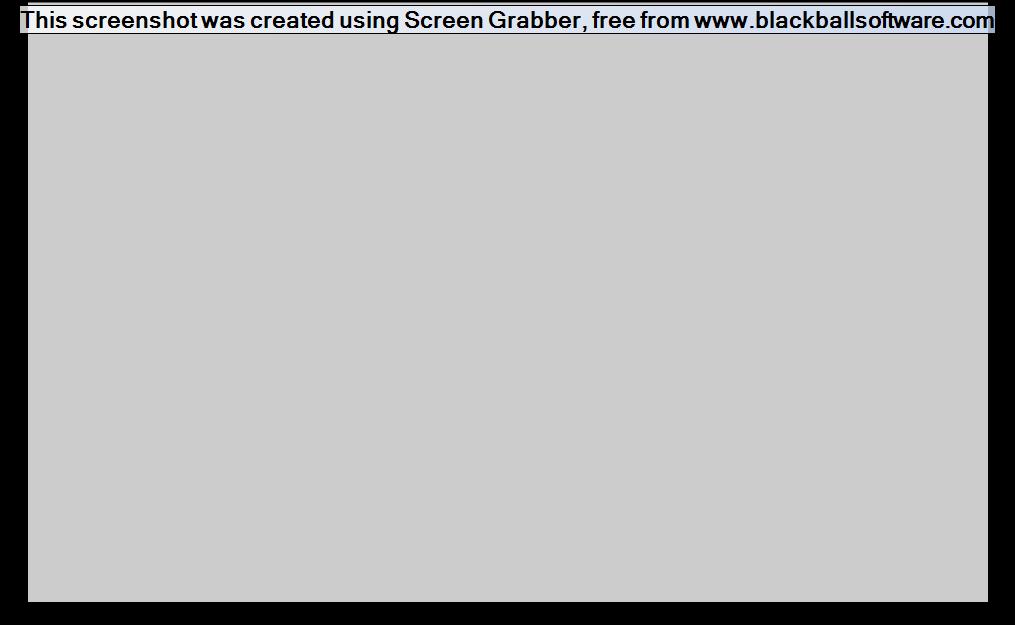
6) Now I will set a size for the site-container, I will use 960px width for this, and just pick a random height and background color. This will just to used to show you where the container is compared to the whole page.
All our code together should look like this
7) Now time to make some content boxes. To create these, we will use sections. It is recomended that the section element only be used for content that will have a "title" to it. Exclusions would be a blog post or such, in which the tag should be used.
Lets create a simple content box! (or should I say, content boxes(s))
Oops! Almost forgot one important element. We should create a div for the main content section in order to style the section elements!
As you see here, We now have the ability to hold our whole site in the site container, and style the main content under the main content div. For the header, you would actually use the new html5 tag and for the footer, thetag. Where there is no need to use a div. But for the main content, its still a good idea to use a div tag.
Now FINALLY, we will create some content boxes!
8) Lets add some style to those sections!
div.main-content section {
 width:220px;
 height:300px;
 margin:30px 20px 0 20px;
 background-color:#0CF;
 }
> What we did here was provide the main content boxes with a width, and a height in order to create a "block". Without these attributes, it can't really be considered a block element! The margin order is as follows; Top right bottom left;
I just used the shorthand version to accomplish this.
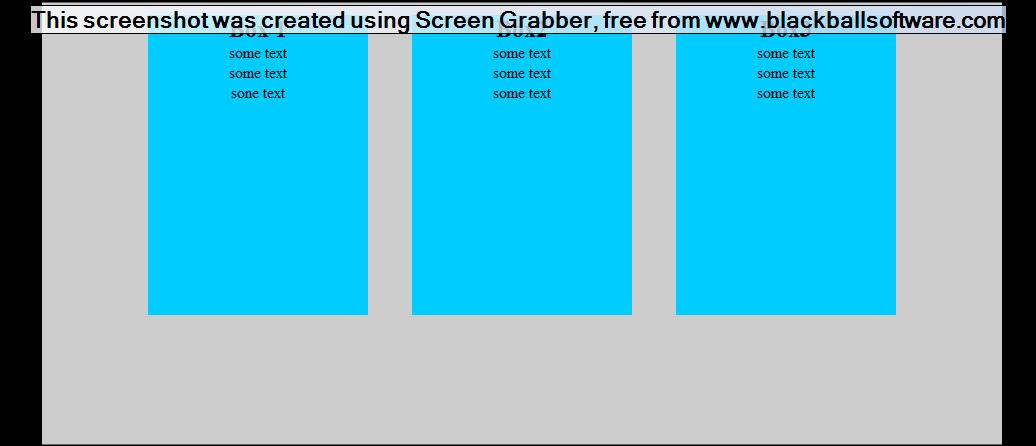
9) Now we added all that, Save your page, and lets take a look at what you should be seeing now.
Oops! There block elements but we have to add one line of code which finalizes the whole point of this tutorial, using inline-block. UPDATE!!!! For inline-block to work correctly, you must use vertical-align for the browser to render the sections equally across. If you dont, the sections will still be horizontal but not stay perfectly aligned when you enter content into it! div.main-content section {
width:220px;
height:300px;
margin:30px 20px 0 20px;
display:inline-block;
vertical-align:middle;
background-color:#0CF;
}
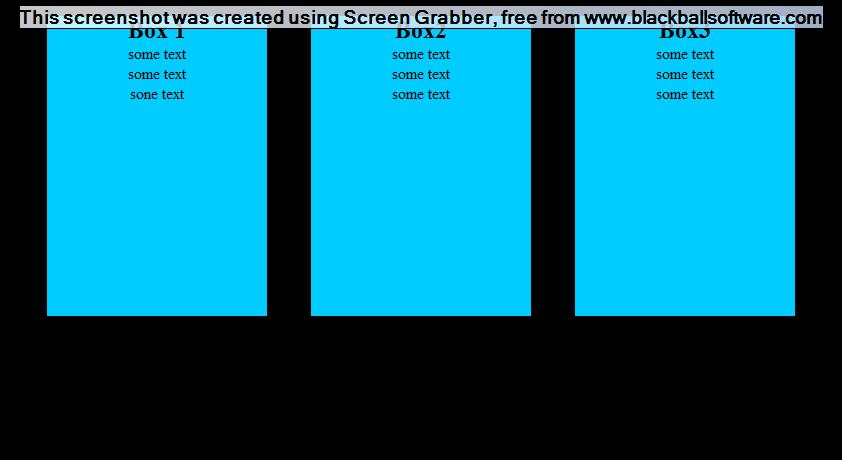
Now we shold have something like this!
Now remove the background color of the site-container. Now you should see 3 very simple content boxes set up horizontally using inline-block on the new html5 tag, without needed the use of floats or absolute/relative positioning!
div#site-container {
	width:960px;
	height:600px;
	margin:auto;
}
10) Our full page should look like this now.
>> And now lets add a little CSS3 fun.
div.main-content section {
 width:220px;
 height:300px;
 margin:30px 20px 0 20px;
 display:inline-block;
 background-color:#0CF;
 -webkit-border-radius: 20px;
-moz-border-radius: 20px;
border-radius: 20px;
 }
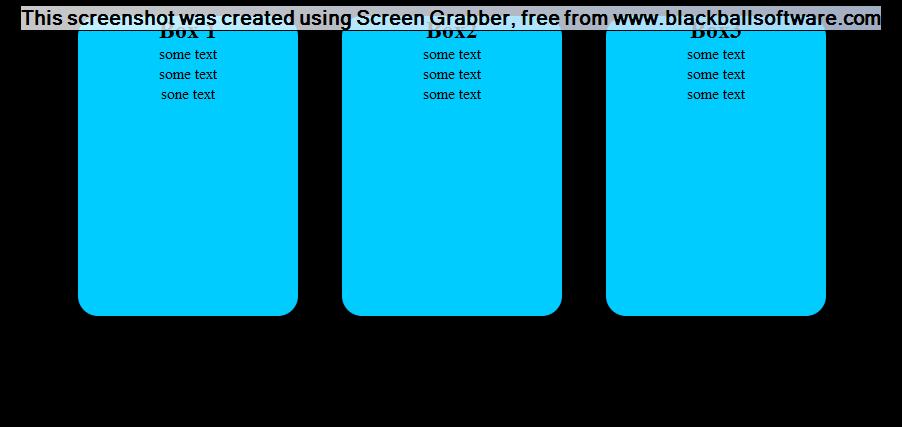
Thats it! Now you can take your creative minds to anywhere you may desire! Hope you enjoyed it!

Dig this tutorial?
Thank the author by sending him a few P2L credits!

GRIMESD
Will be working on more tutorials now that its winter time and have more time on my hands. Getting my hands dirty in html5 and css3 and will try to post tutorials as I am redoing my portfolio in these new standards. Feel free to contact me if you have an 


|