Android supports the Gesture API since version 1.6. The API can be located in the package android.gesture, and lets you store, load, draw and recognize gestures. This tutorial will show you a proof-of-concept application how you can make use of Gesture API.
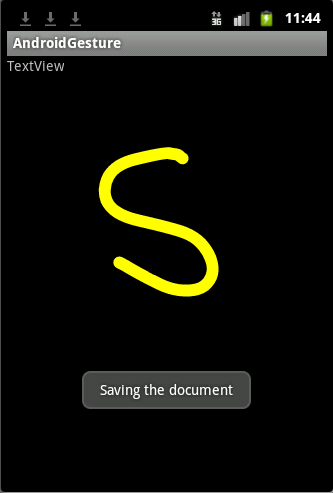
We will define 2 gestures: “S” and “O”. When a corresponding gesture will be recognized, a toast message will be shown.
The result will look like in the screenshot below:
Create a new project:
Project: AndroidGesture
Activity: AndroidGestureActivity
1. Creating the gestures
Starting with version 1.6 and higher the Android Emulator includes a new application pre-installed, called Gestures Builder.
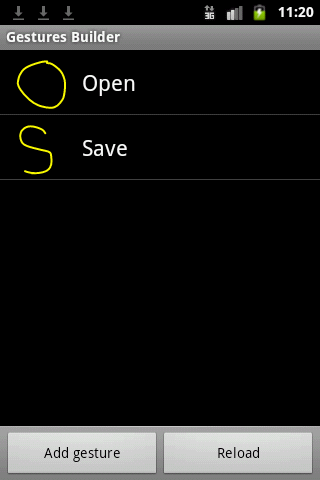
Start the Android Emulator and use the Gesture Builder application to create the “S” and “O” gestures:
A gesture is always associated with a name, but the name does not necessarily have to be unique. In fact, it’s recommended to have several gestures with the same name to increase the precision of recognition.
2. Importing gesture to your project
Every time we create or edit gestures with Gesture Builder, a file is created on the emulator SD card: /sdcard/gestures. We should import this file into our /res/raw project directory.
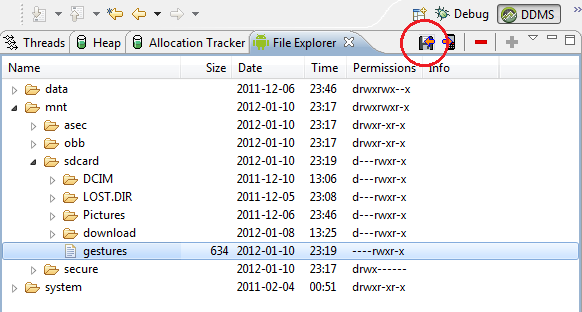
In order to do this, open the FileExplorer tab in the DDMS perspective. (If you don’t have the FileExplorer tab available, add it from: Window -> Show View -> File Explorer). Navigate to /sdcard directory and copy the gesture file to your computer, for example on your desktop.
To copy the gesture file from the emulator, select it and click the “Pull a file from the device” button, marked with red in the screenshot below:
Don’t forget to create a new folder called raw in the res directory of your project and copy there the gesture file.
3. Loading the gesture library and recognizing the gesture
To start recognizing gesture in our application we have to add the GestureOverlayView to our XML layout file. There are 2 ways you can use the GestureOverlayView, one of them is to use it as a normal view embedded inside a LinearLayout for example, and another is to use it as an overlay on top of other views. In this tutorial we will use the second option – an overlay on top of other views.
Edit the main.xml layout to look like this:
<?xml version="1.0" encoding="utf-8"?>
<android.gesture.GestureOverlayView xmlns:android="http://schemas.android.com/apk/res/android"
android:id="@+id/gestures"
android:layout_width="fill_parent"
android:layout_height="fill_parent"
android:eventsInterceptionEnabled="true"
android:gestureStrokeType="multiple"
android:orientation="vertical" >

<TextView
android:id="@+id/textView1"
android:layout_width="wrap_content"
android:layout_height="wrap_content"
android:text="TextView" />

</android.gesture.GestureOverlayView>
Make the AndroidGestureActivity to implement the OnGesturePerformedListener interface and add the the mLibrary member variable of type GestureLibrary:
public class AndroidGestureActivity extends Activity implements OnGesturePerformedListener {
GestureLibrary mLibrary;
In the onCreate() method we load the library and add the GestureOverlayView to the listener:
@Override
public void onCreate(Bundle savedInstanceState) {
   super.onCreate(savedInstanceState);
   setContentView(R.layout.main);

   mLibrary = GestureLibraries.fromRawResource(this, R.raw.gestures);
   if (!mLibrary.load()) {
     finish();
   }

   GestureOverlayView gestures = (GestureOverlayView) findViewById(R.id.gestures);
   gestures.addOnGesturePerformedListener(this);
}
And below is the implementation of onGesturePerformed(). When the listener is triggered, a list of predictions and a score is returned, each with the name you entered earlier in the Gesture Builder. The list is sorted by descending scores; the higher the score, the more likely the associated gesture is the one the user intended to draw:
public void onGesturePerformed(GestureOverlayView overlay, Gesture gesture) {
   ArrayList<Prediction> predictions = mLibrary.recognize(gesture);

   if (predictions.size() > 0 && predictions.get(0).score > 1.0) {
     String result = predictions.get(0).name;

     if ("open".equalsIgnoreCase(result)) {
       Toast.makeText(this, "Opening the document", Toast.LENGTH_LONG).show();
     } else if ("save".equalsIgnoreCase(result)) {
       Toast.makeText(this, "Saving the document", Toast.LENGTH_LONG).show();
     }
   }
}
By this time the application should compile and run successfully.
Reference: http://developer.android.com/resources/articles/gestures.html


Hi, there great tutorial… i always wanted to ask a question from a android developer i am big fan of mobile games and apps i have couple of ideas also.. just wanna know is there any possibilities that i can build an app with the help of tutorials though i din’t have development or coding background.
Please assist me if u can i would be eagerly waiting for the reply. Thanx 🙂
Hi,
Thank you for your comment.
Well, if you are a dedicated person and put a great effort in building an application, I believe even without coding background, and with the help of tutorials you will succeed to build an app.
However, you should be aware that Android relies on JAVA, and if you really want to develop apps and games, you will need to use this language.
And there’s no need to be an expert in JAVA in order to begin writing apps, basic stuff like OOP principles and JAVA syntax should be enough to get you started in Android.
I can assist you, no problem, but I should tell you that most of the time I’m busy, and this may delay my assistance. 🙂
With the Android market on the rise, the demand for Android application is on the rise. This is mainly because the websites need to be compatible with the smart phones with Android operating system and platform. On the other hand no business would like to give the competitors a chance to forge ahead by ignoring the users of Android phones. Developing an Android application is one way easy but very difficult the other way. If you have a software programming background the task of building an Android application becomes quite easy.
Hi, thanks your tutorial, it works fine for me!
Thanks for the tutorial, tested it and worked fine
Aw, this was an exceptionally nice post. Spending some time and actual effort to generate a really good article… but what can I say… I hesitate a lot and don’t seem to get anything done.
Good tutorial for beginners!
Thank you very much!
Plz help me! How can I use gesture for letter which has more than 1 line , ex : letter T or K ….
do you have video.. i try it but i dont seee the main.xml.. where could i find that
thanks
Thank you.NIce tutorial and it is vey helpful for handwrite recognization app.
Thanks ; very helpful. Oddly the library.load returns false for me, but the gestures get recognized after that. The Javadoc is empty, so i dont know why this happens. There are some gestures in the library that always get scored low, or not at all – not sure what the deal is there.
how can you recognize the gestures made using the camera of android mobile phone?
Hi,
Nice tutorial. I have a requirement quite a step forward than this. Please have a look at it
http://stackoverflow.com/questions/17569383/multiple-color-stroke-gesture-and-persist-drawing-in-same-gestureoverlayview. I just want to know whether its possible or not using gestures.
Hi, can you provide the gesture file which was not included here? thanks
Amazing Example 😀
Hello, Ι enjoy геading through your article pօst.
I wanted to write a little comment too support you.
Great example, is there any way to create a gesture for letters like A,T, E, and t? I mean in the correct written form.
In R.raw.gestures
How can we create/modify the gesture folder according to our requirements?
Waiting for your kind response.
wt if i don’t want to use the gesture-builder??
please tell me ??? how to coonect a gesture libaray to my project ..according to ur tutroial i first of all open the file manager ..bt i dont found any data file like your project seen 😦 pleas tell me everything from the starting by one by one step …i neep ur help
First you have to create the gestures, and then you’ll be able to find the data file.
Keep in mind that the Gesture Builder, the app that lets you create gestures, is available on an emulator, not on a real device, and as a result you should browse the files of emulator.
Good tutorial brother (y)
I created such app and uploaded on playstore :
https://play.google.com/store/apps/details?id=pack.GestureApp
If you need coding for this app, you can get it here..
https://github.com/manangandhi7/Gesture-Builder
Thanks for the post 🙂 🙂 it helped me 🙂
thank u its a very nice tutorial but I have a doubt as u said I works only with version 1.6 and above so how can we find out the version.
actually my problem is I am not having the gesture file in sdcard of file explorer so what’s the solution for it pls do reply…