


In this special tutorial, we will teach you how you can create a glossy sphere icon with network energy bands using Adobe Photoshop. This design is reminiscent of computer icons that depict the Internet, or at least a dynamic hub network. If you need that modern representation for your poster printing and postcard printing designs, then the instructions below are what you need. We will cover here how you can create your own customized glossy sphere icon and insert in the eye catching network energy bands inside them. So just follow the steps below and learn.
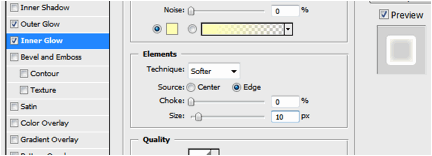
1. First start creating a new document. If you are creating a real icon, using the dimensions 256x256 should be a good start. However, if you are creating a graphic for printed materials, then it is recommended that you go for higher dimensions of around 1000x1000. Set the resolution to a higher level as well (about 300ppi) to make sure the design is print worthy.  2. Once our work area is ready, use the Ellipse tool to create your spherical shape. It does not have to be a perfect circle. For our purposes we are going to elongate our ellipse a bit so that we can emphasize the shape with lighting and shadows later. However, you can hold down the shift key while inscribing your ellipse if you want to have a perfect circle. Of course, color your circle the way you want.  3. Next, double click on our new circle layer. This gives you access to the layer styles and blending options for this layer. Once you see the window, first click on the checkbox for Gradient Overlay. Click on the name of this option to see all of its settings. Use the settings below to get a convincing sphere look for our circle. a. Blend Mode: Normalb. Opacity: 100%c. Gradient Color: Light Blue -> Blued. Style: Radiale. Align With Layer Checkbox: UNCHECK and then move your mouse over the circle, you will see the mouse cursor change to a move cursor, move the lighter spot of the gradient color near the bottom of the circle to simulate the sphere better.f. Angle: 90 degreesg.Scale: 100%  4. Also, click on the ÒInner ShadowÓ option in the layer styles. This adds a darker shadow for our sphere. Apply these settings for its options. a. Blend Mode: Multiplyb. Opacity: 75%c. Angle: 90 degreesd. Distance: 12pxe. Choke: 0f. Size: 50px (varies depending on the size of your circle, just look at the preview and see what looks best.)  5. Great! Now we have a nice sphere, almost like a planet. We will now add some more subtle lighting options. To do this, duplicate our current circle by pressing CTRL+J. Clear the layer styles there my right clicking on the new layer and selecting ÒClear layer stylesÓ.  6. Next, double click on the new layer to get into its own blending style. First in the primary blending options, reduce the fill opacity to 0%  7. Next, click on the ÒInner GlowÓ options. Use these settings for the Inner glow. a. Blend Mode: Screenb. Opacity: 50%c. Choke: 0%d. Size: 15px  8. Now, we will add a shadow at the bottom of our sphere. Just create a new black circle at the bottom part of your new sphere. Move this layer behind our sphere layers. Turn this into a smart object by right clicking on it and selecting the option to Òconvert to smart object.  9. Next, go to Filter -> Blur -> Motion Blur to apply some blurring of the shadow. Use a 73 pixel value on the window that opens.  10. Next, go to Filters -> Blur -> Gaussian Blur. Use a 20 pixel value on the Gaussian blur effect to simulate a good looking sphere shadow.  11. Then, we will add a final highlight. Using the ellipse tool again create a white oval at the center of your circle. Then access its blending options or layer options and then apply a gradient overlay that goes from white to transparent. Finally position your highlight layer accordingly at the top of our sphere.  12. Finally duplicate this white oval layer and then press CTRL+T to squeeze the duplicate layer quite a bit to make it look like the picture below. Once done, click on both layers and convert them to a smart object.  13. Finally, with the smart object selected, go to Filter -> Blur -> Gaussian Blur and use a 20pixel value for the shape.  14. Now, to add the network energy lines simply create an ellipse on the center of our sphere. Go to its blending options and first remove its fill by adjusting it to 0%.  15. Now, tick on the checkbox for stroke. Add a 4 pixel white stroke to our ellipse.  16. Then, click on outer glow, and apply a 10 value to both spread and size. 
 17. Now, convert our ellipse to a smart object by right clicking on it and selecting convert to smart object. Duplicate this layer as a backup. Afterwards use the eraser tool with a 0% hardness to erase the left side of the ellipse. If they ask to rasterize the shape, say ok.  18. Then, just duplicate the curve you made and rotate it to apply it to different places in the sphere.  19. Finally, we make the nodes glow. To do this, simple create a small circle for each of the nodes using the ellipse tool. For each circle convert it to a smart object and then a Gaussian blur (Filter -> Blur -> Gaussian Blur). Just adjust the pixel blur radius depending on how intense you want those nodes to be.  20. Great! Now you have a nice glossy sphere with network energy nodes. This is perfect if you want to create a specialized globe graphic or network representation. Visit this site, Printplace.com, to read more Graphic Design Tutorials. 
Dig this tutorial?
Thank the author by sending him a few P2L credits!

kitkat
Kate Manhaven is a graphic artist who works with PrintPlace.com, an online printing company that offers business cards, postcard printing and poster printing services. She spends her free time either wakeboarding or snowboarding whenever the season permit 


|


