


Let's jump on in! Create a new document by going to File > New.
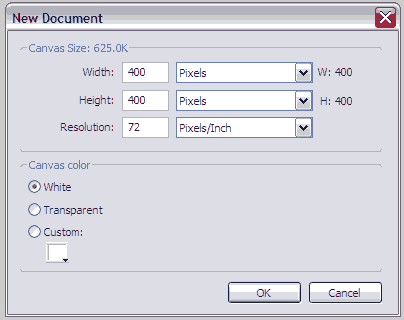
Create a canvas of 400 pixels wide by 400 pixels high. Leave the resolution at 72 pixels/inch.
The first option is JOIN. This option allows two or more overlapping shapes to be combined into a single path, creating a "negative" shape where the shapes originally overlapped.
Now with your rectangle tool...

Draw three rectangles of equal height. Then use the pointer tool to drag them into the same position vertically, leaving parts to overlap.
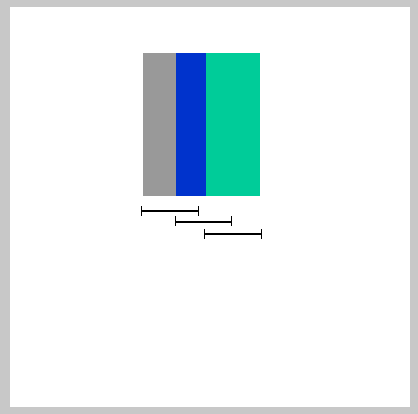
This is relatively what you should have, three rectangles (I colored them for ease of viewing). Those black lines beneath show the length of each rectangle, just to give you an idea of how they overlap.
Next, select all three shapes and go to Modify > Combine Paths > Join
Notice the "negative" shapes that appear in the middle where the three shapes overlapped. This is the key to the Join command. Another thing to note, is that if you have each shape be a different color, the combined shape retains the color of the shape that was lowest on the "stacking order."
The next Fireworks Combine Paths option is just the opposite of join, SPLIT. Select your new shape and go to Modify > Combine Paths > Split. Your three original shapes should now be back to normal, except for the color.
The next option is the PUNCH command. Punch is a very unique option, as it allows you to make multiple paths and then use one as sort of a cookie-cutter, that cuts it's shape into the others.
Click and hold the rectangle tool that we used earlier to get an option menu of sorts. Select ELIPSE TOOL. Now make 3 circles of equal size and overlap them as seen in the next picture.
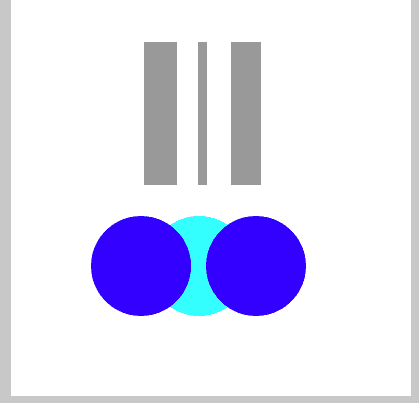
Again, I colored them for ease of viewing, but this is basically what you should have. Now select all three shapes and go to Modify > Combine Paths > Punch. You must do this twice! Notice how each time, Fireworks takes a shape on top and "punches" it through the shape on the bottom.
Now select your new shape and go to Edit > Duplicate. Then, with the duplicated shape selected, go to Modify > Transform > Rotate 90 degrees (Both will work). Now position the rotated shape on top of the other shape to make a cool cross thingy.
The next option is the UNION command. The union command basically does the same thing as Join, but instead of making a "negative" shape, it actually combines all the points in the paths to make a single, fluid shape. Select both your shapes in the cross and go to Modify > Combine Paths > Union. Notice how both shapes are now one. Nothing should really look different.
Now into the last option of Combining Shapes that we will go over. We will not be going over CROP because it basically does the same as intersect, except for multiple shapes. Just experiment with the Crop command on your own and see what you get. We will now learn about the INTERSECT command. The intersect command takes two shapes and then forms a new shape from where they intersect.
Grab your Elipse Tool again and draw two more circles, this time make them smaller. Overlap them on the very edges.
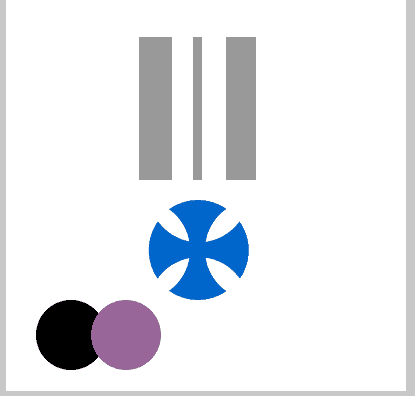
This picture is basically what you should have, again, colored for ease of viewing.
Now select both shapes, go to Modify > Combine Paths > Intersect. Notice how the new shape was formed from the intersection of the other two.
Now for those of you who smelled a finished product coming on, you were right. Just as an example of how simply those shapes could be used for just about anything, I've geared our exercises toward making a military medal of some sort
So with a little arranging of what we've created, a bit of color, and a tad of my own touch, here is my finished product.
I hope this was a good example of how easily Combine Paths can make short work of seemingly complicated projects.
This is my first tutorial here, so I appreciate you taking time to read it and I sincerely hope you can use the knowledge to further your projects.


