Jump to content


Photo

Stick figures! But, good stick figures.


  • Please log in to reply
6 replies to this topic

#1 met3ora

met3ora

    Young Padawan

  • Members
  • Pip
  • 3 posts

Posted 18 March 2008 - 10:40 PM

Hey guys, so this tutorial request may seem quite trivial, and I probably SHOULD be able to do this in Photoshop, but I always end up with crappy looking stick figures! For an example of what I'm talking about, check out this image Posted Image

I'm sure people have seen these types of stick figures. They're on caution signs and all that cool stuff. Can anyone write up a tutorial on how to make one of these guys? And also talk about the style and how to make mine look "professional" ?

Thanks in advance.

Oh, I should mention I use Photoshop CS2. Thanks again.

Edited by met3ora, 18 March 2008 - 10:46 PM.


#2 Blogwatts

Blogwatts

    Young Padawan

  • Members
  • Pip
  • 5 posts

Posted 21 March 2008 - 04:44 PM

I will work on one. I will post it later on tonight.

#3 met3ora

met3ora

    Young Padawan

  • Members
  • Pip
  • 3 posts

Posted 21 March 2008 - 05:29 PM

Thanks Blogwatts! I eagerly await.

#4 Blogwatts

Blogwatts

    Young Padawan

  • Members
  • Pip
  • 5 posts

Posted 21 March 2008 - 10:59 PM

Thanks Blogwatts! I eagerly await.


Sorry about the wait, I didn't get the free time I thought I would today lol. I am working on it right now.

#5 Blogwatts

Blogwatts

    Young Padawan

  • Members
  • Pip
  • 5 posts

Posted 21 March 2008 - 11:35 PM

Create a new document to whatever size you want it.

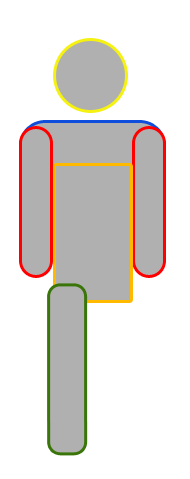
Alright so my image I am going to outline the shapes to make it easier for you.

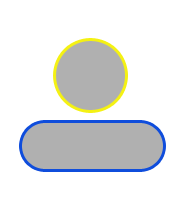
Select the circle tool and create a circle for the head (yellow), and then select the Rounded Rectangle Tool and set radius to 30px. We will use this shape to create the shoulders, and arms.

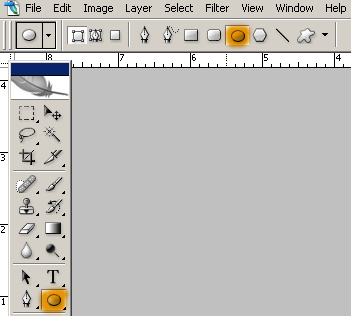
Here are the tools location just incase, as well as the start of the body below them.

Posted Image

Posted Image
Posted Image
Then create the arms (red)
Posted Image

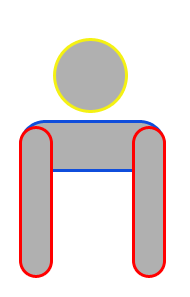
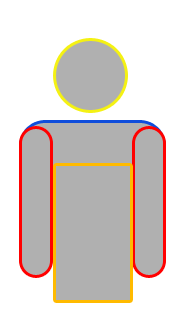
Now for the stomach area (orange) just use the rectange tool

Posted Image

Now go back to the rounded rectangle tool and set the radius to 10px. We are going to create one leg (green) going straight down like this:
Posted Image

Then we are going to rotate it by about 4 degrees. For this press Ctrl T and then look at the top you should see this:

Posted Image

Press enter when the leg is at the correct angle (I just used 4 degrees as an example)
Posted Image

Now press Ctrl J to duplicate the layer and go to Edit > Transform Path > Flip Horizontal, and move it into place.
Posted Image

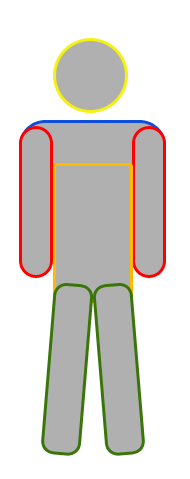
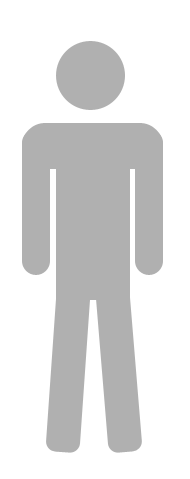
Alright so now we have our "stick figure"

Posted Image
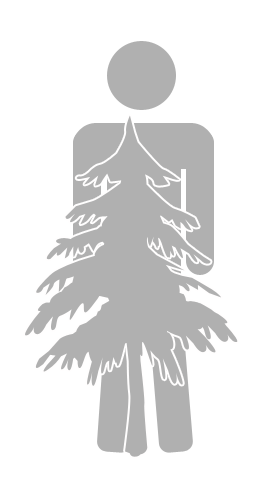
To add something over the top like your sample image has the guitar simply paste it over the top and and a 2px white stroke. (You could also do it by selecting the shape and then selecting Select > Modify > Expand and choose 2px and then delete it from the body (you would need to merge all the shapes first) this would allow you to put it on different bg colors and still have the same effect)

Hope it makes sense...

Posted Image

Let me know if you have any questions ;)

Edited by Blogwatts, 21 March 2008 - 11:36 PM.


#6 met3ora

met3ora

    Young Padawan

  • Members
  • Pip
  • 3 posts

Posted 22 March 2008 - 12:09 AM

Great tutorial. Very simple thing to do-- probably why there haven't been other tutorials on it! I appreciate it very much and I'll be making me some stick figures all night!

#7 Blogwatts

Blogwatts

    Young Padawan

  • Members
  • Pip
  • 5 posts

Posted 22 March 2008 - 12:46 AM

Great tutorial. Very simple thing to do-- probably why there haven't been other tutorials on it! I appreciate it very much and I'll be making me some stick figures all night!


Cool ;)

Yea its very simple, I just wrote it toned down a little so that if there are any new people to photoshop that they would be able to do it as well.


0 user(s) are reading this topic

0 members, 0 guests, 0 anonymous users