Technique: Render Blending Sig
Okay, first start by finding a render, Ive only ever tried this technique on girl renders tbh, okay so I chose;
Once you have your render, create a canvas big enough to show the entire render but it doesnt really matter if parts are cut off, I chose a canvas size of 350 x 130.
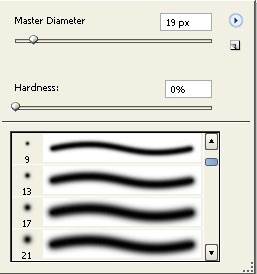
Once you have placed your render on the canvas and positioned it, click the eraser tool and choose a basic brush, I chose;
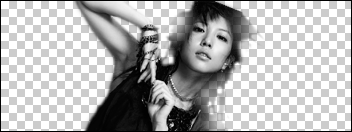
And then fill the background layer with black and then brush around the edges a little so it blends better and your left with something like this;

And then duplicate the background layer and duplicate the render and then merge them together and name it Render [Black BG] and then duplicate the layer and name it Render [Smudged & Brushed] then smudge the layer around the edges using any basic brush, once your satisfied, make a new layer, set it to soft light and brush around the smudged layer with basically any abstract brush and again, once your satisfied, merge the layers together.
Once you have done that, use some low opacity C4D brushes set to soft light, placed over, on the edges and around the smudged layer, so you finally have something like this;

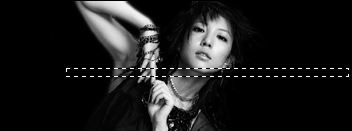
And then once your finally satisfied with that, duplicate the original Render w/ Black BG layer and then make it your top layer, now select the Rectangular Marquee tool, and select sections of your layer like this;
And then move your selection left or right, make sure your other selections are fairly near it and noticeable and once your satisfied, make a new layer, set it to soft light, and use the same abstract brushes as before and then brush around again once your happy, merge the brushing layer onto the render layer and then name it Render [Brushed & Lined] and then set the layer to lighten and set the opacity to 90%, so your left with something like this;

After that, I made a new layer and then brushed a small piece of C4D at the bottom of the render, set it to soft light and then to 46% opacity, just to a little more texture to the layer.
Now, duplicate the original render layer again, hide all other layers, select the eraser tool, choose a hard round brush of about 13 or 19 pixels, depend on the render size and then erase the renders face and then duplicate and hide the newly duplicated layer, and then gaussian blur the original faceless render layer of about 3.0 pixels, so your left with something that looks like this;

And set the layer to lighten with 100% opacity layer, this makes the render appear Dreamy.
Make a new layer above the blurred faceless layer, still having the duplicate of the faceless blurred render hidden, now, set the layers blending mode to soft light and then take the abstract brushes from before, and then begin brush on the edges and face of the render, once your satisfied with the outcome, duplicate the brush layer and then merge the duplicated brush layer in with the duplicate of the faceless blurred render and then, set the layer to soft light and the opacity of about 13% and then duplicate the first layer on the sig, the layer with the render on the back background and then place it between the two blurred faceless layers and now set to lighten and 50% opacity, so your sig should now look something like this;

If not, I have no idea what youve done wrong Okay, if your render choice was black and white like mine, you may want to apply some Colour Balances, Gradient Maps, Photo Filters set to lighten with opacities in the region of 45% or whatever you feel looks best and if your render choice is coloured, you still may want to apply them.
After applying 1 Colour Balance, 1 Photo Filter and a different Photo Filter, duplicated once, I had something that looks like this;

Not exactly, a great difference but it looks better in my opinion.
And now onto the text, I prefer to keep text layers simple, usually Franklin Gothic Medium or any similar font and now, colouring the text, I choose a colour for the text from the render.
I also prefer to have the text placed on the render but not entirely.
And now, onto the border I like to keep the border simple, either a 1 px black or 1 px and the same colour as the text.
Finished Product:

© Ska 2006.
Worth submitting to Good-Tutorials?
I'm curious to see what people have created using this tut, so please post your outcomes.