


Remaking the Pixel2Life Logo into Flash
Ben Fleming First, open up Flash. Start a new document, and change the background colour to #2A8AC6. Rename the first layer to Outline. On that layer, draw a 110x100 circle, with no outline, and a fill color of white (#FFFFFF). Center it to the middle of the stage, then lock the Outline layer.  Add a new layer on top, and rename it Green. Draw a 100x100 circle, no line, a random fill colour, and then center it to the middle of the stage, so it sits over the Outline circle perfectly. Now, open up the Color Mixer (Shift+F9), and mix something like this: 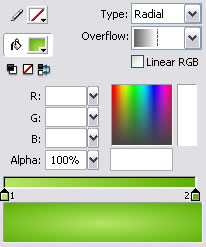 1 = Colour: #B4E666 2 = Colour: #5CB002 Those are the colours I used. Now, fill in the circle on the Green layer with the radial point right at the very top, like so:  Lock this layer, and add a new one. Name this one Gloss Top. On this layer, draw a 95x95 circle, no line, a random fill colour, then center it to the middle of the page, so it sits perfectly ontop of the other circles. Then, get out your Color Mixer again, and mix something like this:  1 = Colour: White (#FFFFFF), Alpha: 100% 2 = Colour: White (#FFFFFF), Alpha: 0% Then fill that in the newly created circle, so that the transparent end is closer to the bottom, like so:  Select the circle, and press Ctrl+C to copy it. Then lock the layer, and add a new one. Call this one Gloss Bottom, and then press Ctrl+Shift+V to paste it in place. Then, with it still selected, go Modify > Transform > Flip Vertical. Still with it selected, open up the Color Mixer. It should have the colour mix of the circle you've selected in there. So, change it from Linear, to Radial. Now a small white glowish circle will appear. Get out your Gradient Transform Tool (press F) and drag the fill out horizontally. Then drag the fill to the bottom of the circle. Keep playing around with the sizes and the position, until you get something like this:  Alright, the very last thing, the arrow. Its very hard explaining to you how to draw it, so I'll show you instead:  Then add a new layer under the Gloss Top layer, and name it Arrow. Then, fill in the arrow you've drawn with white, and paste it on the Arrow layer (if its not already on it. Then center the arrow to the middle of the stage, so it sits in the middle of the circles. And there we have it, a vector Pixel2Life logo:  You can download the logo here:  File Download: Download File Download: Download 
Dig this tutorial?
Thank the author by sending him a few P2L credits!


|


